
The PS4 is a culmination of multiple prior PlayStation versions already been tried and tested for years. The console can easily last up to five years without experiencing any issues. It also boasts a 1% failure rate.
And even then, it can still malfunction from time to time. It also differs from other models in functionality, making it difficult to troubleshoot when it malfunctions. Keep reading to learn how to use all the features of your PS4console and troubleshoot it when it is not working correctly.
Why won’t my PS4 turn on?
When your PS4 doesn’t turn on, you may hear a beep and see the light, or there may be no signs of life at all. This problem can be caused by several issues, such as hardware, software, corrupt software or firmware, or power issues.
Hardware issues such as power supply and broken parts are best left to professionals to fix. However, software and power issues can quickly be resolved if there is no internal power connection issue.
In other instances, power issues result from a have a problem with your power cable, power strip, surge protector, or even outlet. Finally, software issues are caused by an incomplete system update, corrupt files, or even a bad hard drive.
Fortunately, the PS4 comes with a built-in safe mode that you can use to perform a lot of fixes. Below are some troubleshooting steps you can follow to get your console back up and running again. In addition, you can try different combinations to identify the source of the problem and fix it.
How to Fix It When a PS4 doesn’t Turn On
Perform each of the following steps to eliminate issues from the easiest to fix to more complex ones;
Interrupt power to the PS4.
First, unplug the power cable from your PS4 for at least 30 seconds, and then plug it back in. Once it’s plugged back in, you can attempt to turn the console on.
Power cycle your PS4.
- Turn the console off by holding down the power button even if the console seems to be off already.
- After the lights stop flashing, or about 30 seconds have passed, remove the power cables and let your console sit for at least 20 minutes.
- Press and hold the power button again while the console is still unplugged.
- Then plug the console back in and see if it will turn on.
Try a different power cable.
Remove the current power cable and try the other one. The PS4 uses a standard IEC C7 power cable, the same cable used by the Xbox One S, and a variety of other electronics devices. If you don’t own any such devices, these cables can be found at most electronics stores.
Try a different power strip or outlet.
Check to see if the power strip or surge protector is damaged. Check to see if other devices work using the outlet your PS4 is connected to, and try plugging your PS4 into a different outlet.
Clean the dust out of your console.
Using canned air, blow the dust out of your PS4 through all of the vent holes. Depending on how much dust you’re dealing with, you may have to take the console apart to clean it thoroughly.
Note: Opening your PS4 up to clean it out may void your warranty. If you still have a valid warranty, you may want to try cleaning the dust out without actually opening the case.
Try inserting a game disc.
If the system automatically pulls the disc in and powers on, you should use your PS4 as usual. If you can’t, there may be a problem with your hard drive or the system files that can be fixed in safe mode.
Try starting your PS4 in safe mode.
Safe mode allows the console to boot with only the most basic functions active, so it is sometimes available when a PS4 won’t start up usually.
To boot into safe mode;
- First shut your console down entirely.
- Then push and hold the power button until you hear the console beep twice.
- You will have to connect a controller via USB and push the PS button.
Note: If you can boot into safe mode, you probably have a software problem. Try updating your system software or perform a factory reset if nothing else works.
Remove your PS4 hard drive.
First, remove the hard drive, then try starting the PS4 as usual. And then in safe mode, if that doesn’t work. If there is a problem with your hard drive, your PS4 will turn on either the standard or safe mode methods.
You may be able to shut the console down and reinstall the hard drive at that point. But in most cases, you will have to replace the drive.
Note: Removing the hard drive may void your warranty. If you have a valid warranty, consult with Sony about potential free repairs before taking apart your console.
Check for signs of insects.
PlayStation 4 consoles have warm, dark interiors and large vent holes for heat to escape, attracting physical bugs more than compact consoles like the Nintendo Switch. If the console has bugs, you will have to open the console up and clean it out.
Bugs living inside your console may have shorted out internal components, in which case you will need professional repairs.
Make sure your power button is connected internally.
The power button on the PS4 cover uses a slight metal contact to push a button on the internal circuit board. Check to see if you reinstalled the cover in such a way that the power button no longer touches the circuit board.
Take the cover off, and inspect the metal piece that extends from the power button on the cover. Ensure the metal piece contacts the power button inside your console when reinstalling the cover if it isn’t broken.
Note: If your Console has never been taken apart, do not take it apart to check the power button. Doing so may worsen your problem as you may snap off the piece that pushes the power button.
Replace your power supply.
In some cases, an inadequate power supply is the root cause of your PS4 not turning on. Consult a professional before you try replacing the power supply yourself.
How to hard reset a PS4
Go to Settings > PlayStation Network/Account Management > Activate as Your Primary PS4 > Deactivate, then restart the console.
Sign in again and go to Settings > Initialization > Initialize PS4 > Full, then confirm to begin the reset.
Note: To hard reset a PS4 that won’t boot up, start the console in safe mode and reinstall the system software using a flash drive.
How to Factory Reset a PS4
The factory reset is ideal if you plan to sell your PS4 or if your PS4 has a software glitch preventing it from booting up. These instructions apply to all models, including the PS4 Slim and PS4 Pro.
- Before you begin, the console has to be on, and you must be signed in to your PS4 account.
- Navigate to the Settings option (the briefcase icon) in the row of icons above the home menu.
- Click on the PS4 Settings Icon
- Go to PlayStation Network/Account Management > Activate as Your Primary PS4.
- Choose Deactivate and then manually restart the console.
- After you sign in again, navigate to Settings.
- Choose Initialization, and then pick Initialize PS4.
- Select Full, and then confirm with Initialize and then Yes.
- A progress bar should appear but expect the process to take a few hours.
- Once finished, follow the on-screen instructions.
- You should then turn off your PS4 by holding down the console’s power button until it beeps.
Note: A factory reset is irreversible, so back up your game data with an external hard drive. Alternatively, PlayStation Plus users can upload their data to the cloud for safe storage.
How to Hard Reset a PS4 in Safe Mode
If you can’t access the settings because your PS4 won’t boot up, you’ll have to reset your console in safe mode and reinstall the system software. In addition, you will need a computer with internet access and a USB flash drive with at least 500 MB of free space.
- Insert a flash drive into the computer and make a new folder on it called PS4.
- Within that folder, make another called UPDATE.
- Download the latest PS4 software from PlayStation.com, saving the (.PUP) file inside the UPDATE folder.
- Safely remove the flash drive from your computer and set it aside for now.
- Turn off your PS4. Make sure it’s not in rest mode; you want the power to be entirely off.
- Hold down the console’s power button for several seconds until it beeps a second time.
- The system will then boot up in safe mode.
- You’ll be presented with a list of options.
- Restore Default Settings
- Initialize PS4
- Initialize PS4 (Reinstall System Software)
- If your console isn’t having software issues, go to Initialize PS4 > Full
- Otherwise, choose Initialize PS4 (Reinstall System Software).
- Once the process is finished, you’ll be prompted to connect a device containing the system software.
- Insert into the PS4 the flash drive that contains the software you downloaded.
- The console will automatically detect the file and install the operating system.
- After installation, the PS4 will reboot again and should start up as usual.
Note:
- The Initialize PS4 (Reinstall System Software) option will completely wipe the console’s hard drive of everything, including the PS4 operating system.
- The Restore Default Settings option deletes any custom system preferences set up but will not erase your game data.
All PS4 error codes, their meaning, and fixes
Below is a list of frequent errors that PS4 users encounter and solutions to fix them.
CE – Common Errors
CE-33987-0 Internet connection test error
Test your internet connection by going to Settings > Network > Test Internet Connection. If testing your connection doesn’t solve the problem, reset your local network connection by rebooting your modem or router.
Update your router’s firmware. You can contact your router manufacturer or Internet Service Provider (ISP) for assistance. If none of these solutions helps, try connecting your console later when the server has high traffic.
CE-30774-1 Cannot update
If you cannot perform the system software update, make sure that your USB device is formatted as FAT or exFAT. If it was the case, you should check if the update file was stored in the correct file structure.
CE-35287-5 Cannot connect to the server
Either the game server or the PSN is temporarily unavailable. The only thing to do here is to try again later and check the status of the PSN.
CE-33945-4 Connection to server failed
The issue might come from the PSN or the game’s servers. Make sure to check the status of the PSN. If the servers of the game and the PSN are up and running, perform an Internet connection test by going to Settings > Network > Test Internet Connection.
If the error is still occurring, try updating your router’s firmware or try again later as the servers may be overwhelmed.
CE-34861-2 Connection has failed
Check the status of the PSN and the status of the game’s server via its official website may clarify the nature of the error. Also, verify the availability of the SSL in your Internet connection.
CE-34632-8 Content unavailable
Try again later or contact PlayStation Support for assistance.
CE-35486-6 Cannot read disc
If you are inserting a disk for the first time, make sure the format is supported. Among the supported disc formats, your system accepts the following: Blu-ray Discs and DVDs. CD, BD-RE, and DVDs. If the error is still happening, try shutting down and rebooting the system.
CE-35489-9 Region code of disc is not supported
If you bought a game or DVD from another country, your system might not support the disc’s region code due to regional restrictions. Unfortunately, since a region code cannot be changed, there are no solutions besides avoiding buying discs from elsewhere than your country. By the way, I would get a refund if I were you.
CE-34335-8 No HDD detected
Users may experience this error when the PS4 cannot detect the Hard Disk Drive in the system.
Solution:
- Turn off your system and unplug the power cord
- Remove the top cover.
- Remove the HDD and reinsert it.
If the error persists, contact PlayStation Support.
CE-35406-8 PS Vita couldn’t be linked to PS4
To bypass this error, you must link both systems to the same PSN account. Switching the PSN account on your PS4 can be done by going through Power > Switch User from the home screen.
CE-34878-0 Error with the application
Try closing the application and installing the latest System Software and game updates before restarting your system.
- Re-install the original Hard Disk Drive (HDD) in your system.
- In case re-installing the original HDD doesn’t work, try restarting the system.
- Contact the PlayStation support center if none of these solutions helped with the error.
CE-36244-9 Download suspended
- Restart your PS4 system then restarting the download may fix the issue. To restart the download, you need to go through Notifications>Downloads.
- Re-install the original Hard Disk Drive (HDD) in your system.
- Try a different network if available or change to a static IP. If you can’t change the network, try again later.
CE-33676-5 Item Corrupted
To fix that error, you need to check if you have the license to the content. Try re-downloading the content and go to Settings > PSN > Restore Licenses. Shut down the system and reboot in safe mode to avoid the error.
Other CE Errors
There are about a dozen more similar to the one we previously went over. Please refer to the solutions previously viewed in this article, as they can be used for errors of the exact nature.
E – Exceptions
E-8200002E Credit card on file is not valid
Remove the credit card from the account and re-enter the credit card information. For more information about the error, refer to the PlayStation article on correcting billing errors. The error E-82000171 Credit card on file is invalid is similar to that one.
E-82000113 Can’t redeem the voucher code
Try again later, or if the error persists, contact the PlayStation Support center.
E-82000102 Issue adding funds sub-account
Sub-accounts can’t have a wallet. Therefore, you need to add the funds from the Master Account linked to the sub-account.
E-82000138 Failed to add funds to wallet using voucher or PSN card
Try redeeming the code when the balance in your balance is not exceeding the limit.
E-82000133 Voucher code expired
It may seem logical but making sure the code has been entered correctly can help you with this one. You may also want to check the availability of the code, and it has any restrictions of usage.
E-80558337 PS4 Can’t recognize content properly
Re-downloading the content can solve the problem.
NP – PlayStation Network
NP-31952-0 Network connection timed out
Place your PS4 and your router close to each other and perform a connection test.
NP-31739-3 Download of the latest update file is ongoing
Install the update file before using the application.
NP-31730-4 Signed out of PSN
If you receive this error code, try signing in PSN once again.
NP-32062-3 Data may be corrupted
Restart your system or initialize it.
NP-35000-8 PSN under maintenance
This error suggests that the PSN is undergoing maintenance. The only thing you can do here is to try again and check the status of the PSN.
NP-31730-4 Signed out of PSN
You were signed out of the PSN. If you receive this message, sign in to the PSN to avoid the error.
NW – Network
All NW error codes refer to a network connection or server failure. The solution to these errors are almost all the time similar to each other.
- NW-31201-7 Could not connect to the network
- NW-31374-8 Connection timed out
- NW-31253-4 Response from DNS server is delayed or unstable
- NW-31250-1 Internal server error
- NW-31205-1 Network connection unstable or too weak to reach PSN server
- NW-31247-7 Network connection timed out
- NW-31294-9 Connection timed out for unstable wireless connection
- NW-31246-6 DNS settings are invalid
- NW-31456-9 Connection error
- NW-31453-6 Delayed server response
- NW-31194-8 Could not connect to the network
Solution:
Connection failure can be annoying, but in most cases, the only things to do are:
- Testing your connection
- Check the status of the PSN.
- Check your DNS settings.
- GET A BETTER WIFI
- Go back to number 1.
SU – Software Update
SU-35931-1 Update data of system software is partially corrupted
Restart your system and re-download the system update. If it didn’t work, try updating via USB.
SU-30696-4 Failed to update system software
Try re-downloading the update, or if you’re updating via USB, make sure you are saving the file in the correct folder.
SU-30746-0 Couldn’t find file required for system software update
WS – Web and Server Errors
WS-36812-0 Unable to join a party
If you couldn’t join a party, restart your system and ask for a second invitation.
WS-37337-3, WS-37368-7, WS-37338-4 Account Suspended or banned
Check your email associated with your PSN account for information concerning your ban.
The following WS relate to a server error or PSN maintenance.
- WS-37501-6
- WS-37504-9
- WS-37432-9
- WS-36856-8
- WS-36855-7
Solution:
Check the status of the PSN and test your connection. For example, if the PSN is under maintenance, try again later.
WS-36782-6 Friend requests cannot be sent.
The person you are trying to add has reached the maximum amount of friends on their list.
Solution:
Kindly tell that person to stop being so popular 🙂
WV – Web View Errors
WV-33899-2, WV-33907-2, WV-36450-7
These errors may occur when experiencing server or PSN failure.
Solution:
Check the status of the PSN and test your internet connection. If the error persists, try again later.
WV-33898-1
PS4 couldn’t open a webpage on the browser. PS4 is unable to access the webpage on the browser.
Solution:
Relaunch the browser and make sure the URL entered is correct.
WV-33917-3
Too many redirects. The PS4 doesn’t support the page trying to be accessed.
Solution:
Try visiting the page from another device.
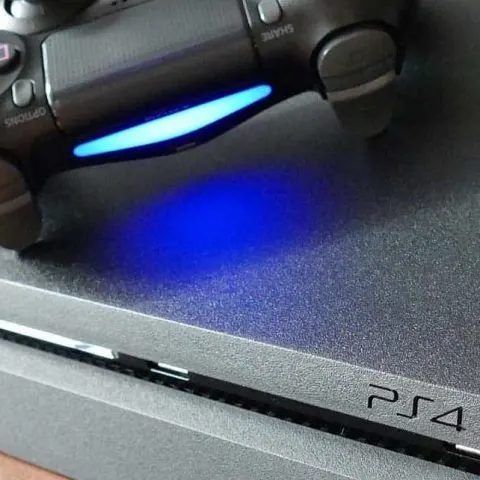
What do different Indicator LED color lights to mean on PS4?
Your PlayStation 4 has an indicator light that can blink or show in multiple colors. This can give you essential information about the status of your PlayStation 4 gaming system. Below are details on what each light means.
Light off.
The PlayStation 4 is off. You won’t be able to charge your controller or use the device while it’s off. Ensure the power cable is plugged in, then push the Power button on the front of your PlayStation to turn the system on.
Starts Blue Then Transitions to White
Your PlayStation is powering on. You will see the PlayStation logo on the screen while your system boots up.
Solid White light.
Your PlayStation is powered up and ready to use.
Blinking orange light.
Your PlayStation 4 is going into Rest Mode.
Solid Orange light.
Your PlayStation is in Rest Mode. This allows your PlayStation 4 to wake up on its own to download updates and start up quickly when you want to use it.
Error Lights
Blinking White Then Transitions To Off
Your PlayStation is turning off. This can take a few moments if files are written to disk or an update is applied. After that, it’s safe to walk away; you do not have to monitor the shutdown process.
Blinking White or Blue, or Solid Blue
If the light just blinks, your system may be having further issues.
Blinking red light.
Your PlayStation 4 has overheated.
Light Bar color meaning
When the PS4 is turned on, a blue light bar will appear on the PlayStation 4 controller. Additionally, each controller connected to the PS4console will have different meanings based on its color. Games also utilize various colors, such as turning red when you have low health in Call of Duty or when the police are chasing you in Grand Theft Auto.
The light bar on the PS4 controller indicates the players that are connected to the PS4console. For example, blue Is Player 1, Red is Player 2, Green is Player 3, and Pink is Player 4.
Games indicator light colors
Tomb Raider
Color: Red/Orange
Flickering yellow and orange are the colors of the torch.
Destiny
Color: Multiple
Red indicates low health, white is for the flashlight, and bright yellow lets you know that your super attack is fully charged.
Grand Theft Auto 5
Color: Red & Blue
When the cops are chasing you, your controller will flash red and blue repetitively.
Kill Zone
Color: Green & Red
Red indicates low health, and green indicates full health.
DC Universe
Color: Multiple
The indicator lights change based on the power your character has. This can be annoying if you play in a dark room, as the frequent color changes may distract you.
Infamous
Color: Blue or Red
The lights indicate your karma. The controller starts with white light and changes to blue for good deeds and red for bad deeds.
Far Cry 4
Color: Multiple
Far Cry
Color: utilizes the entire color scheme in their game, based on your class.
- Assault: Red
- Trapper: Green
- Medic: Light Blue
- Support: Yellow
- Monsters: Yellow
Fortnite
Color: Multiple (for different players)
How to Dim The PS4 Controller Light Bar
- Go to settings on the PlayStation Dashboard
- Devices
- Controllers
- The brightness of DUALSHOCK 4 Light Bar
- Select bright, medium, or dim.
- If you’re not using the light for anything, in particular, choose the “dim” option, as it will save the battery life on your controller.
PS4 beep codes, their meaning, and fixes
The beep codes are used by the BIOS (the software that runs your PS4 hardware) during the POST (an initial test to make sure your PS4 is OK to start) to report errors.
Beep codes mean that the motherboard has encountered some kind of problem before sending any type of error information to the monitor. In some cases, the PS4 beeps in rest mode only, not when the PS4 turns on. This case is more straightforward to fix than when the PS4 beeps at the boot-up time. At times the PS4 beeps normally.
When Does the PS4 Beep Normally?
The PS4 is beeping normally when the PS4 is turned on. This happens when it runs a Power-On Self-Test (POST) to check that various hardware components are working correctly. If problems are detected, the PS4 will not start.
This test runs before the PS4 is ready to display anything on the monitor, so if any faults are found, the PS4 will beep to indicate an error. The PS4 beeps even if there’s no issue with the system. The instances include;
- Wake up using the controller (“Keep Application Suspended” disabled).
- Wake up using the controller while a game is suspended.
- Wake up using the power button (“Keep Application Suspended” disabled).
- Wake up using the power button while a game is suspended.
- Wake up by putting a disk in the disk tray (PS4 won’t take the disk for the first couple of seconds after waking up).
- Put in Rest Mode using the power button.
- Eject disk using the eject button.
- Pressing the eject button while no disk is present (PS4 beeps twice).
- Improper shutdown due to PS4 crashing (PS4 beeps multiple times).
- If it doesn’t beep for all of the above, your PS4’s speaker might be defective.
Basic troubleshooting steps will identify common problems and isolate defective components that may cause a PS4 to beep and fail to operate as it should.
The PS4 Three Beeps
These beeps are also known as the PS4 3 beeps of death. This happens either when you try to turn the PS4 on. The three beeps happen before shut down. In some instances, three beeps occur while the console is in use, and the PS4 consequently shuts down.
Beeps When Turning on The PS4
When the PS4 beeps when it is turned on, this means there has been a parity error in base memory. This problem affects the first 64kb block of memory in the PS4 RAM. Additionally, the three beeps may mean that the motherboard timer is not working correctly, but they could also mean a problem with the RAM module in the lowest (usually marked 0) slot.
This isn’t usually something you’ll be able to fix yourself or get repaired. You have to consult with an experienced technician. If the beeps constantly continue and don’t stop, it means either the CPU or GPU is damaged. It can also mean the motherboard is miserably malfunctioning and is about to go on the fritz.
Solution;
Turn off the PS4, switch off the power and unplug the power cable from the power outlet. Wait a minimum of 10 seconds, then plug the power cable and switch on the power. Now try to turn on the PS4 and check whether the problem is resolved or not. If not, contact Sony or take it to a PlayStation repair technician.
PS4 Beeps When Coming out of Rest Mode
PS4 beeps when it wakes up from rest mode. Your PS4 may start fine with no issue, but the beeps come out after turning on the PS4 from the Rest Mode. The PS4 may beep while it is in rest mode because of one of two problems:
- Overheating system
- Failing hard drive
To remedy this issue, ensure the PS4 is clean inside, the fan is spinning seamlessly, and you have no overheating issues. Next, reformat the hard drive on your computer to restore its original functionality, and the beeps will fade out. If this does not work, replace the PS4 internal hard drive with a better driver.
PS4 Beeping and Ejecting Disc
- Switch your PS4 off and on again
- Ensure that the latest system software update is installed on your PS4 system
- Tighten the manual eject screw
- Check the disc for scratches and dirt
- Change the Blu-ray disc
- Contact PS4 Support
PS4 fails to eject discs
The PS4console may eat a disc now and then. Below are some ways to eject a stuck disc from the PS4;
Reboot the Console
This is an easy method since it does not involve taking apart your PlayStation 4.
- Turn off your PS4 by holding the power button until the system shuts off completely.
- Unplug all of the cords that are connected to your PS4 from the system directly.
- Place the PS4 vertically. The disc usually gets stuck when the console is horizontally resting. Placing it vertically may help dislodge it.
- Wait about 30 minutes.
- Reconnect all of the cords.
- Boot into safe mode by holding the power button for 7 to 8 seconds.
- The disc should eject after this.
Dismantle the Console
This method requires you to take apart your PS4 and remove the disc from inside the PS4console. Follow the steps below;
- Remove the Shiny Cover
Use your hands to remove the shiny part of the PS4 cover. It should come off relatively easily.
- Find the Screw
There is a small black screw located in-between the vents. You will see two sections of tightly packed slots and one single slot somewhat separated. This is where the screw is located.
- Rotate Counter-Clockwise
Use a Phillips screwdriver and rotate the screw counter-clockwise. This shouldn’t require much pressure, and you should see the stuck disc slowly come out of its slot after a few twists.
- Put It Back Together
Pull the disc out and then retighten the screw. Next, place the cover back on, plug in all the cords, and get ready to enjoy your PS4 for more details on manually ejecting a stuck disc in the PS4 console.
Note: Ensure you’re running the latest version of the PlayStation software before putting another disc in. If neither worked for you, you might have to send it to Sony for repairs or contact PlayStation Support for more information.
PS4 automatically ejects disc after insertion
The original PS4 is notorious for constantly ejecting discs due to problems with the eject button. At the same time, all three consoles can perform unwanted ejection due to disc, software, and physical hardware problems. When your PS4 keeps ejecting discs, it may simply eject them, beep, or provide an error message.
The main reasons your PS4 might keep ejecting discs are a problem with the eject button, a problem with the eject screw, software issues, and issues with the actual discs. Eject button issues are primarily limited to the original PlayStation 4 and its capacitive eject button, while the other problems affect all three versions of the PlayStation 4 equally.
- Disc problems: Scratches and foreign materials like dirt, food, and other debris can cause the system to eject your disc immediately.
- Software problems: Power cycling the PS4 and updating the software usually solve these issues.
- Eject button: The capacitive eject button used by the PS4 is touchy, and it will cause the console to turn on by itself, beep randomly, and eject discs if it malfunctions. The rubber foot found under this button on the bottom side of the console is the most likely culprit.
- Eject Screw: This screw is used to eject discs from malfunctioning systems, but it can also cause unwanted ejections.
How to Stop a PS4 from Ejecting Discs
If your PS4 is ejecting discs when it shouldn’t, beeping, or providing an error message about not being able to read discs, follow this troubleshooting procedure;
Check your disc for damage.
If your game disc, DVD, or Blu-ray disc is scratched or dirty, the PS4 will display an error message and may eject the disc or make a beeping sound. Clean the disc with a lint-free cloth by wiping straight lines from the center to the outer edge.
Try a different disc.
Try a different game disc, DVD, or Blu-ray if you notice any scratches or imperfections on your disc after cleaning it. If the PS4 accepts some discs and rejects others, the ejected discs are probably too damaged for the PS4 to read.
Power cycle your PS4.
Power cycling can sometimes help get the eject button back in line.
To power cycle your PS4;
- Turn your PS4 off.
- Unplug the power, HDMI, and controller cables.
- Press and hold the PS4 power button.
- Wait until you hear two beeps.
- After five minutes, plug the power and HDMI cables back in.
- Turn the PS4 on and try to insert a disc.
Install the latest PS4 updates.
PS4 system software may cause this issue. In this case, you’ll have to install an update to fix the problem.
To check for system software updates;
- From the main menu, select Settings.
- Select System Software Update.
- If there is an update, install it.
- After the update has been installed, check to see if your PS4 still ejects discs.
Tighten the manual eject screw.
Your PS4 has a manual eject screw designed to help eject discs if the system is malfunctioning. However, if it loosens, the system may end up ejecting your game when you insert it or even when you’re playing.
Remove the rubber foot under the eject disc.
The original PS4, not the PS4 Slim or PS4 Pro, has a capacitive eject button right above one of the rubber feet supporting the console. Unfortunately, the rubber foot may swell over time or shift until it contacts the switch, causing the PS4 to eject discs randomly.
The easy fix for this is also destructive and permanent:
- Unplug your PS4.
- Turn your PS4 upside down.
- Locate the rubber foot under the eject button.
- Grip the foot using pliers or another similar tool.
- Pull gently, being careful not to remove the foot.
- Check to see if the PS4 still ejects discs.
- If the PS4 still ejects discs, try fully removing the foot.
Note: If you remove the foot entirely, your warranty may be voided. Consider contacting Sony for assistance before attempting this fix. If your PlayStation 4 keeps ejecting discs, contact Sony customer service.
What to do when I run out of storage in my PS4
The PS4 and PS4 Pro come with either 500GB or 1TB of built-in storage. While this might seem like a lot, it fills up pretty quickly when you factor in the operating system, game installs, and downloadable content, files, screenshots, and videos.
Fortunately, there are many ways to manage and expand the storage on your PlayStation 4;
Delete files and games
Before buying new hardware, try and figure out if you can clear enough space on your existing hard drive for your needs. Go to Settings > System Storage Management to see exactly how your hard drive space is being used up by games and other applications, screenshots, and videos.
Games are likely to take up the bulk of the space. So if you have any games you know you’re not likely to play again soon, you might be better off deleting them from the console to save space for new games.
To see which games are using up the most space, go to the Applications section of System Storage Management. To delete a game, press the Options button on your controller. You’ll then see a checkbox next to every entry on the list. Then select the games you want to uninstall, and then hit Delete.
Note: deleting a game won’t affect its save files, so you’ll still be able to pick up where you left off whenever you reinstall the game.
Delete screenshots, videos, and themes
If you’ve already cleared out some old games but still need to make more space, try deleting some screenshots, videos, or themes too. Go to Settings > System Storage Management, as above, but head into either Capture Gallery or Themes, depending on what you want to clear out.
Screenshots and videos are categorized by game, and you can either delete individual screenshots or videos or delete all the files linked to a given game at once. There’s also a ‘Copy to USB Storage Device’ option if you want to save a copy of your files elsewhere before deleting them from the console.
Themes are unlikely to take up too much space, but they can add up if you have a few. So just head into Themes, and pick the ones you don’t want anymore. You will always be able to download them later on.
Delete saved data
Some games are poorly optimized, so their saved files take up a bit more space than is ideal. To see the space occupiers, go to Settings > Application Saved Data Management > Saved Data in System Storage > Delete.
Start by backing up saved data and files via the cloud or using USB storage first. Once you select Delete, you can pick specific save files for each game you want to delete. To bac up the data, go to Settings > Application Saved Data Management > Saved Data in System Storage > Copy to USB Storage Device.
If you’re a PlayStation Plus subscriber, Sony will automatically back your saves up in the cloud so that you can delete and re-download them at will. Ensure the backups are working before you delete them. Go to Settings > Application Saved Data Management > Saved Data in System Storage > Upload to Online Storage and confirm everything’s been uploaded before you start clearing it out.
Connect an external hard drive
If you don’t want to delete any of your files or games, or have cleared some but still just don’t have enough space, then you can expand your storage. There are two basic methods: connecting an external USB hard drive or upgrading the internal one.
The PS4 supports USB 3.0 hard drives up to 8TB, but they must be explicitly formatted for the console. That means that you probably don’t want to use a drive that you’re also using to store other files on.
To set it up, plug your hard drive into one of the USB ports on your console. Next, go to Settings > Devices > USB Storage Devices. Then select your drive, and you should see an option to ‘Format as Extended Storage’. Press that, and give the console a minute or two to format the drive.
The PS4 will default to installing new games and downloads onto that drive as long as you have the external drive connected. Saved files, screenshots, and videos will still save on default to the internal drive.
If you want to move any of your current games over to the external drive, go to Settings > Storage > System Storage. Next, go into Applications, press the Options button, and select ‘Move to Extended Storage.’ Then choose the games you want to move, then tap ‘Move.’
Note: The transfer process might take a while, though, so don’t start it up right before you’re hoping to play something.
Replace the internal hard drive
If you don’t want the mess of an external drive cluttering up your console or happen to have already a spare internal drive lying around, you might prefer to swap out the drive inside your PS4 instead.
You can upgrade your existing 500GB or 1TB drive to something with a higher storage capacity. The PS4 only supports internal drives up to 2TB, and the drive has to be in 2.5in laptop form factor, not the larger 3.5in desktop drives.
You can opt for an SSD, which will boost performance by improving loading times across both the operating system and your games.
Why is my PS4 fan making such a loud noise?
When your PS4console is getting hot, the fan kicks in. If your PS4 is too hot, the fan spins and gets louder than usual. If your PS4 fan is making a loud noise, you can try these fixes:
Place your PS4 fan in a ventilated area
If there’s something on or around your PS4console, move them away. Then wait for a while to see if your console cools down and gets quiet. Leave enough space around the back and sides of your PS4 for better airflow.
Do not cover your PS4console, and do not place items on top of or around your PS4 console. Lastly, never ever put your PS4console into a cabinet since there would be no space for airflow.
Turn your PS4 console to vertical
If you place your PS4 vertically, it could probably eliminate some heat and noise in your console. This is because the console will be cooler and, as a result, quieter. However, if this does not work, the PS4 fan is probably full of dust, so you need to clean out your PS4 fan to quiet it.
Use a can of compressed air
This is the easiest and quickest way to clean out your PS4. Take a can of compressed air to go through all the inputs and vents. Never use a vacuum to clean your PS4, as it may probably cause damage to the components of your PS4. To keep your PS4 fan in good condition, you can use this method to clean your PS4 once a month.
Open your PS4 console to clean out
We know that a dusty PS4 fan would make it loud, and if a can of compressed air doesn’t work, it’s time to open your PS4console to do a deep clean.
- Use a T8 or T9 Torx security bit screw driving to remove the screws.
- The screw driving may look like the image above.
- Remove the four screws on the back of your PS4console.
- You should then see its fan, then remove the dust covering on the fan. Just clean out as much of the dust as you can.
- When you finish cleaning the fan, please put all the things back together.
- After all, is done, turn on your PS4 and try to play games.
- Your PS4 should become much more quiet, even the same as when it’s new.
NOTE: Once you open your PS4console, you will lose its warranty. So if your PS4 is new or used within one year, you can send it to Sony for warranty service about the issue.
Bluetooth headphones not working with PS4
The PS4 does not support A2DP, including Bluetooth audio devices. In addition to A2DP, PS4 does not support other audio streaming Bluetooth profiles. If you get the error message “Bluetooth audio devices are not supported by the PS4” when you try pairing Bluetooth headphones to PS4, use these four easy ways to resolve the error;
Use Compatible Bluetooth Devices
If the Bluetooth device you own is compatible with PS4, you can pair it by directly configuring the settings.
Then perform these steps to pair the devices;
- Turn on the Bluetooth audio device in the pairing mode
- Click Settings in PS4. Then click Devices and select Bluetooth Devices
- Choose the name of the headset you want to connect
- In case the headset can connect, you can see if you’re able to play your favorite games with the Bluetooth headset
If it is not able to connect successfully and you get one of these two error messages or any other error message similar to them, you can attempt the other solutions given in this post.
“Cannot connect to the Bluetooth device within the time limit.”
“The PS4 does not support Bluetooth devices.”
Use audio cable having an inbuilt microphone
You’re going to require an audio cable having an inbuilt microphone. The majority of Bluetooth headsets come with such cable. Follow the steps listed below;
- Connect the Bluetooth headset to the PS4 controller using an audio cable with a built-in mic.
- Next, turn on the headset.
- Now click Settings in PS4. Next select Devices and then Bluetooth Devices
- Now choose the name of the headset you want to connect
- Then Click Devices and then Audio Devices
- Next, click Output Device
- Click Headset Connected to Controller
- Now you need to click on Volume Controller and change its setting to either louder or medium
- Click on Output to Headphone
- Choose All Audio
- See if your headset is working when you play games
Use any USB adapter
You might be able to connect the Bluetooth headset to PS4 when you use a USB adapter. Several users have said this solution worked for them. It might work for you, and so it is worth a try. If you don’t have a USB adapter, you might consider buying one.
Here are the steps you need to follow;
- Insert your USB adapter in the USB Slot of the PS4
- Turn the Bluetooth headset on
- Then click on Settings on the PS4
- Click Devices and then Audio Devices
- Now you need to click on Output Device
- Click USB Headset
- Select Volume Control. Set it to either louder or medium.
- Click on Output to Headphone
- Choose All Audio
- See if your headset is working when you play games
Use a Dongle
You can try this method if you have a Dongle and a wireless microphone for receiving Bluetooth signals, especially since it’s straightforward.
- Insert wireless mic in the PS4 controller
- Now in the USB Slot of PS4, insert Bluetooth Dongle
- Turn the Dongle on by pressing the button that’s on it
- Turn the Bluetooth headset on. Wait a little while (not more than a few seconds) for these two to connect.
- Now click Settings in PS4
- Click Devices and then Audio Devices
- Now click on Input Device
- Choose Headset Connected to Controller
- Click on Output Devices
- Click USB Headset
- Now click Volume Control. Set it to either louder or medium
- Select Output to Headphones. Click All Audio
- See if your headset is working when you play games
How to connect unsupported Bluetooth headphones to your PS4
Here are other methods you can use to connect unsupported Bluetooth headphones to your PS4.
How to Connect unsupported Bluetooth headphones to PS4 – Wired method
This method requires a male-male audio cable or cord with a built-in mic.
- Connect the audio cable with a built-in mic to your headphones.
- Plug the other end of the audio cable into your PS4 controller and turn on your headphones.
- On your PS4 main menu, go to ‘Settings’ and then to ‘Devices.’
- Click on ‘Audio Devices,’ scroll down to the ‘Output Device’ option, and select ‘USB Headset.’
- Next, scroll down to the ‘Output to Headphones’ option, and select ‘All Audio.’
How to Connect Unsupported Bluetooth Headphones to PS4 – Wireless Method
For this method to work, you will need a Bluetooth adaptor and mic.
- Connect the Bluetooth USB adapter to your PS4console.
- Power on your headphones and let them pair with your PS4.
- Connect the 3.5mm Bluetooth adapter jack to your PS4 controller.
- On your PS4 main menu, go to ‘Settings’ and then to ‘Devices.’
- Click on ‘Audio Devices’, go to the ‘Input Device’ option, and select ‘Headset connected to the controller.’
- Hit back, navigate to the ‘Output Device’ option, and select ‘USB Headphones.’
How to Connect Unsupported Bluetooth Headphones to PS4 – Using the PS4 Remote Play App
The PS4 Remote Play app allows you to access your console via a Wi-Fi connection using your mobile phone and enables you to use your phone as a controller and communicate through your phone’s mic. However, this method may not work for some games or devices.
- Download and install the PS4 Remote Play through Apple’s App Store or Google’s PlayStore.
- On your PS4, go to ‘Settings’ and then to ‘Enable Remote Play.’ Then, activate the feature by checking the ‘Enable Remote Play’ option on your PS4.
- Click on ‘Add Device’ and then ‘Code.’ An 8-digit code appears on the screen.
- On your phone, open the PS4 Remote Play app and register your device by entering the 8-digit code.
Note: You may experience gameplay and audio lag, depending on your network connection speed and mobile phone specs.
How to Connect Unsupported Wired Headphones to PS4
Most mainstream smartphone headsets use either CTIA (Cellular Telecommunications and Internet Association) or OMTP (Open Mobile Terminal Platform).
- Turn on your PS4 and go to the ‘Settings’ menu.
- Click on ‘Devices’ and then on ‘Audio Devices.’
- Connect your headphones to the OMTP to the CTIA converter and plug the converter into your PS4 controller.
- Select ‘Output Device’ on your PS4, then select ‘Headset Connected to Controller.’
- To test if your headset mic is working, go back to the ‘Audio Devices’ page and click on ‘Adjust Microphone Level.’ Then, adjust the input level of your mic using the slider.
- Go back to the ‘Audio Devices’ page, select ‘Output to Headphones,’ and select ‘All Audio.’
How to Connect Compatible Wired Headphones to PS4
Most headphones having a 3.5mm audio jack will work with a PS4 with a few settings tweak here and there.
- Switch on your PS4 and go to the ‘Settings’ menu using the controller.
- Scroll to the ‘Devices’ option and click on ‘Audio Devices.’
- Plugin your wired headset into the PS4 controller.
- Go to ‘Output Device,’ select ‘Headset Connected to Controller.’
- Navigate to ‘Audio Devices’ and select ‘Adjust Microphone Level’ to adjust the input level.
- Hit the back button and click on ‘Audio Devices’, set the ‘Output to Headphones’ option to ‘All Audio.’
How to Connect Supported Wireless Bluetooth Headphones to PS4
Here we show you how to connect headphones that are officially compatible with the PS4.
- Ensure your headset is charged and connect it to your PS4 using your USB cable.
- Switch your headphones on and enter pairing mode.
- On your PS4, go to the ‘Settings’ option, click on ‘Devices,’ and move to ‘Bluetooth Devices.’
- Your PS4 will start searching for nearby Bluetooth devices; once you see your headphones, click on them and wait for a few seconds.
PS4 not sending video via HDMI
If you see a “No Signal” error or a blank screen when you try to play PlayStation 4, chances are the issue is caused by an HDMI connection issue. But this is not the only reason why you are having a video issue.
There are several possible reasons for your PS4 video problem. Let’s discuss each of these causes below.
Incorrect HDMI port.
If it’s your first time setting up a PS4, be sure to check again if you’re using the correct HDMI port on your TV. Then, manually trace the HDMI cable from your PS4 to the TV and make sure that you plug the cable snugly.
Bad HDMI cable.
The next thing that you can do is to make sure that the HDMI cable is working. Try another cable if it’s available. If you have no other HDMI cable, use the one you have to connect your PS4 to another TV. This should help you isolate if the problem is cable-related or not. If your PS4 still has no video when connected to another TV, it’s either a cable issue or a problem with the console itself. You can narrow down the causes by doing the rest of the troubleshooting steps in this guide.
HDCP-related bug.
The PS4 uses an Intel-developed High-bandwidth Digital Content Protection (HDCP) coding scheme that allows digital content (both audio and video) to remain protected while going through different connections. It’s meant to shield digital creation owners from piracy.
If DHCP is enabled, your console helps filter pirated versions of content, which can mean blocking video or audio signals. Such extra anti-piracy capability can hinder the console from playing videos from being shown to a TV. You can try to turn DHCP off to see if it helps.
TV firmware issue.
Running outdated firmware on your TV, PS4 console, or both can lead to some issues. If your TV is constantly connected to the internet, it’s probably running the latest firmware version, but you can double-check it. Consult the TV’s documentation to see how to check for firmware updates manually.
On your console, make sure that your PS4 is also fully updated, especially if you have not connected it to the internet for a long time.
PS4 software issue.
Sometimes, a software glitch in the console may lead to specific issues. For example, this can sometimes happen if there are changes with the software, like after an update or if the software has been modified.
How to resolve the Video issue
Follow these steps to resolve the video problem;
Make sure the PS4 is connected to the correct HDMI port.
Ensure your PS4 is plugged into the same HDMI input that’s selected on your TV. Then, use your TV remote to cycle through all of the HDMI inputs to ensure you haven’t chosen the wrong one.
Try unplugging and re-plugging the HDMI cable in again to make sure you have a secure connection. If it’s connected to the correct port, you could switch it to another available port and try again.
Bypass the receiver
If your PS4 is not plugged directly into the TV and is instead plugged into an audio/video receiver, try plugging it directly into the TV instead. The receiver may not be accurately passing the signal to your TV.
Check the HDMI cable and ports physically.
Remove the HDMI cable from the PS4 and the TV and look inside both HDMI ports with a flashlight—do you see any bent pins inside the HDMI ports? If there’s a bent pin in the PS4 or the TV, you’d see a “No Signal” area or a blank screen. If there’s a bent pin, unplug the TV or PS4 from the wall and gently push it back into place using a flat screwdriver.
Try a different HDMI cable.
HDMI cables can be faulty, so try swapping out your current cable with another one if you have one. If you’re still getting the “No Signal” error or seeing a blank screen, continue to Change the Resolution in Safe Mode.
Changing the Resolution in Safe Mode
Press and hold the power button on your PS4 for seven seconds. This ensures that the PS4 turns off, which is necessary for starting it in Safe Mode. You will hear one beep when you begin to press and hold the button, and a second after about seven seconds. You can remove your finger from the button after you hear the second beep.
If you see “No Signal,” “Weak Signal,” or a blank screen, it could be because the resolution is incorrect in your PS4 settings. This sometimes happens when you move the PS4 between different TVs, switch between game systems on the same TV, or make a change to your TV’s display settings.
Use a USB cable to connect your controller to the PS4.
If you’re using a wireless controller, you’ll see a message on the screen telling you to connect with a USB cable—this is required for using the controller in Safe Mode.
Press the PS4 button on the controller. It’s the one at the bottom center. You should see a menu on the screen.
Select Change Resolution.
This is the second option on the menu. To select the option, press X. You’ll see a message that says, “The PS4 will restart.”
Press X. This restarts your PS4. When it comes back up, it’ll ask you to choose a resolution.
Select a resolution. Leaving the default option of Automatic will nearly always work, but you can also select a different resolution if you know it works with your TV. Keep in mind that if you choose a resolution that doesn’t work with the TV, you’ll continue getting no signal when trying to play your PS4.
For example, if you have a 720p TV, select 720p. Don’t try selecting something higher than that, or else it won’t work!
Press the X key. As long as you selected a resolution compatible with your TV, you should now be able to play your PS4.
Try Booting into Safe Mode
Just as you would troubleshoot a computer, you can launch your PS4 in safe mode in hopes of remedying the signal issues. With the PS4 off, hold down the power button for 7-8 seconds on the boot to launch into safe mode (release the button after the second beep).
Then restart the system, change resolution, update system software, restore defaults, rebuild the database, and initialize. You can learn more about what each of these does on the PlayStation Support site, but I recommend updating the software first.
If you don’t have an Internet connection available on your PS4, you can also manually update the software via a USB flash drive.
Check if Your PS4 is Blinking Blue
If your PS4 blinks blue and never enters the powered state (white light), it could be a power issue. First, turn off the PS4 using the force-shutdown method of holding down for at least 7 seconds until the PS4 beeps twice. Next, disconnect the PS4’s power cord from the wall outlet and inspect it for damage, including the pins where you connect it to the PS4 directly.
Disable HDCP.
If your PS4 screen goes black when playing a disc or game, it may have something to do with HDCP. Turn it off by following the steps below:
- On your PS4, open Settings.
- Select System.
- Disable HDCP (uncheck Enable HDCP).
Update TV firmware and Install PS4 software updates.
Keeping your devices up-to-date can keep away bugs but also fix known ones. Be sure that both the TV and PS4 console runs the latest firmware. If you don’t know how to update your TV, get the details of how from its manual or documentation.
To check for PS4 updates, you can go to the Settings>System Software Update.
Factory Reset your PS4.
If your PS4 still has the no video issue at this point, you’ll want to perform a factory reset. This will wipe the hard drive by clearing all user data and returning the software to its default settings. Follow the steps below on what to do:
- Sign in to your PS4.
- Go to Settings.
- Select Initialization.
- Select Initialize PS4.
- Select Full wipe.
Depending on the size of your hard drive, this process may take a few minutes to over an hour or even longer. Just wait for the entire process to finish and make sure not to interrupt it. You can potentially damage the hard drive if you interrupt the formatting process.
Note: If the solutions above won’t help, there’s probably a more profound issue why your PS4 has no video. It may have a graphics card problem, or there’s another motherboard problem. Contact Sony so you can set up an appointment for repair.
How to put the PS4 on safe mode
The PS4 Safe Mode is a simple way to troubleshoot issues with your console. The Safe Mode menu includes options to change your console’s resolution, rebuild its storage database, and restore the device to factory settings.
How to put PS4 in Safe Mode
- Turn off your console by holding the power button for 3 seconds. After blinking a few times, your PS4 will power off.
- Press and hold the power button, releasing your finger only after the second beep sound. This should take about 7 seconds.
- Your PS4 will start in Safe Mode. First, make sure your controller is connected to the console, and press the PS button.
What does Safe Mode do?
Once your PS4 boots up in Safe Mode, you’ll be taken to a screen with eight options:
- Restart System is the easiest way to get out of Safe Mode. This option forces your PS4 to restart normally.
- Change Resolution switches the display resolution to 480p once the console restarts, which may help you resolve screen issues.
- Update System Software lets you update your console’s software through a direct download, a USB drive, or a disc.
- Restore Default Settings resets your console to its factory settings without deleting games, app, or other data.
- Rebuild Database adds all your content to a new database on the system, which can resolve system feature issues, like if an app icon doesn’t disappear after you’ve deleted the app.
- Initialize PS4 resets your console to its original settings, and delete all user data and settings.
- Initialize PS4 (Reinstall System Software), remove your console’s firmware, and delete all user data and settings.
- Set HDCP Mode (PS4 Pro only) applies to images that don’t appear on 4K TVs that aren’t compatible with HDCP 2.2. This setting lets you choose HDCP 1.40 to view pictures that otherwise won’t appear on your TV.
Note: Before switching your PS4 out of Safe Mode, make sure to back up your data because some Safe Mode options will result in data loss.
How do I fix a PS4 stuck on safe mode
If your PS4 is stuck on Safe Mode, you may be dealing with a Safe Mode loop that makes it challenging to resume playing. When you put your PS4 in Safe Mode, it can get stuck in a Safe Mode loop.
The PS4 system gets stuck in a Safe Mode loop due to several significant reasons:
- One of the PS4 cables is broken/damaged.
- The PS4 database is corrupted
- The PS4 operating system has serious file conflict or is corrupted.
- Serious issues with the PS4 internal hard drive.
- Major power issues
- A constant electrical short within the PS4 hardware pieces tat prevents the operating system from loading.
- A damaged/malfunctioning area in the motherboard that needs extensive testing to discover.
- Corrupted data in the CMOS memory chip.
Here are four troubleshooting methods you can use to remedy the issue;
Restart your PS4
Restart your PS4 using option 1 in the Safe Mode menu. Press “X” on your controller to select this option.
Make sure there are no power issues
Hold down the power button on your PlayStation until the light stops flashing. If the first method fails, check to ensure all of the cables, including your USB and HDMI connections, are working correctly.
You can also try unplugging your PS4’s power cord and plugging it back in. Then unplug the HDMI cord and switch which end is plugged into the TV and which end is plugged into the PS4. If one of the cables or connections is broken or failing, try replacing it.
If the cables and connections are working fine, try power cycling your PS4, as explained in our article on troubleshooting a PS4 that won’t turn on.
Rebuild corrupted files
Rebuilding your database can sometimes take several hours, depending on how much data you have saved on your PS4. If the second method fails, the problem might be caused by a corrupted file.
Select option five on the Safe Mode menu, “Rebuild Database,” and press “X.” This will build a new database for your PS4 without affecting any saved data. It will take a while for your PS4 to rebuild — when it’s done, restart your PS4.
Update your PS4’s software
There are two significant ways to update your PS4’s settings through Safe Mode. First, try updating your PS4’s system software from the Safe Mode menu. Press “X” to select elect option three on the menu, “Update System Software.” Then, press “X” to select “Update Using Internet.” From there, follow the instructions on the screen.
If nothing else works, select option 7, “Initialize PS4 (Reinstall System Software),” and press “X.” Follow the instructions on the screen.
Update System Software
Updating the PS4 system software may fix any file issue caused by a corrupted file system within the operating system.
Initialize the PS4
Initialization of your PS4 system restores system settings to default values. It deletes data saved on system storage and deletes all users and their data from the system. Data is not deleted from USB storage devices that are connected to your PS4™ system.
To get started, you have two options for initializing the PS4, 6, and 7. These two options are the last resort if you can’t fix your PS4 stuck in the Safe Mode loop.
Clear the CMOS Memory
Do not try this unless you’ve tried everything above and none worked.
The CMOS, also known as the Complementary Metal-Oxide-Semiconductor, is a small chunk of memory used to store your PS4’s BIOS configuration. This configuration controls what your PS4 does on boot. If your machine won’t boot properly or behaves weirdly without an apparent reason, clearing the CMOS memory can often set things right.
White light on PS4 controller instead of blue
Two reasons mainly cause the PS4 controller flashing white light. One is low battery, and the other is that your controller is trying to connect to your PlayStation 4 without success. Use the methods below to solve the flashing white light issue.
Check the hardware
Check to see if your PS4 has lost cables or something wrong with the PS4 controller. To handle any cable issues;
Use another USB cable
If you have checked your USB cable and it is plugged correctly, you can try another USB cable to see.
- You will need another PS4 USB cable that works properly.
- Plug the cable into your PS4 and the controller correctly.
- Turn on your PS4 and controller to see if it works.
If it usually works, the issue was the cable. If it doesn’t work, the cause of the problem is the controller or your PS4 software.
Try another controller
If you have checked the USB cable and find no problem with the cable, try another PS4 controller to see if the issue will be resolved.
- Use another PS4 controller to turn on your PS4.
- Shut down your PS4 completely.
- Unplug your PS4 cable from your PS4, and wait for 3 minutes.
- Re-plug your PS4 cable into your PS4 correctly.
- Plug another connector to your PS4 controller that occurs the problem.
- Turn on your PS4 now and see if it works properly.
Reset the PS4 controller
Many PS4 problems can be solved by resetting the PS4 controller, such as PS4 blinking white light, PS4 Bluetooth issue, PS4 not syncing or connecting. Follow these instructions:
- Turn off your PlayStation 4.
- Locate the reset button, and it’s on the back of your controller near the L2 shoulder button.
- Use a small and unfolded paper clip or something like that to push the button, hold it down for a few seconds, and release it.
- After resetting the controller, repair the controller with the PS4 by connecting the USB cable correctly and turning the PS4 on.
- Press the PS button to log in to the PS4.
- Your controller should connect to your PC4console and start to work.
Update your controller driver on your PC
If your device driver on your computer is missing or outdated, that will cause problems when using your PS4 controller. You can try to update your PS4’s driver on your PC to fix it. First, you will need to uninstall the device and driver on your computer. And then reinstall the device and driver to have a complete update.
How to uninstall the PS4 device and driver on your Windows
- On your keyboard, press the Windows logo key + R at the same time to invoke the Run box.
- Type devmgmt.msc, and press Enter on your keyboard.
- Right-click your device, and click Uninstall device.
- Check the box next to Delete the driver software for this device, and click Uninstall (If you are using Windows 7 & 8, click OK).
- Unplug the device from your computer, and restart your computer.
How to reinstall the PS4 device and driver on your Windows
- After restarting your PC, re-plug your PS4 into your PC, then your computer will detect it and install the driver for you.
- You will need to install a proper driver for your device. There are two options to install the device driver in your computer;
Option 1 –Manually
You can go to the manufacturer’s website, find the proper driver for your device, and install it on your computer. This may require time and computer skills.
Option 2 – Automatically
If you don’t have time or skills, you can try Driver Easy to download and install the correct drivers for you.
Note: Driver Easy will detect the driver’s condition in your computer and install the correct drivers for your PC. You can update your drivers automatically with either the FREE or Pro version of Driver Easy.
Drive Easy installation
- Download and install Driver Easy.
- Run Driver Easy and click Scan Now. Then Driver Easy will scan your computer and detect any problem drivers
- Click the Update button next to the driver name to download and install the correct driver (you can do that with the FREE version).
Alternatively, click Update All to automatically download and install the correct version of all the problem drivers. Then restart your PC and try to connect your PS4 again to see if it works.
Start PS4 from safe mode
Safe Mode allows you to start the PlayStation with only the most basic functions. The Safe Mode menu options will help you correct issues and allow your PlayStation 4 to start usually.
Safe Mode options include;
- Restart System: Ends Safe Mode and restarts the PS4 usually.
- Change Resolution: Changes the screen resolution to 480p when the PS4 is restarted.
- Update System Software: This allows the PS4 to update the system software by the Internet, USB Drive, or Disc.
- Restore Default Settings: Reset the PS4 to the default factory settings.
- Rebuild Database: Scans the drive and creates a new database of all content. This operation may take a long time, depending on the type and number of data items.
- Initialize PS4: Erases all user settings and data and restores console to default settings.
- Initialize PS4 (Reinstall System Software): Wipes the entire content of the hard drive, including the system software.
- Set HDCCP Mode: If your PS4 Pro is connected to a 4K TV that doesn’t support HDCP 2.2 (please refer to your TV manual), it may not display images when playing 4K games or 4K video streaming. To see the image, you need to choose this setting and select [2. HDCP 1.40 Only] on the next screen
Start Safe Mode to rebuild the database
This solution can help you scan the drive and create a new database of all content. However, this operation may take a while, depending on the type and number of data items.
- Press the Power button on the front panel to turn off your PlayStation 4. The power indicator will blink for a few moments before turning off.
- After turning off your PS4, press and hold the Power button, then release it after you hear two beeps: one when you press at first and the other seven seconds later.
- Connect the DualShock 4 controller with the USB cable, then press the PS button on the controller.
- You will enter the Safe Mode and see eight options. Select option 5. 9Rebuild Database) Then wait for it to complete.
- Try to use your PS4 again to see if it works.
Start Safe Mode to update system software
This solution allows the PlayStation 4 to update the system software via Internet, USB Drive, or Disc so that the problem in your system can be fixed.
- Press the Power button on the front panel to turn off your PlayStation 4. The power indicator will blink for a few moments before turning off.
- After turning off your PS4, press and hold the Power button, then release it after you hear two beeps: one when you press at first and the other seven seconds later.
- Connect the DualShock 4 controller with the USB cable, then press the PS button on the controller.
- You will enter the Safe Mode and see eight options. Select option 3 – Update System Software, then wait for it to complete.
- Try to use your PS4 again to see if it works.
Note: All data and settings will be lost by performing this step. Safe Mode deletes all user data and restores the PS4 as if it just came out of the box. Remember to save your data before using this option.
Reset controller connections
If your problem persists, you can use this trick to reset all controller connections and search for a new one.
- Press and hold the PS button and Share button at the same time.
- Wait for a few seconds until your PS4 is turned on.
- Try to use your PS4 to see if it works now.
PS4 won’t connect to Wi-Fi
Not being able to connect your PS4 to Wi-Fi means that you will not play games online. Unfortunately, you will also not be able to update your games and the play station’s firmware. Below are some common causes of the issue and remedies you can use to fix the problem.
Reasons Why Your PS4 Is Not Connecting To The Internet
These are some of the most common reasons;
- The PlayStation Network (PSN) is offline.
- Your Wi-Fi network lost internet connectivity.
- You’re attempting to connect with an invalid username or password.
- The DNS settings on your PS4 aren’t configured correctly.
- The distance between your PS4 and the wireless router is too far, causing intermittent signal loss.
Solutions
You can use the methods below to troubleshoot the problem and remedy it.
Check the status of the PlayStation Network.
If PS4 is offline, it doesn’t matter whether the console can connect to Wi-Fi. So, check its status as an initial step. Gamers often misdiagnose PSN outages as a problem with their network connectivity, which can cause unnecessary confusion.
Restart the modem and router.
Restart both the modem and wireless router wait about five minutes, and see if the console will connect to the Wi-Fi network. This will reboot the modem and router. Then check to see if the PS4 can establish a connection. Refer to the router manual or talk to your Wi-Fi service provider’s customer support.
Restart the PlayStation 4.
This will reset the PS4 by clearing programming on the PlayStation. Then restart it to see if it connects successfully. Finally, power down the console and turn it back on to reset the PlayStation.
Confirm the PS4 network log in details
Confirm the Wi-Fi password used in the PlayStation is correct. Perhaps your PS4 can’t establish a connection to your Wi-Fi network because you’re using the wrong password. You can confirm the password by connecting a different device (such as your laptop or smartphone) to the same Wi-Fi network using the same password. If the other device can see the Wi-Fi network but can’t connect to it using that password, chances are the password is invalid.
Move your PS4 closer to the wireless router.
The physical distance between a wireless router and the PS4 can affect connectivity. Also, ensure the Wi-Fi signal isn’t blocked by device-related interference or obstructions such as reinforced doors or excessively thick walls.
Change the Wi-Fi network’s channel number.
Change the channel on the wireless router to establish a stronger connection. Unfortunately, most internet-connected devices tend to use the same narrow radio frequency range by default. As a result, your Wi-Fi network channel could be by other neighboring networks, making it difficult for your PS4 to connect.
Change the DNS settings on the PS4.
Modify the DNS addresses used with your Wi-Fi network and see if that fixes the issue. This is often an overlooked cause of PS4 Wi-Fi connectivity problems.
Connect the PS4 using a wired connection.
Use a reliable hard-wired option, like an Ethernet cable to connect your PS4 to the Wi-Fi network. If you attempt all of the above solutions, this will circumvent the problem and can still not connect your console to the Wi-Fi network.
Factory reset the PS4.
Your last resort is to reset the PS4 to its default factory settings. This means you will lose all your saved settings and game preferences, but it is the only solution if you have reached this point and still can’t establish a connection. Ensure you backup your data and save games before attempting this step.
PS4 won’t register controller
Without a controller, you cannot play games on your PS4. Follow the steps below to learn how to remedy the issue using the solutions listed below.
1. Connect your PS4 controller manually using a data cable
Use the cable that came with your PS4console. You can also use a USB cable with a micro-USB connector. You may have to experiment with multiple cables until you find one that works with your PlayStation. Then restart your PS4. Your console will automatically recognize and connect your controller.
2. Reset your PS4 controller
This will resolve the connecting issue. To reset the controller;
- Turn off your PlayStation 4.
- Locate the reset button on the back of your controller near the L2 shoulder button.
- Then use a small, unfolded paper clip or something similar to push the button and hold it down for a couple of seconds. Then release the button.
- Connect your controller to your PS4console.
- Then turn your PS4 on.
- If the issue is resolved, your controller will connect to your PS4console at this time.
3. Restart your PS4 console completely
This will resolve any corruption issues on your PS4console that cause your controller to disconnect. Restart your PS4console ultimately to see if this will fix the problem;
- Press the power button on your PS4console and hold it until you hear the second beep.
- Then release the button.
- Unplug the power cable and the controller that wouldn’t connect from the console.
- Leave your PS4 for 2-3 minutes.
- Plug the power cable and the controller back to the console.
- Turn your PS4 on. Check the controller to see if it works fine now.
PS4 won’t update
Updates are essential as they keep your PS4 in working order. They provide bug fixes, new features, security updates, and more. So the first course of action would be to update your PS4 manually instead of letting automatic updates take care of everything.
If it works, this may solve the problem, and future updates will happen automatically. You can also try to install the update in Safe Mode. Additionally, you should delete notifications as they may prevent updates from installing.
Other reasons why the PS4 is not updating;
Internet connection is slow or intermittent
Ensure that you have at least 3Mbps speed on your console. To have uninterrupted downloads of games and updates, your PS4 needs a decent internet speed. Make sure that the signal is not constantly disconnecting as this might interrupt the updates. If necessary, connect the console to the router with a network cable.
Sony servers are down
Sony servers can go offline from time to time. If you’re getting an error message when trying to update, this indicates an ongoing server downtime. Server errors go away on their own. To remedy this issue, cancel the update and wait for the problem to get fixed.
PS4 software is blocking updates.
If you’re running unofficial PS4 software, system updates from Sony may be blocked. To update the system, you will need to modify settings on your modified software or install official PS4 software.
Unknown software glitch.
In some cases, even official software may encounter an error and prevent the latest updates from being installed. Restore the software settings to factory defaults or initialize the console to fix the issue.
Perform manual or offline PS4 updates.
If there’s no internet connection problem, but your console still won’t directly download updates from the internet, try doing an offline PS4 update.
To delete notifications;
- Select “Notifications.”
- Press the Options button on your controller.
- In the menu, select “Delete.”
- Choose “Select All.”
- Select “Delete.”
- After deleting the notifications, try to install the update again manually.
How to Install the update in Safe Mode
Safe Mode starts your PS4 in a configuration that loads only the most basic features, often bypassing corrupted software that prevents features like system updates from working.
- Turn the PS4 off completely.
- When it’s fully shut down, press and hold down the power button until it beeps twice.
- Release it after the second beep. This occurs about seven seconds after the first beep.
- Connect the controller using its USB cable and press the PS button.
- In the Safe Mode menu, choose option three, “Update System Software.”
Note: If your PS4 refuses to install the update even in Safe Mode, contact Sony support for additional assistance.
PS4 won’t turn on
This is the most common sign of a PS4 hardware error. Below are some common issues that can cause the PS4 to beep and turn off and what to do if you encounter them.
Rebuild the database
With the PS4 plugged in, press and hold the power key until you hear two beeps. If the console turns on and begins the database rebuilding process, you’ve fixed the issue. But, unfortunately, it also means there is a corrupt file or something similar halting the initial start-up process.
Ensure your PS4 has proper ventilation
If your PS4 beeps once then turn off, it could be because the console is overheating and doesn’t have sufficient airflow. Make sure the space around your PS4’s air vents is large enough for air to flow freely, and don’t obstruct the console with anything that could impede airflow. Dust the console regularly.
Check power source
The power supply can be the problem. Unplug the PS4’s cable from the back of the console, wait for a few seconds, and plug it back in again. Unplugging it will function as a hard reset. Wait 30 seconds to a minute before plugging it back on.
Switch your PS4 from a power strip to a wall outlet
If the PS4 isn’t receiving sufficient power, it will not turn on. If you have multiple electricity-hogging appliances plugged into the same power strip, the strip will simply fail to supply the correct amount of power to some devices.
Note: If all else fails, and you simply cannot fix the issue, contact Sony customer support or take your PS4 to a reputable, good-quality service center for repair.
PS4 won’t beep twice
Typically, the PS4 should be twice when it turns on. If you turn on your PS4 and it beeps once, then it shuts off, there is a likelihood that it is experiencing a power supply issue. Inconsistent power supply affects the launch model, the PS4 slim, and the PlayStation 4 pro. Other underlying problems can also cause the beeping problem.
If you have any PS4 model that beeps once but will not turn on, follow the steps below to try and troubleshoot the issue and fix it;
Remove the power cable and wait a few minutes
The power supply stores a small amount of charge, even when you remove the power cable. Remove it and wait a few minutes. This will give time for the power to drain out of all circuitry and be entirely dead.
While the system is plugged out, press the power button a few times. Next, you should hear it beep, even though the system is not plugged in. This will speed up the power draining from the system. Once it stops beeping, leave it alone for a few more minutes before plugging it back in and attempting to power it up again.
Connect controller via USB and press PS Button
Use a USB cable to connect the controller to the PS4. Then press the PS button on the controller and see if it causes the system to start up.
Try and insert the Disc
You can be able to turn on the PS4 by inserting the disc. The system will be forced to wake up. Do not press the eject button if you already have a disc inside the PS4, which will trigger the system to turn off.
Turn the Console on its Side
Turn the console, so it is standing on its side. This will help to dislodge some dust or any particles inside that could be disrupting the power connection.
Blow all dust out of air vents
Ensure no dust and dirt is blocking the air vents, as this will cause the console to overheat and shut down or lose power connection due to expansion and contraction. In addition, cleaning the ducts will allow cold air to come into the system and hot air to escape.
Turn off the TV before turning on the console
This may be a simple glitch with the HDMI output. If you turn on the PS4 first and then turn on the TV, it may work fine. It shouldn’t be a long-term problem. It might just be a one-off glitch.
Connect to a different TV
The HDMI ARC port with a return channel can interfere with the PS4 start-up. If you have a different TV available to you, you should try to plug the PS4 onto that TV and see if it will start up as usual.
Give a slight tap near the power connection
This will help to dislodge some dust or any bad connection that could be causing the system to fail to boot correctly. Tap the console gently, do not punch it.
Connect power and hold the power button for 30 seconds
Pressing the power button for 30 seconds can cause a complete drain of all electricity built up in the power button and internally to perform a hard restart.
Remove and Reinsert the Hard Drive
If the HDD connection is loose, you will get the blue light with a single beep. The problem is most often associated with the PSU, and it can be fixed by simply removing the hard drive and inserting it back in again.
You will not lose any data stored on the drive-by doing this. It is perfectly safe. Just make sure the system is not turned on when you do this.
Remove Dust from Inside The System
Dust and dirt build-up inside the console will restrict airflow and cause the console to overheat. If your system is clogged full of dirt and dust, it will be the cause of your problems. Remove the console shell and use compressed air to remove as much dirt as possible from the system.
Then remove the power supply to check for dust underneath this. It only takes four screws to do this and is relatively easy to do. Almost like it was designed to be easy to replace. It is worth popping this off to check for dust underneath.
Check Power Supply Screws
When you take off the back panel, you will find the power supply is screwed into the case. When I opened my PS4, I found two of these screws were very loose. I unscrewed them anyway and removed the PSU to check for dust always, but these screws being loose could have caused the PSU to slip and have a bad connection.
Tighten screws around CPU heat sink
The PSU is easy to access and can be removed from the console by simply removing a few screws. However, do not over-tighten the screws.
Note: The worst-case scenario is that the power supply has failed. If your PS4 is still under warranty, get Sony to repair it for free. Do not attempt to open the PS4 as this voids the warranty agreement.
Step by Step Guide on How to Clean Your PS4
You’ll realize that the performance of your PS4 slows down and becomes louder over time depending on how long you’ve had it. Just like other gadgets, dust particles tend to build up over time and may affect the way the machine runs thus it’s advisable to clean your PS4 at least once every other time to keep it performing at its best.
Before getting started, it’s important to note that opening the console and cleaning an original PS4 model will render its warranty void and in most cases, it is valid for one year after the date of purchase. Other models like PS4 Slim and PS4 Pro can be opened and cleaned without interfering with the warranties.
- For a thorough cleaning job you’ll need the following items to clean an original PS4:
- Compressed air can spray
- A standard Phillips Head screwdriver
- A TR8 or TR9 Torx security bit screwdriver
- A knife
- Cotton balls and swabs
- A flashlight
- A cleaning brush or an old toothbrush
- A piece of tape (optional ) to place the screws
After assembling the items, prepare a place with enough room to facilitate the cleaning as you’ll be dealing with small screws so you should have a safe place to keep them. You should also take care not to work on a static-prone surface to prevent a static electricity build-up.
Make sure you shut down and unplug your PS4
The console should be off with no lights on the top. An orange light indicates a rest mode which will require one to shut it down properly by turning the PS4 on. Press the PlayStation button and hold to open the Quick Menu, select Power, Turn Off PS4 then all the lights will turn off. You can now unplug the HDMI cable, USB devices, and power cord.
Opening the PlayStation 4
Turn the PS4 around to have the backside facing you then turn it upside-down to remove the three back stickers and the screws underneath. The two stickers on the sides are slightly thicker and may require you to use a knife to peel part of the stickers for you to have them come off easily. A special warranty sticker is in the middle and is damaged immediately you remove it.
You should be careful not to scratch the PS4 as you remove the stickers which can be re-applied after or done without. Once all stickers have been taken off, remove the screws using the TR9 Torx screwdriver. Be careful not to drop them and keep them in a safe place. This will not require much effort as the screws are short.
You can now pop off the cover by lightly pulling up the edges
Clean the dust on the cover you just removed using the compressed air and dab out any traces of dust using a cotton ball then set it aside. At this point, you have a good glance at how dusty your machine is as you can see the fan. Before getting to clean the fan you have to remove the power supply to access the heat sink.
The power supply unit is held in place by five screws; two standard Phillips head screws and three TR9 security screws. Be careful as you work on removing the screws as the Phillips screws are tougher and longer to remove. Note that the power supply unit is connected to the motherboard by a cable that you need to be cautious not to accidentally unplug.
The power supply unit may require some slight wiggling to make it come out easily. Gently place it on the side ensuring it is safely plugged into the motherboard. This gives you access to the fan and heat sink for a thorough cleaning exercise.
Break a can of compressed air can or a compressor
Use the compressed air spray and spray short bursts of air around the PS to get rid of the dust. When using a can of compressed air it is advisable to first spray in the air to ensure no liquid gets into the play station.
Clean hidden dust from the corners by using cotton swabs to clean parts the air won’t clean well. Focus more on cleaning the heat sink; a set of metal bars, the fan, and the outer edges of the PS4. A flashlight will come in handy in this bit.
Reassembling the PS4
Reassemble your PS4 once you feel satisfied with the cleaning job first by flipping back the power supply unit back in place. Replace the screws bearing in mind the two different types (the two long Phillips screws on the sides and the three TR9 security screws)
Lastly, put cover back into place and lightly press it down all around the edges before fastening with the screws. Be careful not to damage the screws then replace the stickers. At this, the work is over and you can plug in, run updates and enjoy a smoother, less noisy PS4.