
The Nest thermostat is a reliable option when it comes to temperature control. Additionally, the fact that it is voice-activated makes it a convenient option. However, it is a great inconvenience when the Nest thermostat is delayed for minutes.
As a result, it is crucial to know how to use it on a thermostat delay mode. This is to help you keep using your thermostat with ease.
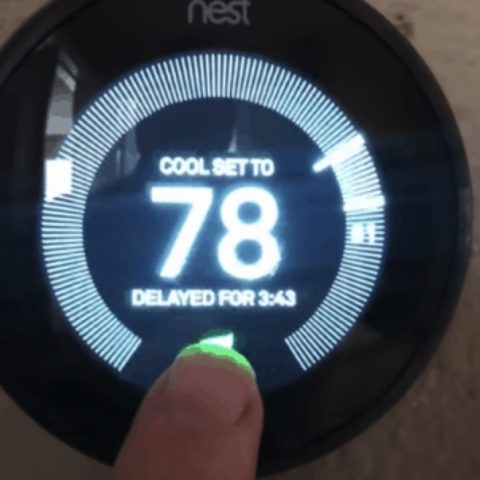
Why Does My Nest Thermostat Say Delayed?
The ‘Delayed’ message on Nest Thermostats is a common issue. In some cases, the delayed message results from a power shortage or an underpowered thermostat which you can fix via the device’s wiring system.
The delayed message isn’t always a result of a power shortage or underpowered thermostat, though, and we’ll cover some of the other potential causes in the next section.
If your Nest thermostat’s digital reader specifically includes the word ‘Delayed,’; it means your heating and cooling functions have been put on hold.
There are three main reasons why this happens:
Your Nest Thermostat Has Been Recently Installed
A newly installed Nest thermostat won’t know how long it takes for your home to heat up or cool down, so it will need some time to ‘settle in’ to get to know your home before performing optimally.
If you have recently installed your Nest Thermostat and it starts showing the message ‘In 2 Hours’, you need to give it some time to learn enough about your home before it can provide you with a more exact estimate.
You Recently Rebooted Your System
A total system reboot will remove all the data saved in your Nest thermostat, so it will have to re-learn your home again as if it was a newly installed device. Give the thermostat sufficient time to learn more about its surroundings. This will help remove the delay on the Nest thermostat.
There Is an Issue with the Wiring Circuit
If there is a missing wire or incomplete circuit between the HVAC and Nest thermostat, this could be another reason why your device is displaying the delayed notification. To check whether or not your device’s circuit is complete, open the settings on your Nest and scroll to ‘Equipment.’
You should see a wire for the following: Y1 for the cooling system, G for the fan, W1 for heat, RH for power, and C for the common wire. If the C wire is missing from the display, you will need to attach the common wire to complete the circuit.
How to Fix the Nest Thermostat Delay
How do I turn off the delay on my Nest thermostat? If your Nest Thermostat is currently displaying the ‘Delay’ notification, the following steps will help you fix the issue:
Charge the Battery
When the Nest thermostat’s battery is drained of power, and there’s an insufficient power supply coming from the HVAC system, you could try charging the battery manually to get it working again.
To do this, remove the front of the device on the wall to reveal the micro-USB port. Then, go ahead and connect a compatible charger to the device and give it some time to recharge the battery.
ProTip: The very first Nest thermostats neither have a USB port nor a rechargeable battery. They use AAA alkaline batteries. The 1st gen Nest learning thermostat has a mini-USB while 2nd gen, 3rd gen, and the Nest Thermostat E all have micro-USB ports and rechargeable batteries.
Once you have left it for some time, replace the front of the Nest Thermostat, and you should notice the ‘Delay’ notification is no longer showing. However, this quick fix is not a permanent solution to the ‘Delay’ issue because you will have to recharge the battery regularly if it isn’t getting enough power from the HVAC system.
Check if the Nest Thermostat Is Newly Installed
There’s no need to panic if your device is new and displays the message ‘Delayed for 2 Hours’ or some other timescale. Instead, give the device a bit of time to settle in, and it will soon be operating as normal.
Similarly, you’ll also see the delay notification if you have recently reset your Nest thermostat. Again, the delay occurs because the device will have lost all the saved data it has learned about your home, so you’ll need to treat it like a new device and wait a couple of days to get back on track again.
Check for Software Updates
Like most smart devices, Nest thermostats rely on regular software updates to ensure they run as smoothly as possible. So if your device is displaying the ‘Delay’ notification, it could be because it is running an update and unable to operate its regular functions.
Any ‘Delay’ notification is normal here, so don’t worry if you notice this happening with your device. Instead, leave the device for a bit of time to complete the updates, and it should start working normally again.
Check if a C Wire Is Connected
In most cases, the Nest thermostat is delayed by a C wire. The C wire or ‘common wire’ provides a constant flow of 24 volts of AC power to the Nest Thermostat.
When the R wires are connected, the C wire completes the circuit between the HVAC and smart thermostat, which is what provides a continuous stream of power that keeps the Nest thermostat operating 24/7.
How to Install a C Wire
With regards to the C-wire, here are your installation options;
- Install a new C wire from the HVAC system to the thermostat terminal.
- Use the Fan (G) wire instead of the C wire.
- install a C wire adapter
Considering how complicated it is to install a C wire, it is best to hire a professional electrician to install a C wire.
How to install a New C Wire
Warning: While installing the common wire yourself is cost-effective, you should be aware of the electrocution risk if you are not sure you can handle the task. However, if you’re unsure of the process or have any reservations, get a professional electrician to complete the steps below.
Establish the Wiring Route
Firstly, work out the route the wire will need to take to get it from the HVAC system to the Nest thermostat.
Connect the C Wire to the Nest Thermostat
- Pull the wire into the thermostat and connect it to the corresponding terminal on the device.
- Ensure that it is securely connected and there are no tangles or kinks in the wire.
- You will need to pull it through the device and work it through the walls until the other end reaches the HVAC system.
- Then use wire rods to feed the wire through awkward and hard-to-reach spots.
Connect the C Wire to the HVAC System
Once the wire has been pulled through your home and has reached the HVAC equipment, you will need to connect it to the correct terminal to complete the circuit.
- Remove the cover and turn off the HVAC system by unplugging it or pressing the switch at the circuit breaker.
- Locate the thermostat terminals labeled R, W, Y, G, and C.
- Connect the C wire you have pulled through from the Nest Thermostat to the C terminal on the HVAC board.
- Switch the HVAC system back on at the mains and replace the front cover.
- Configure the Settings on the Nest Thermostat
- Finally, return to the Nest Thermostat device and follow the setup instructions to confirm the C wire is installed and connected correctly.
- If you open your ‘Equipment’ menu on your device, it should show that the C wire has been successfully connected.
With the C wire installed, your Nest thermostat should no longer display the ‘Delay’ notification because it will be receiving a constant flow of power from the HVAC system.
Use the Fan (G) Wire Instead of the C Wire
The G wire is the green wire that controls the fan. You can use it to trick your thermostat into thinking you have installed a C wire.
You will need to turn off the HVAC system and remove the front panel from your thermostat device, take out the G wire from the G terminal, and reconnect it to the C terminal.
You will need to return to your HVAC system terminals and do the same there. Then, turn the system on again and return to your Nest thermostat to complete the setup in the settings menu.
Note: If you opt for this solution, you will no longer be able to use your fan independently for heating or cooling your home.
How Do I Install a C Wire Adapter?
Installing a C wire adapter is a quick and easy process that doesn’t always require a professional electrician.
- Remove the front of your Nest Thermostat to reveal the wiring terminals.
- The adapter has two wires attached to it – connect one to the Power (RH) terminal and the other to the Common (C) terminal.
- You will then need to connect the adapter plug to the mains electricity by plugging it into a nearby wall socket.
Note: While the C wire is not usually required when installing a Nest thermostat, it’s usually a better option to install it to avoid any future problems. This is because the Nest thermostat relies on recharging its battery by consuming some of the power used to heat or cool your home. This may cause issues with your system and cause your thermostat to be on delay mode.