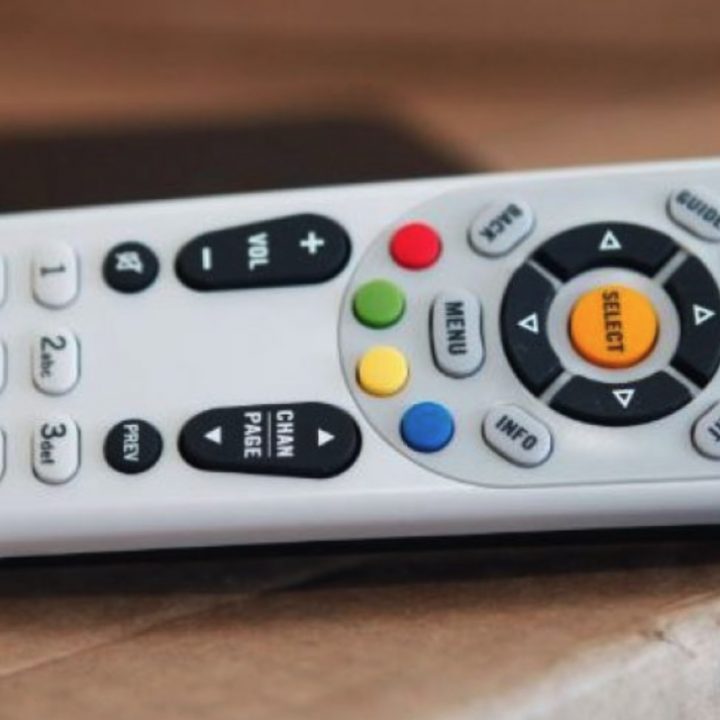
There are two kinds of DIRECTV remotes ― the Universal Remote and the Genie Remote.
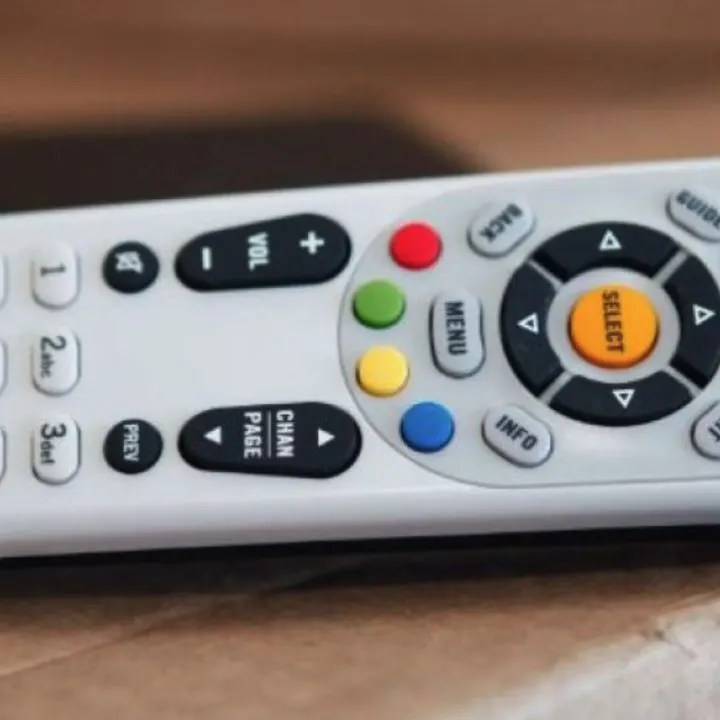
The DIRECTV Universal remote is easy to use and not only lets you control your TV set and the DIRECTV receiver but also DVD players and audio receivers. The Mode switch at the top of the remote allows you to control different devices.
When you select the DIRECTV icon, you control the DIRECTV receiver. To control other devices, like a soundbar or audio system, slide the switch to AV1 or AV2. Moving the switch all the way to the right to “TV” lets you power on or off the TV, change channels, and the volume levels.
The Genie Remote, on the other hand, does more than turn your TV and DIRECTV receiver on and off, change channels, and adjust the volume. You can get on-screen descriptions of the program you are on and detailed channel guides.
MENU brings you to the DIRECTV home screen, where you can browse programs, get recommendations, manage your recordings, access extra features, review system settings, and more.
If you are having issues with your DIRECTV remote or it has failed to work, first try to troubleshoot before you think of replacing it. Some problems with the DIRECTV remotes are not as complicated as they may appear and can easily be resolved.
Why Isn’t My DIRECTV Remote Working?
If your DIRECTV remote is not working, it could be due to several issues. The problem can be with the remote itself, your receiver, or the settings.
To troubleshoot, run your fingers across each button to make sure none are stuck in the pressed-down position. If a stuck button isn’t the issue, another thing to check is the batteries. The batteries could have run out of charge.
To test the batteries, press any button on your remote. If you see:
- A solid green light – the batteries are strong.
- A fast blinking green light means the batteries are okay but may need to be replaced soon.
- A slow, blinking green light or no light means your remote needs new batteries. Remove the battery cover and insert two new AA batteries.
If the DIRECTV remote volume controller is not responding when adjusting volume or the remote doesn’t seem to work when attempting to change channels, try these tips:
- Make sure you have a direct line of sight to the receiver.
- Next, make sure your remote is set to control your DIRECTV receiver:
- At the top of the remote, slide the mode switch all the way to the left to the DIRECTV symbol.
- If your remote controls your receiver but doesn’t work on other devices, change the input mode. Slide the mode switch to the input symbol (for example, TV, AV1, or AUX).
For a Genie
- Press and hold the “ENTER” button for three seconds.
- A source menu appears to change your TV’s input.
- Select the DIRECTV receiver’s input source. For example, HDMI 1, Satellite Receiver, could be the name of the input. Try different inputs to find the one set up for your TV.
If the above tips don’t fix the problem, you may need to program the remote.
Sometimes, if your DIRECTV remote is not working, you may need to pair your remote and reset your receiver to resolve the issue:
- Go to your receiver and press the Guide button on the front panel. If it works, continue with the steps below. If not, make sure it’s powered on and troubleshoot your receiver. Your remote may need to be paired with your receiver.
- The remote uses light to send the signal to the receiver. If anything blocks the receiver, it can affect the remote’s response.
- Make sure there are no objects blocking the path between the receiver’s sensor and the remote’s emitter. The sensor is on the front of the receiver, and the emitter is on top of the remote.
- Clean the receiver’s sensor and remote control emitter using a soft, lint-free cloth. Wipe the front panel of your receiver and the top of the remote.
- Turn down the brightness on the TV.
Try pairing your remote. Follow these instructions:
- Press “MENU” on the remote.
- Select “Settings,” then “Remote Control.”
- Select “IR/RF Setup.”
- If currently in RF mode, change to IR.
- Select “Continue.”
- Press the “Exit” button.
Your remote should now be paired, and you can change to IR or RF.
Try resetting the receiver.
- Most DIRECTV receivers have a red button inside the access card door or on the side of the receiver. Press the red button to restart it.
- If you cannot find the red button, unplug the power cord to the receiver from the electrical outlet. Wait 15 seconds, then plug it back in.
If, after the above efforts, your DIRECTV remote still isn’t working, then maybe you should consider ordering another remote control.
How Do I Reset My DIRECTV Remote Control?
Resetting your DIRECTV remote control can help fix the issue when it is not working. To reset your remote to its default factory settings, follow these steps below:
- Press and hold “MUTE” and “SELECT” together until the light flashes three times.
- Press 9, 8, 1, and “SELECT.” The remote flashes four times and should now reset.
How Do I Get My DIRECTV Remote to Work with My TV
To set up DirecTV rc73 remote to work with TV, first, find your five-digit remote code for your TV. Follow these instructions below:
- Turn on your Television and point the remote at the TV.
- Press the SELECT and MUTE buttons until the GREEN LED flashes three blinks on your DIRECTV remote.
- On your DIRECTV remote, input the remote code for your TV (GREEN LED will blink for each number that is pressed)
- On your DIRECTV remote, after entering the remote code, the GREEN LED will flash two times if it was successful.
NOTE: When entering remote codes, it may take numerous tries as the remote codes vary per TV model; repeat the process if the remote code was not correct.
How Do I Connect My DIRECTV Remote to My Box
Universal Remote
The Universal remote can control up to four devices. These include TVs, sound systems, game consoles, or DVD players. Slide the mode switch at the top of your remote to pick the device you want to control (DIRECTV, AV1, AV2, and TV). If you cannot adjust the TV’s volume, you need to program your TV before changing the TV’s input source.
To program your remote for an HD DVR or HD receiver, follow these steps:
- Press MENU on your remote.
- Go to Settings > Remote Control> Program Remote.
- Select the device (TV, audio, DVD) you wish to program. If you do not see your TV or device listed, use the code lookup tool to find the 5-digit code.
- Follow the on-screen prompts to complete programming.
To program your remote for a Standard DVR or SD receiver, follow these steps:
- Press MENU on your remote.
- Go to Parental Favs & Setup > System Setup > Remote or Remote Control > Program Remote.
- Select the device (TV, audio, DVD) you wish to program. If you do not see your TV or device listed, use the code lookup tool to find the 5-digit code.
- Follow the on-screen prompts to complete the programming.
Change your TV’s input source
- At the top of the remote, slide the mode switch to “TV.”
- Press and hold the MUTE and SELECT buttons at the same time. Stop when the green light at the top of your remote flashes twice.
- Enter 960 using the keypad on the remote control. The green light should flash twice again.
- At the top of the remote, slide the mode switch to the DIRECTV logo.
Genie Remote
To program Genie remote:
- Point the remote at your Genie HD DVR, Genie Mini, or Wireless Genie Mini.
- Press and hold the “MUTE” and “ENTER” buttons. Stop when the green light at the top of the remote blinks twice.
- When the TV screen displays “Applying IR/RF setup,” you are in RF mode and ready to program the remote.
- Power on the device you want to control.
- Press “MENU” on your remote.
- Select Settings> Remote Control> Program Remote
- Select the device you wish to control with the remote.
- Follow the on-screen prompts to complete programming.
Program remote manually for your HDTV or audio device
- Point the remote at your Genie HD DVR, Genie Mini, or Wireless Genie Mini.
- Press and hold the “MUTE” and “SELECT” buttons while continuing to point the remote at a Genie device. Stop when the green light at the top of the remote blinks twice.
- Use the buttons on your Genie remote to enter code 961.
- Press the “channel up” button once.
- Press “Enter.”
- Select OK when the TV screen displays “Your Remote is now set up for RF.”
- Power on the device you want the remote to control.
- Press “MENU” on your remote.
- Select Settings > Remote Control >Program Remote.
- Select the device you wish to control with the remote.
- Follow the on-screen prompts to complete programming. The directions vary for different devices.
Program remote for a DIRECTV Ready TV
- Point the remote at your Genie HD DVR, Genie Mini, or Wireless Genie Mini.
- Press and hold the “MUTE” and “ENTER” buttons while continuing to point the remote at a Genie device. Stop when the green light at the top of the remote blinks twice.
- When the TV screen displays “Applying IR/RF setup,” you are in RF mode and ready to program the remote.
- Power on your DIRECTV Ready TV.
- On your remote, press and hold the “MUTE” and “SELECT” buttons. Stop when the green light at the top blinks twice.
- Enter the appropriate manufacturer’s code. If you do not see your TV or device listed, use the code lookup tool to find the 5-digit code.
- For Samsung DIRECTV Ready TVs, enter 54000.
- For Sony DIRECTV Ready TVs, enter 54001.
- For Toshiba DIRECTV Ready TVs, enter 54002.
The Genie remote is now set up for your DIRECTV Ready TV.
NOTE: The DIRECTV remote powers on your TV and controls the volume while watching DIRECTV. To adjust TV settings or access third-party apps, use the remote control that came with your TV.
All DIRECTV Remote Codes: Comprehensive List
The following are DIRECTV remote codes for TVs:
- AOC: 11589, 12087, 11089, 11365, 11590, 12014, 12402, 12621, 13707
- Audiovox: 11564, 10451, 10180, 13410, 13065, 12513, 12413, 12121
- Coby: 13478, 13646, 13629, 13627, 13493, 13202, 12560, 12348, 12347
- Craig: 10180, 13423
- Daewoo: 10154, 10451, 11661, 10623, 10661, 10672, 13115
- Dynex: 12049, 11463, 12184
- Element: 11886, 12183, 12964, 13559
- Emerson: 11864, 11394, 11886, 10178, 10171, 10154, 10451
- Fujitsu: 10809, 10179, 10186, 10853
- Funai: 11394, 10171, 10180, 10179, 11271, 11904, 11913, 11963
- GE: 11447, 10178, 10047, 10051, 10451, 10765, 11347, 11547, 11917
- GoldStar: 10178
- GPX: 10179, 12617, 12784, 13402
- Haier: 11753, 11749, 11748, 11570, 12293, 12309, 12494, 12690, 13204, 13382
- Hisense: 10748, 11314, 11660, 12183, 13519
- Hitachi: 11643, 10145, 10679, 10797, 11484, 11576, 11904, 12207, 12756
- Hyundai: 11219, 13418
- Insignia: 12049, 11423, 11564, 10171, 10463, 12751, 12432
- LG: 11423, 12358, 12731, 12424, 12834, 10178, 10017, 11265, 10700, 12612, 12864, 13941
- Magnavox: 11867, 11454, 11455, 12597, 12372, 11755, 10054, 10171
- Memorex: 10178, 10154, 10463, 10150, 10179, 11570, 11665, 11670, 11892, 11903, 11911, 11924, 11927, 11938, 12739 Mitsubishi: 11250, 10093, 10178, 10150, 11797, 11917
- Orion: 10463, 11463, 10179, 11911, 11938, 13540
- Panasonic: 11480, 10250, 11291, 12264, 10650, 10051, 11271, 11924, 11927, 11941, 11946, 11947, 12240, 12654
- Philips: 11867, 11454, 11455, 11744, 12597, 12372, 11394, 10054
- RCA: 11447, 12434, 12746, 12932, 12187, 10093, 10047, 10051, 11661
- Samsung: 10702, 10650, 10178, 10060, 10178, 10766, 10814
- Sansui: 10171, 10463, 11463, 11409, 11670, 11892, 11904, 11911, 11935, 11938, 13540, 13564
- Sanyo: 11142, 10054, 10154, 10088, 11362
- Sceptre: 10878, 11217, 11360, 11599, 12337, 12506, 12528
- Seiki: 10178, 12964, 13559, 13560, 13953
- Sharp: 12360, 10818, 10093, 11393, 11917, 12402, 13867
- Supersonic: 11753, 12104, 12784, 13154, 13204, 13593, 13595, 13877, 13894
- Sylvania: 11864, 11394, 11886, 10054, 10171, 11271, 11314, 1 1595, 11665, 11913, 11931, 11944, 11963
- Symphonic: 11394, 10171, 10180, 11595, 11904, 11913, 11944
- TCL: 12434
- Toshiba: 11524, 11656, 10156, 11156, 11256, 11936, 12006
- Viewsonic: 12049, 10864, 11755, 11564, 12087, 13706, 12839
- VIZIO: 11758, 13758, 12757, 10864, 11756, 10885
- Westinghouse: 11712, 13470, 13579, 12397, 10451, 13949, 13908, 13382
- Zenith: 11423, 12358, 12731, 10178, 10047, 10017, 10463, 11265, 10145, 11661, 11365, 11904, 11911, 12612, 12742
How to Program DIRECTV Remote to TV without a Code
You can program your universal or Genie remote automatically. Below are instructions for programming DIRECTV remote automatically, without a code:
Universal Remote
- Make sure that your remote is a universal model. Remote model numbers RC-66, RC-65, RC-64, RC-32 (or RC-32RF), RC-24, and RC-23 are all universal remotes. These are usually grey, rectangular remotes.
- Turn on your TV. Press the TV’s “Power” button, or use the TV’s original remote to turn it on.
- If your DirecTV box is not connected to the TV or a power source, make sure that it is plugged in as well.
- Change your remote’s switch to the “TV” option. On most DirecTV remotes, you will find a switch near the top; push this switch over so that it sits next to the “TV” label.
- If you want to program your remote for a component other than your TV, change the switch to one of the “AV” positions instead.
- Press the MENU button. For most remotes, you will find this button near the top of the remote. You should see a menu pop up on your TV.
- Select Settings & Help. Use the arrows on the remote to highlight this option, then press SELECT in the middle of the remote to select it.
- If you use a standard definition (SD) receiver or DVR, you will select Parental Favorites & Setup here.
- Select Settings. It should be in the middle of the screen.
- For an SD receiver or DVR, select System Setup here.
- Select Remote Control to open the Remote Control menu.
- Select Remote or Remote Control for an SD receiver or DVR.
- Select Program Remote. This will open the programming menu, which should list each component (TV, audio, DVD, etc.) item that you have available for programming.
- Select an item. You will usually select the TV option here, but if you want to set up your TV’s audio component or a DVD player, select the appropriate option instead.
- Follow the on-screen instructions. These instructions will vary depending on your available components. Once you are done with the on-screen setup, your remote should be programmed for your TV or component.
Genie Remote
- Turn on your TV. Press the TV’s “Power” button, or use the TV’s original remote to turn it on.
- If your DirecTV box is not hooked up to the TV or a power source, make sure that it is plugged in as well.
- Point your Genie remote at its receiver. This receiver should be either the Genie HD DVR, the Genie Mini, or the Wireless Genie Mini.
- Press and hold the MUTE and ENTER buttons. MUTE is usually in the lower-left side of the Genie remote’s black section, while you will find ENTER in the bottom-right corner of the remote. Do not release these until prompted.
- Wait for two green flashes. The light at the top of the remote will blink twice, at which point you can release the buttons. Your TV will display the phrase “Applying IR/RF setup” at this point.
- Press the MENU button. This will open the on-screen menu.
- Select Settings & Help. Use the arrows on the remote to highlight this option, then press SELECT in the middle of the remote to select it.
- Select Settings to open the Settings menu.
- Select Remote Control to open your remote control’s menu.
- Select Program Remote. It is in the pop-up menu. You should see a menu with a list of the available components (TV, audio, DVD, etc.) that you have available for programming.
- Select an item. You will usually select the TV option here, but if you want to set up your TV’s audio component or a DVD player, select the appropriate option instead.
- Follow the on-screen instructions. These instructions will vary depending on your available components. Once you have finished the on-screen setup, your remote should be programmed for your TV or component.