Genie garage door openers are known for their convenience and simple-to-use intellicode remote controls. However, programming or reprogramming the remote or wireless keypad can prove challenging. If you are having trouble with your Genie garage door opener, here is an easy-to-follow troubleshooting guide, with steps to take you through some of the common issues with this device.
How to Program Genie Garage Door Opener
Before programming the opener, there are several important things to note:
- Check to make sure that there are no objects in the garage door opening.
- The door must be locked to the opener prior to programming.
- The door should rest somewhere between full open and closed. Do not start with the door fully open or closed.
The order of programming the opener’s functional settings and install any accessories should strictly be as follows:
- Down Travel Limit
- Up Travel Limit
- Force Control
- Contact Reverse test and adjustment
- Remote Control Programming (remote controls included with the opener come programmed from the factory)
- Accessory Programming
- Install Battery Backup
Programming DOWN Limit
Travel limit refers to a programmable setting to adjust how far the door travels up or down. Follow these steps to set the down limit:
- Press and hold the Down arrow button. Long LED will light blue.
- Release DOWN arrow button. Long LED will flash blue.
- Press and hold the DOWN arrow button until the door is fully closed. If the door closes too far, use the UP arrow button. Use both UP and Down buttons to adjust close travel as necessary.
- Press and release the SET/PRGM button. Both LEDs will flash blue then go out.
- The DOWN limit is now programmed.
Programming UP Limit
Follow these steps to set the up limit:
- Press and hold the UP arrow button. Long LED will light blue.
- Release UP arrow button. The round LED will flash blue.
- Press and hold the UP arrow button until the door is fully open. If the door opens too far use the DOWN arrow button. Adjust open travel as necessary using both UP and DOWN buttons.
- Then, press and release the SET/PRGM button. Both LEDs will flash blue then go out.
Programming Force Control
Force control refers to how much power is needed to open/close a particular door and doesn’t require programming. The force controls are set automatically when the wall control is used for the first time with a garage door opener. The door must complete one full cycle before the settings are automatically recorded.
- Press and release the wall control button and allow the garage door to travel and stop at the DOWN limit.
- Press and release the wall control button and allow the garage door to travel and stop at the UP limit.
How to Do a Contact Reverse Test
- With the garage door open, lay a 2 by 4 board flat on the floor at the center of the door opening.
- Close the garage door using the wall control.
- The door should stop and reverse direction within 2 seconds to the fully open position when it contacts the board.
- The long LED light on the powerhead will start to flash RED with the reversal of the door.
- Remove the 2 by 4 board and operate the opener with the wall control again. This cycle will clear the flashing red LEDs.
Programming Remote Controls
To program remote controls;
- Remove the battery’s protective film from the remote by pulling straight down.
- Press and hold the SET/PRGM button on the opener for 2 seconds. The round LED will turn blue. The long LED will then flash purple.
- Standing at least 5 feet away from the opener, slowly press and release the desired button on the remote two times. Both opener LEDs will flash and turn off confirming the remote has been programmed.
- The opener should now run when you press the desired button again.
- To program the same remote for other openers, repeat the above steps using one of the other remaining remote buttons.
Programming the Keypad
Step 1: Programming a PIN Number (Single Door)
Program the keypad for the first time with a PIN. The PIN must be 3 to 8 digits. Follow these steps:
- Make sure the number pad backlighting is off.
- Press 3-5-7 in sequence.
- Press PROGRAM key. LED will blink once per second.
- Enter a PIN number.
- Press PROGRAM key. LED will blink twice and shut off.
Step2: Programming the Keypad to One Opener
- Place the garage door opener into programming mode by pressing and holding the program button on the powerhead until the round LED turns blue, then release. The round LED will go out and the long LED will start flashing purple.
- Make sure pad backlighting is off.
- Enter the PIN number on the keypad.
- Press the UP/DOWN key 3 to 4 times slowly until the garage door opener operates.
Step 3: Operating the Keypad with the Opener
Single door operation:
- Ensure number pad backlighting is off.
- Enter the PIN number.
- Press the UP/DOWN key.
- The opener will operate.
How to Program Genie Garage Door Opener to a Car
Genie garage door openers are compatible with HomeLink and Car2U wireless control systems which you can program to activate your opener. Follow the steps below to program your garage door opener to a car using these systems:
Programming HomeLink System
Step 1: Clear HomeLink
- Press and hold down the first and third buttons until the indicator on the HomeLink blinks slow and then fast for 20 seconds then release both buttons.
Step 2: Train HomeLink to the Genie Remote
- Choose the button on the HomeLink that will be used to open the door.
- Hold down the Genie remote button. While holding, press and hold the chosen HomeLink button.
- Hold down both buttons until HomeLink indicator blinks slow then fast. Release both buttons once it blinks.
Step 3: Program HomeLink to the Genie Opener
- Place the opener into programming mode by pressing and holding the PROGRAM button on the opener until the round LED turns blue, then release the button. The round LED will go out and the long LED will start flashing purple.
- Press the chosen HomeLink button for 2 seconds and release. Press that same button again for 2 seconds and release. Long LED will flash blue and then turn off.
- Press the HomeLink button a few more times until the door moves.
Programming Car2U System
Step 1: Clear Car2U to default settings
- Press and hold buttons 1 and 3 for 20 seconds or until all three LEDs start to flash.
- Release both buttons. The Car2U system is now set to factory default settings.
Step2: Program Car2U to the Genie Opener
- Place the opener into programming mode by pressing and holding the PROGRAM button on the opener until the round LED turns blue, then release the button. The round LED will go out and the long LED will start flashing purple.
- Press the designated Genie Car2U button for 2 seconds and release. Press that same button again for two seconds and release. The long LED will flash blue and then turn off.
- Press the Car2U button a few more times until the door moves.
How to Reprogram a Genie Garage Door Opener
- Press and hold the SET/PRGM button on the opener for 2 seconds. The round LED will turn blue and then flash purple.
- Press and hold the UP and DOWN buttons simultaneously until both LEDs turn off. Both opener LEDs will flash and turn off indicating that all remotes have been erased.
- Standing at least 5 feet away from the opener, slowly press and release the desired button on the remote two times. Both opener LEDs will flash and turn off confirming the remote has been programmed.
- The opener should now run when you press the desired button again.
How to Connect a Genie Garage Door Opener to iPhone
You can connect the opener to iPhone using the Aladdin Connect System. It is a convenient mobile device app to operate up to 20 garage door openers from anywhere. To connect:
- Start by checking the Wi-Fi signal. If weak or no signal, move the Wi-Fi router closer to the garage or try installing a Wi-Fi range extender.
- Download the Aladdin Connect iOS app.
- Follow the app instructions to create an account, set up the opener, add users, and set rules and notifications.
- Place include the unintended operation warning placard next to the garage door openers wall button.
How to Erase Genie Garage Door Opener
Clearing memory of remotes from the powerhead will clear all programmed remotes, wireless keypads, and vehicle transmitters. Follow these steps to erase the Genie garage door opener:
- Press and hold the SET/PRGM button on the opener for 2 seconds. The round LED will turn blue and then flash purple.
- Press and hold the UP and DOWN buttons simultaneously until both LEDs turn off. Both opener LEDs will flash and turn off indicating that all remotes have been erased.
- The opener should not run when you press any remote button.
- Repeat the steps above using one of the other remaining remote buttons to deprogram the same remote for other garage door openers.
How to Reset Genie Garage Door Opener After Power Outage
To reset a Genie garage door opener after a power outage, follow these steps:
- Press and hold the SET/PRGM button for about 3 seconds. The round LED will light up. The Oblong LED adjacent to the round LED will then flash purple.
- Doing this puts your opener into programming mode, which allows you to reset the device.
- Find the “Learn code” button and LED indicator. Reset the opener by pressing and holding this button until the LED starts flashing.
- Choose one of the buttons on your remote and press it once and release. The oblong LED on the opener will light up as a solid purple and stop blinking.
- Press the same remote button 2 more times. Both LEDs will light up and then go out.
- Once both LEDs switch color and turn off, push the same button on your remote to close or open your garage door.
- The opener will be fully reset and synced with your new remote.
Where is the Learn Button on My Genie Garage Door Opener?
Depending on the model of garage door opener you own, “Learn Code” button is typically a small, black, unmarked button located behind the light lens at the powerhead and is near the antenna wire that protrudes from the powerhead.
Check this too: How Much Does it Cost to Install a New Garage Door Opener?
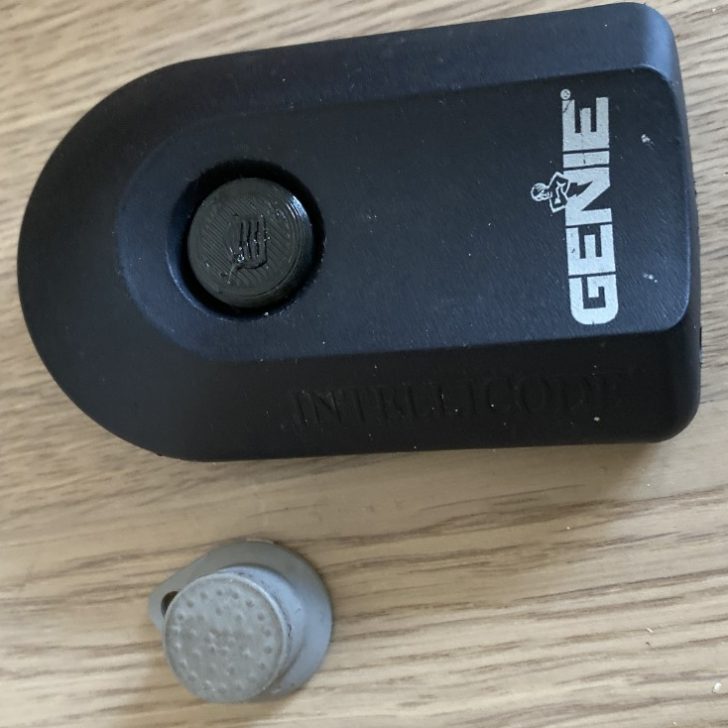
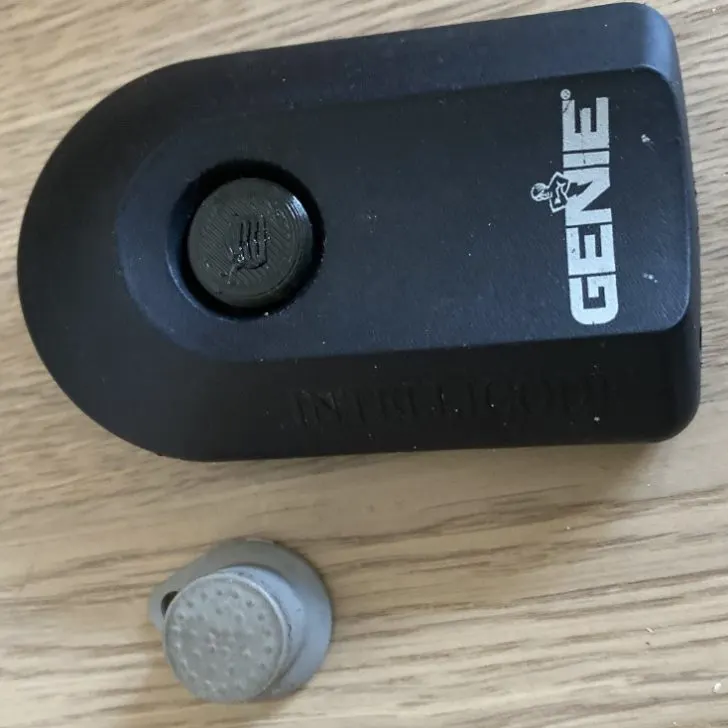
How to Change the Battery in a Genie Garage Door Opener Remote
Remote Battery Replacement (1-button)
Replace the remote battery with a CR2032 coin cell battery. Follow these steps to change the battery:
- Slide off the battery cover.
- Slide out the old battery and slide in the new one. Make sure the positive side (+) is UP.
- Slide the battery cover until it snaps into place.
Remote Battery Replacement (3-button)
Replace the remote battery with a CR2032 coin cell battery. Follow these steps to change the battery:
- Use a washer or coin that fits into the slot on the top of your remote to open remote case.
- Replace the battery, making sure the positive side (+) is UP.
- Align components and snap case closed.
How to Change Code on Genie Garage Door Opener
- Press and hold the Learn button until the indicator light stops blinking. This erases all intellicode remotes and wireless keypad entry.
- Gently press and release the Receiver Learn Code button on the powerhead.
- After pressing the Learn Code button once, press your transmitter button 3 times for your system to grab the frequency and code it in. Keep the transmitter you want tuned at least 2 feet away from the powerhead while tuning.
- Press the transmitter button once more to test the system and start your door moving.
How to Adjust Force Settings
Force settings are pre-programmed at the factory and applied during the open/closed limit settings steps. However, some conditions may require you to adjust the settings. Follow the steps below to adjust force settings.
- Press and hold both UP and DOWN arrow buttons until the round LED turns red, then release the buttons. LEDs will show the current force level as shown in the force setting chart shown in your manual.
- Press either the UP or DOWN arrow button until the desired UP force setting is shown.
- Press and release the PRGM button to lock the desired UP force setting. LEDs will now show the current DOWN force setting.
- Press either the UP or DOWN arrow button until the desired DOWN force setting is shown.
- Press and release the PRGM button to lock the desired DOWN force setting. Both LEDs will turn blue then go out confirming the force settings have been changed and are locked.
- The opener is now ready to operate and test.
- Operate door from the wall console two full cycles then perform safety contact reverse test.
Why is My Garage Door Opener Not Working?
If your garage door opener isn’t working, it could be that you are out of range. The antenna on the powerhead could be blocked from the signal or it’s damaged. You should make sure it is hanging from the powerhead. If the door opens with the wall switch, replacing the battery can solve the problem. Try reprogramming the remote if the problem persists.
Check this too: Keurig Troubleshooting and How to Guide