Thermostats are used to manage and control the use of energy to ensure efficiency, as well as adjust humidity and temperature levels, lock and unlock doors, switch lights on and off, and check your security cameras. Because of technology, you can easily monitor these functions from your phone or computer, regardless of your current location.
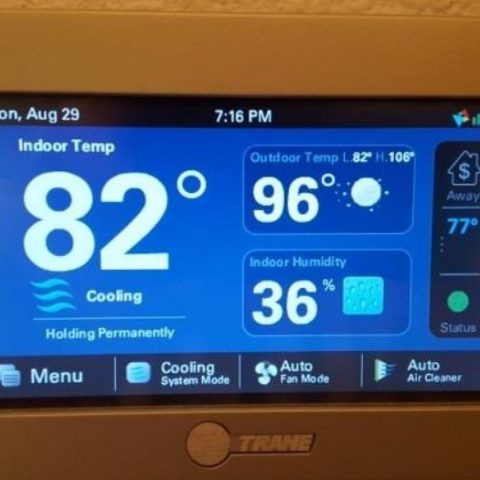
Trane thermostats are groundbreaking devices used to control your room temperature. They are superior to other brands because they have features that make them unique and better advanced. The thermostat controls in Trane are high-tech, and they provide users with an easy-to-use and manage thermostat for temperature control of any room through a Wi-Fi connection.
With your smartphone, you can increase or decrease your room temperature- how cool is that! Trane has both programmable and non-programmable thermostats available in various models that accurately control the temperature of your room. These thermostats are efficient in their operations, operate as expected, are durable and reliable, and are ideal for creating the perfect home environment.
Installing a Trane Thermostat
Step 1: choosing a thermostat
Trane thermostats come in various models, depending on their use. It can be a single cooling or heating unit, like an air-con or furnace, an electric heating system that has an air-con, or a dual system that incorporates electric elements and has a gas backup.
Depending on your needs or budget, the first step is choosing an ideal thermostat for your home. If you have a family that’s constantly at home, you can choose a manual system. But if there are regular periods when no one is at home, a programmable thermostat is ideal for saving energy costs.
Step 2: connecting your thermostat
You need to connect your thermostat wires. This is a simple task, especially if you are changing out another Trane thermostat. You need to mark the wires and then replace them with the new ones, ensuring you place them where you have marked and removed the previous thermostat.
But if you are installing from scratch, you need to follow the wires’ colour code. Ensure you correctly match the colours. The red is the power wire from the transformer and connects to the transformer’s R terminal. Yellow is connected to the cooling contactor coil and its other end to the thermostat’s Y terminal. Then, connect the white wire to the relay for the gas valve or electric heat. Connect the green wire to the fan relay and the thermostat’s G terminal. Programmable thermostats often require a common wire, usually the black wire. Connect it to the common side of the transformer’s secondary winding and on the thermostat’s C terminal.
Step 3: further connection
Connect the wires as above, but this time, connect the orange wire to the reversing valve. This connection energizes the valve and puts the heat pump in the primary heat source. Connect the white wire to the heat relay to enable the production of emergency heat, which comes on automatically when needed. The thermostat has a switch for this emergency heat you can use when the heat pump fails.
Step 4: testing
Testing allows you to feel how the thermostat works and let you know whether you have connected the wires correctly. Turn on the breaker and test your unit and ensure you test both heating and cooling functions.
However, you need basic electrical knowledge to install a thermostat on your own success and a general understanding of the equipment.
How to use a Trane thermostat
Programming
Trane thermostats allow you to schedule a program to control better the temperature of your room as you desire. You need to program a newly installed thermostat. You can contact a local Trane service provider to program the thermostat for you, or you can do it.
First, you need to identify the control pad on your thermostat to find various control functions. You can then manually set your desired temperature level for the different times of the day according to what you feel is convenient.
Manual control
Select system mode
Select system mode by pressing and holding the system mode button. The system mode allows you to choose between cooling, heating and auto. Auto means that the thermostat will operate your system according to the input temperature.
Temperature settings
Identify the up and down buttons. Push either button until you reach the desired temperature value. Your thermostat will then work toward reaching this set point.
Temperature override
If at any time you feel the need to override the manual temperature on your thermostat, you can do this by pressing the hold button. This action allows you to override any settings programmed before and lets you manually set a new temperature value. Also, remember that programming a schedule can significantly reduce your energy costs in the long run.
Programmed control
Schedule setup
Begin by pressing the set clock/day/schedule button on your thermostat. To program, use the up and down keys to toggle to the desired schedule option. Set up both weekday and weekend schedules.
Weekday schedule
Wake up time and temperature
Depending on the time you wake up during weekdays, you can set your schedule using the up and down keys to select the ideal wake time and wake temperature.
Additional settings configuration
When the ideal wake time and temperature are set, press the next button, where you will set the leave time and temperature. This setting allows you to set the ideal room temperature for when you leave the house.
You can then set return time and temperature for when you return to the house later in the day, as well as sleep settings. After you have set up each mode, press the ‘next’ button. Set up your weekend schedule, and then press the ‘done’ button upon completing the setup of all the modes to exit. In the future, the thermostat will automatically control your HVAC (Heating, ventilation, and air conditioning) unit according to the set schedules and temperatures. To override these settings, you can press ‘hold’ to clear the set schedules.
How to troubleshoot a Trane thermostat
No cooling
Causes
- A tripped circuit breaker
Solution: reset your circuit breaker
- Thermostat control set incorrectly or may be off
Solution: Check your thermostat and ensure control is on and set to cool. You can reset the thermostat to your desired temperature levels.
- Your outdoor unit may not be running while the indoor unit runs
Solution: any air that comes through the vent is warm. Check your thermostat for temperature changes. If there are no changes, turn off your thermostat for a few hours and then turn it on to see if it will reset itself. Alternatively, you can contact your local Trane dealer.
No Heating
Causes
- Gas may be turned off
Solution: check the gas valve at the gas metre, the shutoff valve at your furnace, and check other shutoff valves. You can contact your gas company to turn on the valve or seek the help of your local Trane dealer.
- Your system may be turned off or unplugged
Solution: check the heating unit and thermostat and ensure they are plugged in according to your user guide, or contact a local dealer for help.
- Your thermostat may be set incorrectly or is off
Solution: check whether your thermostat is on and is set to heat. You can reset your thermostat to your desired temperature level.
- A tripped circuit breaker
Solution: reset your circuit breaker.
No airflow
Causes
- Dirty filters
Solution: Check your system’s components’ filters and clean or replace them according to your user guide. If after cleaning or replacing them the problem persists, contact your local dealer
- Frozen system because of a dirty coil
Solution: check for water below your unit or a cold surface around your indoor coil enclosure. Turn off your thermostat for a few hours to see if it defrosts. Also, you can seek help from a local Trane dealer.
Skyrocketing utility bill
Your system may not be working correctly, or temperatures in your locale have been extreme.
Solution: Check whether your system is working correctly to reach its set point. Engage the services of a local Trane dealer to run a diagnosis on your system. Also, check if your system cycling is constant and whether the thermostat reaches its set value. Also, check whether there is an addition of home appliances that use a lot of power or whether your utility company’s rates have increased.
System constantly running
Your system may be trying to get to its set value that is quite extreme.
Solution: check whether the set points of your thermostat are very low or very high, and then reset the thermostat.
Overflowing drain pan
The pan may overflow because of the overflow switch malfunction.
Solution: turn off the system and seek help from a local Trane dealer.
Malfunctioning system
Your system may malfunction because of the issues mentioned above.
Solution: identify which issue is causing the malfunction and solve it as advised. If these solutions fail to solve the problem, turn off the system and contact a local dealer.
How to reset a Trane thermostat
If your room temperature is not cooling or heating up as you desire, you may need to reset your thermostat. However, if the thermostat is malfunctioning, you cannot feel any temperature changes, even if you reset the thermostat. Although Trane thermostats are built to be reliable and durable, they can break down. Whenever you experience a problem with your unit, resetting your thermostat should be the first thing you do. Here is how to:
- Turn off your unit. Find the unit’s shutoff and ensure the thermostat is turned towards the ‘off’ point.
- Identify the circuit breaker box and the unit’s control. Check the basement or closets to locate the box. You will find that the box is labelled with the various control items. Find the circuit breaker for your unit and turn it to the ‘off’ position. Wait for a few seconds, then turn it to the ‘on’ position to reset the breaker.
- Turn on the thermostat. After resetting the thermostat on your unit, you need to turn it on, set the temperature as desired and temperature changes in temperature. Resetting your thermostat may help solve any air conditioning problems, but if they persist, you can contact a local Trane dealer for help.
How to change the battery on a Trane thermostat
It is important to note that not all thermostats have batteries. Most of them are electric. But if yours uses batteries, remove the front cover of the thermostat from the wall plate and in the battery slots you see at the back of the thermostat, change the batteries. The new batteries should power up your thermostat. It is advisable to change your batteries annually.
How to turn off schedule on a Trane thermostat
You can easily turn off a programmed schedule by pressing the ‘hold’ button next to the directional buttons.
How to lock a Trane thermostat
Press the ‘menu button on your thermostat. Press and hold the padlock icon for a few seconds. This unlocks to a half lock. To reach a full lock, press the same icon again and hold it down for a few seconds.
How to turn off the fan on a Trane thermostat
Press the ‘menu button and select the fan icon. Choose the period you want the fan to run, and press ‘confirm’. Next, choose ‘start’ to run the fan or ‘cancel’ to cancel the action. When you press ‘start’, the fan runs and then turns off automatically after the set period. You can also turn off the fan by pressing the ‘stop’ button on the fan menu.
How to unlock a Trane thermostat screen
On your thermostat, identify the (+) and (-) buttons. Place one finger on the (+) and another finger on the (-) button and press them simultaneously. Hold the controls for a few seconds before releasing. The thermostat screen should by now be unlocked.
How do I get a Trane thermostat off hold
You can get your thermostat off hold by pressing the ‘cancel’ button and then pressing the ‘hold’ button to adjust the temperature permanently. This action overrides any programmed schedules on your thermostat, allowing you to adjust the temperature as you desire manually.
Trane thermostat touchscreen not working
A touchscreen thermostat requires battery power to operate. If your touchscreen isn’t working, it may be time to change your thermostat’s batteries. If the batteries cause the problem, the screen alerts you of the low battery before going off. If you missed the alert, you could still check your thermostat’s batteries before contacting a technician. It is advisable to change thermostat batteries annually to cut on any unwanted costs from visits from technicians. If after changing the batteries the problem persists, consider contacting a technician for help.
You may also reset your touchscreen thermostat. Restart the system by turning it off and then back on. You can also do a factory reset which gives you the option to reset all functions previously programmed in your thermostat. Resetting your thermostat may get your touchscreen to work.
A defective thermostat may also cause your touchscreen not to work. Before concluding that your device is defective, change its batteries, do a factory reset and also check if the wiring is done correctly. Also, ensure the filters in your unit are working correctly and are clean. Also, clean your thermostat to fix any malfunction. If neither of these options works, it is possible that your device is defective and will need replacing. Before replacing, ensure you seek help from a technician.
Trane thermostat says waiting
It is normal for your thermostat to display the waiting message. The message means that your thermostat is waiting for the unit to get activated. Waiting can take around five minutes, and it gives the compressor time to kick on. It occurs to avoid short-cycling, which can cause damage to the compressor. If your thermostat is running correctly, the message should automatically disappear after a few minutes and resume regular operation.
Troubleshooting Trane thermostats
Troubleshooting Trane xl824 thermostat
After purchasing your thermostat, you need to set it up. You will need the following before setting up:
- A valid email address
- Internet connection with high speed
- Wi-Fi network login
Connect your thermostat and power it with new batteries. Turn it on by pressing the ‘on’ button.
Then go to the setup wizard, which will allow you to connect your thermostat to Nexia Home Intelligence.
To access the setup wizard, go to the menu, click on Settings, then select the user setup wizard. It is important to note that the setup cannot be cancelled after commencing the installation process. You will need to give it time to complete.
Screen settings
You can easily adjust your screen’s colour, screensaver, backlight, and brightness to your preference.
Schedule settings
Schedule settings will allow you to program your desired daily temperatures. Here, you can enable or disable XL824 scheduling. One-touch presets are available when scheduling is disabled, and guided scheduling is available when scheduling is enabled. Presets for heating and cooling the temperatures for home, away and sleep are selectable right from the Home Screen.
Wireless networks
The next step is to select your wireless network and enter your password. This action ensures you establish a connection with other gadgets in your home and gives you control over your home without requiring third parties.
If you can’t find your wireless network in the list shown, you can select Hidden Network and then manually enter the name of your network (SSID).
Trane xl824 thermostat screen calibration
The sensor calibration screen, like in other Trane models, is used to change the temperature and is adjustable by increasing or decreasing by seven degrees.
On your screen, go to the Sensor Calibration menu, where current temperature calibration is displayed. Then press + or – keys on the screen to adjust to your desired temperature.
Trane xl824 battery replacement
Dead batteries cause your thermostat to malfunction, and it is advisable to change batteries annually. The battery powers all the electrical actions of your thermostat. A blank thermostat could be a result of dead batteries.
Begin by turning off the power, then remove the security screw right at your thermostat’s bottom. Hold the control plate, i.e., the top and bottom of your device mounted on the wall and pull it gently off the wall. On the backside, you will notice the batteries. Remove each battery and replace it with a new one, keeping in mind the anode and cathode terminals for proper battery placement. Once you are done, return your thermostat to the wall and ensure you fit it as it was before. Then press the ‘configure’ button that’s at the back of the control head.
How to remove Trane xl824 thermostat cover
Trane thermostats consist of two parts of the wall, the wall plate and the control head. The control head is also called a cover and contains the battery compartment. To remove the control head, begin by turning the power off. Unscrew the security screw using a screwdriver and pull out the control head from the backplate and depress the clip under the control head.
Trane xl824 thermostat software update
Software updates are inevitable because the thermostat runs using the software. You can either update automatically or manually. Automatic updates can be done when your thermostat is connected to a Nexia Home Intelligence account. You will only require a reliable internet connection for the update.
The manual setup, on the other hand, will require a computer, reliable internet connection, a USB connector and a flash drive. Begin by accessing Trane.com/residential from your computer. When the page loads, select Thermostat & Controls and click your thermostat model. Then choose Download Latest Version Software and follow the prompts on the screen.
Trane xl824 blank screen fix
- A blank screen can be caused by dead batteries and can be resolved by replacing them with fresh batteries.
- A blown fuse is also another cause of the blank screen, which makes the flow of the electricity circuit incomplete. Your blown fuse will need replacing to restore your thermostat’s functionality.
- Low LCD brightness can make your screen look blank, especially if you are viewing from a distance. You can resolve this by adjusting the settings to ‘brighter’.
- Also, if your circuit breaker trips, you will experience a blank screen. A tripped float switch can also cause a blank screen and can be resolved by resetting your circuit breaker.
- Other issues that are caused by electrical problems may be because of poor wiring from installation. You can resolve this by checking the connection.
It is essential first to check whether the above reasons are the cause of a blank screen before you begin fixing it. However, if these solutions do not solve your blank screen issue, you can contact the manufacturer for help.
How to remove Trane xl824 thermostat from the wall
- First, turn the power off and switch the circuit breaker by removing the fuse
- Then remove the security screw at the thermostat’s bottom by turning it anticlockwise using a screwdriver.
- Pull out the control head from the backplate.
- Depress the clip under the control head
Trane xl824 emergency heat not working
There are a few reasons why the emergency heat may not be working.
- A tripped circuit breaker. It causes incomplete electric flow, and you can resolve this by resetting your circuit breaker and checking whether it is operational.
- Dirty filters. Resolve this by cleaning your filters as the user guide recommends.
- Incorrect thermostat calibration. You can resolve this by adjusting your thermostat calibration upwards
Trane xr724 thermostat troubleshooting
Trane xr724 display not coming on
This may be caused by the loss of 24VAC at the control between R and C terminals. You can resolve it by checking the wire connection between R and C terminals, checking 24VAC output on the transformer, and checking if there is a broken or shorted thermostat wire.
Trane xr724 thermostat Incorrect indoor temperature display
This may be caused by improper calibration. To resolve, ensure you allow one hour after a power cycle before calibrating.
The incorrect temperature display can also be caused by heat from the touchscreen being entrapped in the control’s body. You can resolve this by changing your controls location from any air sources competing with it or redirecting those air sources away from the control.
Trane xr724 thermostat incorrect humidity reading
This means that your indoor humidity sensor may need calibrating. Resolve this problem by calibrating the sensor.
Trane xr724 thermostat overshoots room temperature in cooling mode
Your thermostat may overshoot the room temperature beyond the desired point when in cooling mode. This problem is caused by setting the delta “off’ to a negative number, enabling the cooling overshoot option, a higher indoor RH than the target cooling RH, or not meeting the minimum compressor on time.
Check this too: Johnson Controls GLAS Thermostat How to & Troubleshooting Guide
These issues can be resolved by changing the delta ‘off’ from the negative number to 0 degrees, disabling the cooling overshoot option, raising the target cooling RH, and changing the control response settings from the installer settings in the Comfort Settings Menu, respectively.
Trane xr724 thermostat overshoots temperature in heating mode
Your thermostat may overshoot the room temperature beyond the desired point in the heating mode because the minimum compressor and indoor heat on time have not been met. You can resolve this by changing the control response settings from the installer’s settings in the Comfort Settings Menu.
Trane xr724 thermostat is not cooling
Your thermostat may not cool your room because of a few reasons.
- The system mode may not be set to ‘cool/auto’, or you have set its setpoint too high. You can resolve this by selecting the correct system mode and setting a lower set point.
- You may also have set your delta ‘on’ for cooling too high. Resolve this by changing the delta ‘on’ settings.
- Also, the minimum off-time delay is being enforced. You can resolve this by changing the control response settings from the installers settings in the Comfort Settings Menu.
- Also, it may be a sign that your cooling system requires service. Resolve this by checking your system and making the necessary repairs.
Trane xr724 thermostat not heating
- Your thermostat may not be heating your room as you desire because of a few reasons.
- The system mode has not been set to ‘heat/auto’, or you have set the setpoint too low. You can resolve this by selecting the correct system mode and increasing the setpoint.
- The delta ‘on’ for heating may be set too high. Resolve this by changing the delta ‘on’ setting for the heating mode.
- Your minimum off time delay may be enforced. To resolve this, change the control response settings from the installer settings in the comfort settings menu.
- Also, the heating system may be needing service. Resolve this by checking the system and making the necessary repairs.
Trane xr724 thermostat displaying heating/cooling, but no air is coming from the vents
Your fan delay time may not have expired, and so you need to wait a few minutes for the blower delay to end and check the vents.
Also, your system may not be operating correctly. You can check it and repair it accordingly
Trane xr724 thermostat fan runs all the time
Your fan mode may be set to ‘on’ or ‘circ’. Change this setting to ‘auto’.
Alternatively, the problem could be caused by your system not operating correctly. Check your system and repair as needed.
Trane xr724 thermostat fan set to ‘on’ but not running
This could be because you have enabled the smart continuous fan and the humidity indoors is higher than the cooling setpoint. Resolve this by disabling the smart fan and raise your cooling setpoint humidity.
A malfunctioning system can also cause this problem. Check your system and make the repairs needed.
Trane TZON1050 thermostat troubleshooting
Trane TZON1050 thermostat control displays an alert on the screen
This means that there is a major problem in the system that you are being alerted about. The solution to this problem is to visit the diagnostic screen on your thermostat’s control for information on the problem description and its possible cause.
Trane TZON1050 thermostat displays ‘-’ symbol on the home screen under indoor temperature readout
This issue occurs when the indoor heat and the compressor heat are being called simultaneously. There is no action required for this as the symbol is only for informational purposes.
All the other Trane TZON1050 thermostat issues can be addressed as in the Trane xr724 thermostat model.
Trane Nexia thermostat troubleshooting
Most Nexia thermostats are digital and normally function without trouble. However, a faulty thermostat will affect the heating and cooling system of your home.
My digital thermostat won’t turn on my HVAC unit
If your thermostat is not turning on your unit, it may not be appropriately set. You can check to see whether it is properly programmed to heat or cool your room according to the season and make adjustments if needed. You can also reset your thermostat by turning it off and then back on.
My digital thermostat won’t connect to the internet
If your thermostat does not connect to the internet, the problem could be your modem or wireless router. To resolve this issue, you can reset the wireless connection according to the user guide. If it still does not connect, reset your modem. If the problem persists, contact your internet service provider because the problem could be with your internet.
My digital thermostat won’t stay set to the desired temperature
You may have already set your desired temperature for your room, but your thermostat may not remain set to that setpoint. It is advisable to program your device within comfortable ranges for different times of the day. You can seek the help of a technician or consult your user manual to program your thermostat.
Nexia thermostat not cooling
This may be because of:
- A tripped circuit breaker. Resolve by resetting the circuit breaker.
- Incorrectly set thermostat controls. To resolve, turn off your thermostat and turn it on again. Then reset the desired temperature. Also, try to turn off your thermostat controls for a few hours and check if the system will reset itself. If the air getting in through the vents is still warm, contact a technician.
Nexia thermostat not heating
This may be caused by:
- Your gas might be off if yours is a gas furnace. Resolve by checking the shutoff valve coming to the furnace from the gas supply piping.
- A tripped circuit breaker. Resolve this by resetting it.
- Incorrectly set controls. This can be resolved by turning your thermostat off and on again and resetting your desired temperature.
Higher utility bills than normal
- This may be because you have set your thermostat’s temperature extremely high or low compared to the outside temperature. This causes your system to overwork as it tries to reach the target temperature, which results in increased energy consumption, causing high utility bills. You can, however, resolve this by adjusting your thermostat to a reasonable setpoint.
- Your utility company may have increased their rates. Contact them to find out if there are changes in their rates, and also compare the rates on your current bills with previous ones.
No airflow in my house
This may be due to dirty filters in your thermostat. Clean them to resolve the problem, and also change them if necessary. You can consult a technician to determine how to change your filters and the type of filters you may need for your thermostat model.
A dirty coil may also cause airflow issues. You will need to consult a technician for help.
Nexia thermostat system running constantly
Your system could constantly be running because you have set the thermostat to too low during summer or too high during winter. Adjust these setpoints to resolve the problem. But if the problem persists, seek professional help.
Nexia thermostat drain pan is overflowing
The drain pan could be overflowing because it may not be moving moisture drainage pipes. This may be because the electric pump responsible for this function may be unplugged. Ensure to check it and plug it and see if you notice any blockage in the drainage line. For further help, you can consult a technician.
You can run a basic thermostat troubleshooting in five simple steps.
Preliminary testing
The first step is to ensure your thermostat is turned on and set to either heat or cool mode depending on your desired temperature level, and turn on the fan system as well. You can also reset the system by first turning it off, then press the reset button, and lastly turn it back on. You can find guidance on resetting your thermostat in your user guide
1.Thermostat sensor
To test if your thermostat sensor is faulty, you need to have an alternative option for measuring room temperature, like a basic thermometer. Leave your thermometer in the room to be tested for about an hour, then take the reading. Also, take the reading on your sensor and notice the difference between the two readings. Any difference is a sign that your system’s thermostat sensor is faulty.
Repairing your faulty thermostat sensor
Replacing or repairing your thermostat sensor is not a cost-effective option. The best solution for a faulty sensor is to replace the entire unit. Before doing this, ensure you seek help from a technician.
2. Calibrate your thermostat
For accuracy in calibrating your thermostat, you can seek the help of a technician. Different models have different specifications that make them function differently. It is essential to calibrate your thermostat according to room temperature. You can follow your user guide to ensure proper calibration. Some thermostats also have calibration instructions in the unit cover.
3. Thermostat wiring connection
By now, you have tested your sensor and have calibrated the unit. You now need to check the wiring connection of your thermostat. You should check for any broken wires, direct shorts, and corroded connections. Before checking, ensure you disable all incoming power sources because electrical wiring can cause serious damage or injury. After you disable the power sources, remove the unit from the wall to get a clear view of the wiring connection. Also, check if the wire nuts have been installed, and correct that accordingly before mounting your unit back to the wall. If you lack basic electrical knowledge, you may not understand the wiring connections, and you may not know if there is a problem with the connection. You should therefore seek the help of a technician.
4. Digital thermostat controls
With digital thermostats that are internet-specific, you can access your system remotely through gadgets like your computer or phone. To experience maximum performance for your internet-specific thermostat and to enjoy remote access, you should:
- Ensure that your wireless connection is active. Check your modem and routers, and computer to ensure they are functioning correctly.
- Reset your thermostat using the wireless connection by following the instructions in the user guide.
- If your internet has problems, contact your service provider for help.
- For any issues that affect your unit but not your wireless connection, contact your unit dealer for further assistance.
5. Replacing your thermostat
If you have done all the above tests alone and are convinced that your thermostat is faulty, you can consider doing a replacement. It takes a short time to install a new thermostat, but you should ensure you use the appropriate equipment to reduce installation issues. But if you do not feel confident enough to complete the replacement alone, contact a technician.
Trane XR402 thermostat troubleshooting
Trane Xr402 thermostat not heating
This may be caused by:
- the system mode may not be set to heat, resolve this by setting the system mode to heat and ensure you increase the setpoint above your room temperature.
- The minimum off-time is being enforced, but after a few minutes, the system should function properly. If it doesn’t, check your heating settings.
- You may have a loose system or control connection. You can resolve this issue by checking your system and making the necessary repairs or adjustments.
- Your heating service may be needing service, or your control needs replacement. Make the necessary replacements and repairs to resume full thermostat operation.
Trane xr402 thermostat is not cooling
This may be caused by:
- the system mode may not be set to cool. Resolve this by setting the system mode to cool and ensure you lower the setpoint below your room temperature.
- The minimum off-time is being enforced, but after a few minutes, the system should function properly. If it doesn’t, check your cooling settings.
- You may have a loose system or control connection. Resolve this issue by checking your system and making the necessary repairs or adjustments.
- Your cooling system may require service, or your control needs replacement. Make the necessary control replacements and repair your system to allow your thermostat to function correctly.
Trane xr402 thermostat displays ‘cool on’ or ‘heat on’ but neither cools nor heats
It is possible to have a ‘heat on’ or ‘cool on’ display but not experience any cool or warm air coming in through the registers. This issue may be because your system automatically turns on the fan after the furnace has warmed up to the target temperature. You can resolve this by waiting for a few minutes after the ‘heat on’ is displayed and then checking your registers.
Another reason why this can happen is that your heating or cooling system may not be operating. Check your system to ensure it is working as it should. If it’s not working, you will need to contact a technician.
Trane xr402 thermostat keypad control not responsive when pressed
You may experience this if the ‘keypad locked’ message is displayed on your thermostat screen. To unlock the keypad, press the up and down arrows until a ‘keypad unlocked’ message is displayed.
Keypad failure may also cause your control not to respond to presses. Resolve this by replacing the control.
Trane xr402 thermostat fan runs all the time
Shorted wires can cause this. You need to check your wires and make any adjustments or repairs.
Also, your fan mode may be set to ‘on’. Resolve by setting the fan mode to ‘auto’.
Trane xr402 thermostat fan not operating correctly in heat or cool mode
Your thermostat fan may not function properly because your heating or cooling equipment may not be working correctly. Make the necessary system repairs to deal with this issue.
Also, incorrect wiring can cause this fan issue. Resolve this by correcting the wiring.
Trane xr402 thermostat cooling cycle too fast or too slow
You may experience a cooling cycle that is too fast or too slow, accompanied by a narrow or wide temperature change. This may be caused by your control’s location and the size of your cooling system. You can resolve this by verifying the cycle rate adjustment as recommended in the user guide.
Trane xr402 thermostat heating cycle too fast or too slow
As with cooling, you may also experience a heating cycle that’s too fast or too slow with narrow or wide temperature changes. This problem arises because of the size of your heating system and the location of your control. To resolve, you need to verify the adjustment of the cycle rate according to your user guide.
Trane xr402 thermostat display not showing
A tripped circuit breaker or a blown fuse could be the problem. You can replace the fuse or reset the circuit breaker.
Also, your furnace may be switched off. You will need to check and switch it on.
Trane xr402 thermostat displaying incorrect indoor/outdoor temperature
This may be because of a lack of or improper calibration. Check your thermostat and calibrate your sensor, as shown in the user guide.
Trane xl624 thermostat troubleshooting
Trane xr624 thermostat troubleshooting is similar to that of trane xr724. You can refer to the troubleshooting guide above for trane xr724 to troubleshoot your xr624 model.
However, the trane xr624 thermostat has some other problems not included in the xr724 model troubleshooting.
Trane xr624 thermostat icon on climate tab remains grey and cannot be selected
This may be because the bridge is not able to communicate with 624 through Z-wave. To resolve, confirm that your bridge is not inside an enclosure and is not directly sitting on other electric equipment. Also, the distance between the bridge and 624 should not be more than 30”. If this distance is not possible to achieve, you can plug a Z-wave repeater into the bridge. You should then turn off all other wireless transmitters that are nearby. Then press the climate tab and wait for a few minutes for the 624 icon to turn blue.
Check this too: Dometic Thermostat How to & Troubleshooting Guide
Trane xr624 thermostat ‘remove operation’ button not working
This can be caused by the inability of 624 and the bridge to communicate through the Z-wave. Confirm that the bridge is positioned correctly and connected to an active internet connection and AC power. Also, ensure the Z-wave repeater is in its original position and is not unplugged and that there is no new wireless equipment added to your home.
Trane xr524 thermostat troubleshooting
This trane thermostat model troubleshooting is similar to that of the trane xr624 thermostat model. Refer to the guide on trane xr624 above.
Trane Comfortlink II XL850 wi troubleshooting
This model’s troubleshooting is similar to the Trane XL824 thermostat. Refer to the details in this guide on XL824 thermostat troubleshooting.
Conclusion
Trane thermostats undoubtedly provide the ideal home climate control, and the option to sync your thermostat with other gadgets in your home makes them suitable for any homeowner. As a homeowner, ensure you take proper care of your thermostat to experience its optimum performance.