
We all know that online data sharing is not secure, especially over a public network. And if you are working with sensitive information, data sharing can be a nightmare even over a secured network. This is where QuickConnect comes in.
With QuickConnect, you can easily connect to your Synology NAS over the Internet with ease. But what happens when you encounter connectivity issues?
Keep reading to learn how to remedy QuickConnect problems.
How do I access Synology QuickConnect?
You can connect to your Synology NAS via the Internet without the hassle of setting up port forwarding rules.
To enable QuickConnect;
- Go to Control Panel > QuickConnect > General.
- Check Enable QuickConnect.
- Enter your current Synology Account information or register a new account.
- Specify a new QuickConnect ID. Make sure it is easy to remember so that you can access your Synology NAS anytime.
- Click Apply.
Note: A custom QuickConnect ID can include letters, numbers, and hyphens (“-“)and must start with a letter.
How to enhance QuickConnect connectivity
Your Synology NAS offers advanced options to make the QuickConnect access more adaptable to different network environments.
- Go to Control Panel > QuickConnect > Advanced.
- Select the options below to suit your needs:
- Enable QuickConnect relay service: Your QuickConnect connection will be relayed via Synology Relay Server when direct QuickConnect access to the Synology NAS is not possible under the current network environment.
- Automatically create port forwarding rules: When your Synology NAS is under a UPnP-enabled router, the router will be informed to create port forwarding rules for QuickConnect.
- Click Apply.
Note: Relayed QuickConnect connection may be slow due to longer network latency.
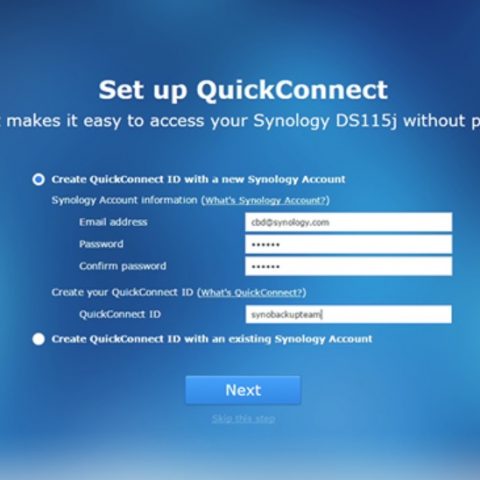
Synology QuickConnect setup
When the router is allowed to create port forwarding rules for QuickConnect, the Synology NAS may be exposed to security risks.
To enable/disable QuickConnect for specific applications/services:
- Go to Control Panel > QuickConnect > Advanced.
- Select the applications/services you want to enable QuickConnect.
- Click Apply.
Note: For better QuickConnect performance, it is recommended that you go to Control Panel > External Access > Router Configuration to configure port forwarding for each service:
- DSM: 5000 (HTTP); 5001 (HTTPS)
- Photo Station: 80 (HTTP); 443 (HTTPS)
- Cloud Station:6690
How to access your Synology NAS over the Internet and share files
- Go to Control Panel > QuickConnect.
- Check the Enable QuickConnect box.
- Proceed to Synology QuickConnect login
- If you do not have a Synology Account, register a Synology Account.
- Enter the required information and click OK.
- If you already have a Synology Account, enter your account information.
- Create your QuickConnect ID in the QuickConnect ID field.
- Then click Apply.
- Your QuickConnect link information will appear.
- Use these links to access your Synology NAS.
- If you do not see the QuickConnect DSM link, click Advanced and make sure DSM is enabled.
How to share files on your NAS using QuickConnect
- Enable HTTPS connection to share your files safely.
- Go to Control Panel > Network.
- Check the Enable HTTPS connection box and click Apply.
- Then enable file sharing for QuickConnect.
- Go to Control Panel > QuickConnect.
- Click on Advanced and make sure the box of File Sharing is checked.
- Open File Station and right-click the file or folder you want to share.
- Then click Share file links from the context menu.
- A file-sharing link will be generated.
- You can now share this link with family and friends to download the shared folder/file.
Note: When configuring advanced QuickConnect settings, log into DSM using the local IP address or domain name of your Synology NAS.
Why is QuickConnect not working?
The main reasons why you can’t connect to Synology include;
Poor internet connection
Ensure that your internet connection is stable and uninterrupted. For example, if you use Wi-Fi, please try switching to a cable – Ethernet – connection instead.
VPN interference
If you are using ProtonVPN for the first time, please ensure that it is properly installed and that you have granted permission to install the OpenVPN TAP adapter. For detailed instructions on installing ProtonVPN, please visit the following page.
Troubleshooting
If you see the Network error occurred message, the QuickConnect service has stopped due to network errors. Follow the steps below to troubleshoot potential causes and fix the issue;
- Your Synology NAS is connected to an active network (at Control Panel > Network > Network Interface).
- The DNS server and default gateway settings are properly configured (at Control Panel > Network > General).
- Ensure the Synology NAS can access the Internet using the following destination ports: 80, 443, 8888.
When the network errors are fixed, the QuickConnect service should resume automatically within a few minutes.
Is QuickConnect Synology Safe?
Yes. QuickConnect is SSL enabled. This means data transmission over the virtual network tunnel is secured with end-to-end encryption. As a result, QuickConnect guarantees confidentiality and integrity of data transmission between the Synology NAS and client devices.
Why is my Synology App not Connecting?
If your Synology app is not connecting, follow the steps below to troubleshoot and remedy the issue;
Go to Synology Service Status to check whether the status of QuickConnect is Operational. If not, it means that the service is undergoing maintenance. Please wait until it resumes normal operations.
Ensure your Synology device is properly connected to the Internet to rule out Internet connection problems. Then, you can connect another device (e.g., personal computer) to the same network ports and cables to test the Internet connectivity.
Sign in to Synology Account to check if the status of QuickConnect is normal. If you have a Synology device located in China, your QuickConnect ID must be registered with an authenticated China phone number under your Synology Account.
If the issue persists, continue with the following section.
Troubleshooting steps
For Synology NAS;
- Check if QuickConnect is enabled.
For DSM 6.2: Go to Control Panel > QuickConnect and ensure the Enable QuickConnect checkbox is ticked. Afterward, confirm the services you wish to access via QuickConnect are enabled at the Advanced tab.
For DSM 7.0: Go to Control Panel > External Access > QuickConnect and ensure the Enable QuickConnect checkbox is ticked. Afterward, click Advanced Settings to confirm the services you wish to access via QuickConnect are enabled.
- Obtain the IP address via DHCP.
Go to Control Panel > Network > Network Interface > LAN > Edit > IPv4. Select Get network configuration automatically (DHCP).2
- Set the DNS server value.
Go to Control Panel > Network > General. Tick the Manually configure DNS server checkbox, and set the DNS server value to “8.8.8.8” or “8.8.4.4”. If you are located in China, use “114.114.114.114” or “223.5.5.5” instead.
- Temporarily turn off the IPv6 setup.
Go to Control Panel > Network > Network Interface > LAN > Edit > IPv6. Set IPv6 setup as Off and click OK.
- Temporarily disable the firewall.
Go to Control Panel > Security > Firewall and untick the Enable firewall checkbox.
- Disable the MTU value configuration.3
Go to Control Panel > Network > Network Interface and double-click on a LAN. At IPv4, make sure the Set MTU value manually checkbox is unticked. Click OK.
- Synchronize the time with an NTP server.
Go to Control Panel > Regional Options > Time > Time Setting. Select another NTP server from the Server address drop-down menu, and click Update Now.
For Synology Router;
- Check if the Internet connection is normal.
Go to Network Center > Status and make sure the Internet connection status is Connected.
- Check if QuickConnect is enabled.
Go to Network Center > Internet > QuickConnect & DDNS. Ensure the Enable QuickConnect checkbox is ticked and confirm the services you would like to access via QuickConnect are enabled in Advanced.
- Set the DNS server value.
Go to Network Center > Internet > Connection and set the DNS server value to “8.8.8.8” or “8.8.4.4”. For example, if you are located in China, use “114.114.114.114” or “223.5.5.5” instead.
- Temporarily disable IPv6 (applicable for PPPoE connection only).
Go to Network Center > Internet > Connection. In the Primary Interface section, click Advanced options and select Disabled from the drop-down menu of the Enable IPv6 field.
- Set MTU and MRU values (applicable for PPPoE connection only).
Go to Network Center > Internet > Connection. In the Primary Interface section, click Advanced options and set both MTU and MRU values to 1492.
- Synchronize the time with an NTP server.
Go to Control Panel > System > Regional Options > Current Time. Select another NTP server from the Server address drop-down menu, and click Update Now.
Notes:
- If the issue is resolved after you set Get network configuration automatically (DHCP), the issue might be caused by the settings of the parent router.
- To select the Use manual configuration option and keep the QuickConnect connection available, make sure the Synology NAS is allowed to connect to the Internet in the settings of the parent router.
- Certain models do not support modifying the MTU value. If the MTU value checkbox is not displayed, please skip this step.
- Install the latest DSM or SRM version to prevent your data from being compromised by security issues.