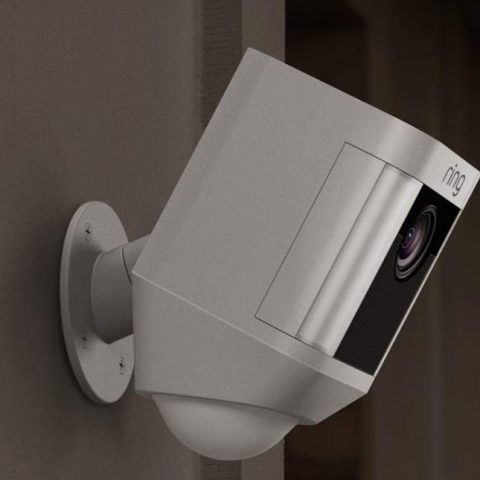
The Ring Spotlight is one of the most interactive security cameras on the market. It allows you to see, record, and interact with your guests. As well as detract intruders even when you are not home. However, like all other computerized inventions, it is bound to fail from time to time.
This troubleshooting and how-to guide will help you figure how to use your ring spotlight and fix any issues you may encounter when using it.
How to set up a Ring Spotlight camera
This step will enable you to access your camera directly from your phone or any other smart device. Follow these steps to set up your camera successfully.
Check this too: Lutron Dimmer Switch Troubleshooting & How-to Guide
Download the Ring App
Go to the App Store (for iOS devices) or the Play Store (for Android devices) and search for “Ring.” Then download and install the Ring app on your mobile device. Or download the App from the ring website by vising www.ring.com/app.
Create an Account or Log in to Your Account
Create an account if this is your first Ring product;
- Open the Ring app.
- Select “Create Account.”
- Follow the App’s instructions to create a new account.
If you already have another Ring device installed, simply open the Ring app and log in.
Set Up the Device
Click on “Set Up a Device,” then select “Security Cams.”
Scan the QR code or MAC ID barcode on your Ring device
The QR code or MAC ID is located on the back of your Spotlight Cam. Simply point the camera on your smartphone at the QR code or MAC ID barcode on your Spotlight Cam. The code is also printed on the product packaging. Or on the Quick Start Guide that comes with your device.
Stabilize your ozone, so the code is in the phone camera’s view at the top of the screen. A green square will appear once the QR code is picked. And a green line will appear once the MAC ID barcode is recognized.
The setup process will automatically proceed to the next step.
If you experience issues with the QR code or MAC ID barcode, select “Set Up Without Scanning” and select “Spotlight Cam Wired” to continue with the setup process.
Specify Your Location
The Ring device will request location activation if it is your first time setting up a Ring device. Allow the App to access your location, which will, in turn, help with inputting your exact address. You can also enter your address information into the App manually, then confirm it.
If you have used a ring device previously, select your location from the list of your locations. Remember, certain features of your Spotlight Cam will not work correctly without a specific location.
Name Your Device
Pick a name for your Spotlight Cam to distinguish it from other Ring devices on your account. You can choose one of the default names suggested or center your own by selecting “Custom…” at the bottom of the list. And key in the name you want.
Plugin Your Spotlight Cam
Then plug your Spotlight Cam into a power outlet near your Wi-Fi router. This will help to ensure an excellent connection to your Wi-Fi network.
Put your Spotlight Cam into Setup Mode
Press the button on the top of your Spotlight Cam. Keep pressing until the light on the bottom of your Spotlight Cam is blinking white. Click on “Continue” in your Ring app.
Connect to Your Ring Device
For iOS: click “Join” when the Ring app asks to join the Ring Wi-Fi network.
For Android: Your device should automatically connect to the Ring Wi-Fi network.
Follow the steps below if your device does not automatically connect to the Ring Wi-Fi network or if you chose to continue without scanning;
- Press the home button on your phone to leave the Ring app.
- Navigate to the Settings app, then tap Wi-Fi.
- On Android, you may need to navigate to Connection then Wi-Fi.
- Select the Ring Wi-Fi network from the list of available networks. The network will appear as either:
- Ring- followed by the last six digits of the MAC ID.
- Ring Setup followed by the last two digits of the MAC ID.
- Once connected, close your “Settings” app and return to the Ring app.
Connect Your Spotlight Cam to Your Wi-Fi
All you have to do is input the Wi-Fi password into the App after selecting your Wi-Fi network. And if you have multiple Wi-Fi networks, select the network closest to where you will be installing your Spotlight Cam.
Note: After connecting to your Wi-Fi network, your Spotlight Cam may update its internal software. the light on the bottom of your device will flash white while the software is updating. When the white light stops flashing, click “Continue” on the Ring app, and your Spotlight Cam is ready for use.
Test Your Device
Then configure your Spotlight Cam’s motion zones once it has completed the updating process. Then open Live View to test your camera.
Why is my Ring Spotlight Camera not working?
These are the main reasons the spotlight camera is not working;
- The Wi-Fi connection is weak or lost.
- The ring spotlight camera batteries are dead and require charging.
- The setup process was not successful, and you should redo the setup.
Do you need Wi-Fi for Right Spotlight Cam?
All ring devices are designed to use Wi-Fi, Ethernet connection, or a cellular connection. In case it loses its Wi-Fi connection, the camera will keep recording and automatically switch to the cellular backup system. or the Ethernet connection if it is setup.
How long does the battery last on the Ring Spotlight camera?
It depends on the camera and spotlight activity. It can range anywhere from six to twelve months. Fortunately, a ring spotlight can work with only one battery which means you can charge them interchangeably. The red and green lights on top of the battery will illuminate while charging, and the green light will light up once the battery is fully charged.
How to replace ring spotlight camera batteries
- Press the white button to open the battery compartment of your Ring Spotlight Cam.
- Remove the old battery and insert the new or charged batteries.
- Push the battery into the compartment until it clicks into place.
- Firmly close the battery compartment door.
- You may have to apply pressure to close the compartment door completely. Push until you hear a click which is an indication that the compartment is closed.
Can the ring spotlight be turned off?
Yes. You can manually control your Spotlight through the Lights On/Off control on the App.
Steps
- Open the Ring app.
- Click on the three lines on the top left of the Dashboard.
- Click on Devices.
- Click on the Spotlight Cam Battery that you want to adjust.
- Click on the Device Settings.
- Click on Light Settings.
- Then turn the lights off.
Ring spotlight Cam how to activate the Siren
First things first, ensure your App is updated before you proceed. This enables you to see the new device on your account.
Select Set Up a Device
Open the App and expand the side menu by tapping the three parallel lines on the screen’s upper left-hand side.
- Click on “Set Up a Device.”
- Click on “Security Devices.”
- Click on “Sirens.”
- Do not select the “Alarms” option.
- Click on “Dome Siren”
- Click on “Ready.”
Open the back cover of the Dome Siren
Then open the back cover of the Dome Siren by twisting the back cover into an unlock position. And open the cover of the Siren, then click on “Next” on the App.
Pull out the clear tab on the back of the Dome Siren
Remove the battery tab located at the end of one of the batteries. This will automatically turn on the Siren. Tap the “Add” button, and your Alarm Base Station should find the Siren automatically.
If the Siren does not pair successfully, try the pairing process again. Follow the in-app instructions. Additionally, do not remove the tab in the middle of the batteries. The correct tab says in tiny letters, “Remove before use.”
Rename your Dome Siren
Once the Siren is added to the system, click on the done button. Then go to the Device Configuration screen. And click on Done. Then change the Siren name by clicking on the Siren on the device profile screen and changing the name. Click save once done.
How to reset a ring spotlight camera
you should only reset your camera if it is not working. Or if you wish to sell it or give it away. This is because resetting the camera restores it to factory settings which will erase any customized settings.
Steps
- Press and hold the reset button atop the camera for at least 30 seconds.
- The status light located at the bottom of the camera will flash a few times, indicating the camera is restarting.
- Once the light stops flashing, the camera is now reset to default settings.
- Ensure the camera battery has a charge for it to reset or the camera is plugged in or powered.
How to install Ring solar panel for a Ring spotlight cam
Solar installation usually sounds intimidating, but in this case, it is easier than it seems. Ensure your Ring spotlight has a charge, is powered, or has batteries before beginning the solar panel installation.
Select your install location
Ensure your installation spot gets reliable Sun exposure every day. The Spotlight Cam Solar Panel can keep your Spotlight Cam Battery charged after a few hours of direct sunlight.
Line up your Spotlight Cam Solar Panel
Use the Solar Panel mounting arm and mark the screw holes on your chosen surface.
Drill Holes
Drill the holes where you marked the mounting holes. Use plastic anchors to secure the holes; if you plan to mount the solar panel on brick, concrete, or stucco. You can use screws if you are mounting the panel on wood or vinyl.
Put up the mounting arm
Then secure the mounting arm onto the wall with the provided screws. Ensure you mount it securely.
Put up the Solar Panel
Then slide the solar panel onto the mounting arm. Ensure it is securely in place. Then adjust the angle of the solar panel for optimal Sun coverage. You can do this by loosening the adjustment screw on the mounting arm and re-tightening the screw after setting your desired angle.
Pop-out the weatherproofing plug
You will need to remove the mounting plate on your ring spotlight cam first. Then pop out the weatherproofing plug and then replace it. Then press the button on the bottom to open the battery compartment and slide the mounting plate out of its slot.
Pop the rubber weatherproofing plug out of its hole and then slide the mounting plate back into its slot on the back of the Spotlight Cam until it clicks in place.
Plug the Solar Panel charging cable into the Spotlight Cam
Connect the panel to the Spotlight by routing the charging cable from your Solar Panel into the power connector on Spotlight Cam. Then remove the center plug and plug the snap ring barrel charging cable into the power connector port on the Ring Spotlight Cam.
Mount the Spotlight Cam
Finally, insert Ring Spotlight Cam into its mounting bracket, set it to the desired angle. Then tighten its adjustment screw.
Ring spotlight cam red light in the battery compartment
This means that the battery is low and requires charging.
What does the red light on the ring camera mean?
This means the camera microphone is muted.
Ring spotlight cam not connecting to Wi-Fi
This can happen for several reasons;
- Your Wi-Fi connection is down. Try rebooting your modem or router to fix it.
- You have input the wrong password. Try inputting the correct password.
- You cleared your phone’s caches and deleted the Wi-Fi password.
- Your Ring spotlight is too far from the Wi-Fi router. Try installing it closer to the router.
Ring spotlight cam live view not working.
You cannot see Live View or a recorded video because there is inadequate data transfer between your Ring device and the Ring app. Your Ring app will display a message if it cannot show you a Live View or display a video recording from your Ring spotlight cam.
These are the most common causes of not being able to do a Live View or see a recorded video;
- A poor connection between your mobile device and the internet
- Slow internet upload and download speeds
- A poor connection between your Ring device and your router.
Poor connection between your mobile device and the internet
Check the connection between your mobile device and the internet. If your phone is not connecting to Wi-Fi, switch to a Wi-Fi network via your device settings on your mobile device to strengthen your signal. Ensure your mobile device has a good Wi-Fi signal.
Slow internet upload and download speeds
To test your internet speed;
- Bring your mobile device to the area where your Ring device is installed.
- Open a Web browser on your mobile device and go to ring.com/speed.
- Click on the Start button in the center of the gauge to start the test.
After the test is done, look at the small table under the gauge. The green number in the first column is the download speed. The blue number in the second column is the upload speed.
Check this too: Blink Camera Troubleshooting and How to Guide
Ring devices function best when upload and download speeds are around 2 Mbps or more. If your speeds are much slower than that, move your router closer to your Ring device or get a faster internet connection.
Poor connection between your router and your Ring device
If your internet speeds are good and you still have an issue, check the signal’s strength between your router and the Ring device.
To check the strength of your Wi-Fi signal;
- Open your Ring app
- Tap on the three lines on the top left of the screen
- Select Devices
- Tap on the Ring device you would like to test
- Tap on the Device Health tile
- On the Device Health screen, look at your Signal Strength under the Network section.
If your signal is poor or very poor, this can be due to the distance between the router and the camera or signal interference caused by other devices (TVs, game systems, etc.) or barriers such as walls and doors.
Why is my ring spotlight Cam flashing?
- Red flashing – this means the Spotlight is not connected to Wi-Fi
- Blue flashing – the Wi-Fi connection signal is poor
- Green flashing – poor internet connectivity
- White flashing – software update or factory reset