
Primo water dispensers are among the best in the market. They come in various models, including top and bottom-loading types, and are designed with the home and office in mind. But, like all machines, you might encounter some problems with your system, so it is great to know Primo water dispenser troubleshooting techniques for your device. Here is a simple guide to help you resolve some of the common issues with these dispensers.
Why is my primo water dispenser not working?
If the water is room temperature, try the following tips to solve the problem:
- Check to ensure the main plug is properly plugged in and not having a short circuit.
- Make sure that hot and cold water buttons are not off and the power club is plugged in the socket at the back of your dispenser.
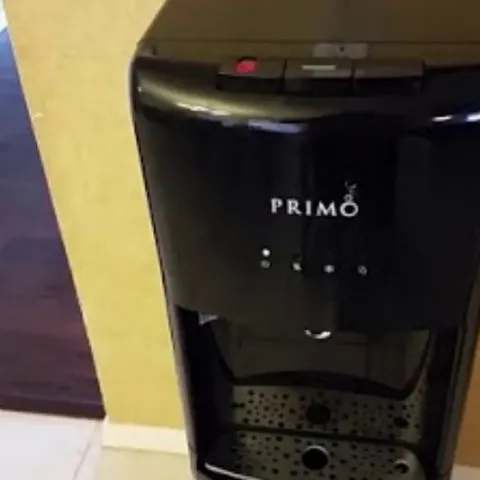
- Check that the hot/cold water light is turned on after reclogging. If it is not turned on, dispense a couple of glasses and wait for about 5-10 minutes for the LED indicator to turn on.
- Try resetting your dispenser by removing some liters of water from it and giving it 24 hours to settle down. Then plug it and turn the buttons on, wait for about 4 hours and try gain.
- If the problem persists, it may be due to faulty wiring. You may need to call in a professional to look into it.
Check this too: Kitchenaid Ice Maker Troubleshooting and How to Guide
If water is not coming out from both the taps on your Primo dispenser, it may be due to a faulty seal on a water bottle or an air-lock. To troubleshoot this problem:
- Check the water bottle before loading it. You can also remove the bottle and check the seal.
To remove the air-lock:
- Remove the air bottle.
- Empty the reservoir.
- Then place the bottle back.
- If everything is fine, you should hear water gurgling down the reservoir.
Why is my primo water dispenser red light blinking?
A blinking red light alerts you when your bottle is empty. Replace the bottle as soon as possible when you get this alert code. Follow the steps below to replace the bottle:
- Open your dispenser door and slide the empty bottle out of the cabinet.
- Remove probe assembly from empty bottle. Place probe assembly on probe hanger.
- Set the empty bottle aside.
- Place a fresh bottle outside of cabinet. Remove the entire plastic cap from the top of the bottle. Clean the outside of the new bottle with a cloth.
- Place the probe into the bottle. Slide collar down until it clicks in place. Push head down until the tube hits the bottom of the bottle.
- Slide the bottle into the cabinet and close the door.
How do you unclog a primo water dispenser?
Mineral deposits can clog your dispenser making it less effective or causing water to leak from the tap. To unclog the dispenser, you need the following items:
- Two tablespoons regular bleach or 2 cups of distilled white vinegar
- One empty 5-gallon bottle
- One 2-gallon bucket
- A Philips head screwdriver
To unclog your Primo water dispenser:
- Turn energy saving switches to OFF.
- Unplug power cord from the wall outlet.
- Remove water bottle.
- Move appliance away from wall to gain access to the back.
- Remove remaining water from reservoirs by dispensing from the hot and cold taps into a pitcher or bucket.
- Remove the cap from a spare empty 5 gallon bottle. Pour 2 tablespoon of bleach or 2 cups of vinegar and hot tap water (2 Gallons) into the empty bottle.
- Apply the cleaning bottle to the dispenser.
- Allow the cleaning solution to fill the reservoirs.
- Wait 10 minutes then drain the water from the reservoirs as described in step 5.
- Rinse the bottle and fill with only hot tap water and apply it to the dispenser.
- Place a 2-gallon bucket in the back of the appliance and remove the drain plug, while also flushing water through the taps (step 5).
- Replace the silicone plug and drain cap.
- Return the unit to its location, install a fresh water bottle, plug the power cord into the grounded wall outlet and turn the energy saving switch ON.
How to Set the Temperature on a Primo Water Dispenser
Adjusting the temperature of the cold water from a Primo dispenser is easy, and doesn’t need any tools. Follow these steps to set the temperature on your dispenser:
- Move your Primo water dispenser away from the wall. While doing this, be careful not to tip or spill the water bottle.
- On the back of the water dispenser, locate the flat, brass-colored screw. For colder water, turn the screw slightly clockwise. Turn it counterclockwise for warmer water.
- Then give it about an hour for the water temperature to stabilize.
- Check the water temperature. Continue adjusting the knob, as necessary, until it reaches your desired temperature.
- Slide your water dispenser back into its original position.
Can you use any water with a primo water dispenser?
You can use any water bottle. All primo water dispensers are designed to accept most standard 3-5 gallon plastic water bottles.
Does the primo dispenser filter water?
Primo dispensers don’t come with filters and thus don’t filter water at the unit. However, Primo’s pre-filled exchange water and Primo’s self-service refill water has gone through a purification process that includes carbon filtration, ultraviolet sterilization, and reverse osmosis. With no filter to replace, the dispenser is convenient and low maintenance.
Primo water dispenser troubleshooting hot water not working
It takes 15-20 minutes after setup to dispense hot water. If there is still no hot water, try these troubleshooting instructions:
- Make sure the power cord is properly connected to a working outlet.
- Make sure red switch on the back of the dispenser is ON.
- If the problem doesn’t resolve, turn all switches to the off position.
- Unplug the unit from the wall outlet.
- After a few minutes, plug the unit back on and give it one hour and recheck the water temperature.
How to clean a primo water dispenser
General Cleaning
For the best taste, performance, and hygiene; clean your cabinet, controls, bottle probe and spout each time you replace your water bottle. Use a clean, soft cloth and food grade sanitizer or bleach. Follow these general cleaning instructions:
- Clean cabinet surfaces with a soft cloth and warm soapy water, then rinse.
- Wipe dust from the back of the dispenser to improve efficiency.
- Remove drip tray assembly by pulling it forward. Remove cover. Place the tray and cover in a dishwasher or use a soft cloth and warm soapy water to wipe parts clean.
Cleaning Hot & Cold Reservoirs and Water Lines
Make sure you clean the dispenser to dissolve mineral deposits, sanitize, and deodorize it every 3-4 months or whenever an off-taste occurs. To do this, you will need the following items:
- Two tablespoon regular bleach or 2 cups of distilled white vinegar
- One empty 5-gallon bottle
- One 2-gallon bucket
- A Philips head screwdriver
Then follow these steps to clean your dispenser:
- Turn energy saving switches to OFF.
- Unplug the power cord from the wall outlet.
- Remove the water bottle.
- Move appliance away from the wall to gain access to the back.
- Remove remaining water from reservoirs by dispensing from the hot and cold taps into a pitcher or bucket.
- Remove the cap from a spare empty 5-gallon bottle. Pour 2 tablespoon of bleach or 2 cups of vinegar and hot tap water (2 Gallons) into the empty bottle.
- Apply the cleaning bottle to the dispenser.
- Allow the cleaning solution to fill the reservoirs.
- Wait 10 minutes then drain the water from the reservoirs as described in step 5.
- Rinse the bottle and fill with only hot tap water and apply it to the dispenser.
- Place a 2-gallon bucket in the back of the appliance and remove the drain plug, while also flushing water through the taps (step 5).
- Replace the silicone plug and drain cap.
- Return the unit to its location, install a freshwater bottle, plug the power cord into the grounded wall outlet, and turn the energy-saving switch ON.
How to Self Clean a Primo Water Dispenser
The International Bottled Water Association together with other water and sanitization organizations will ensure that the water you purchase is pure and clean. It is therefore important to be consistent with good sanitation techniques to ensure that we are getting clean water from the dispenser and prevent possible bacteria build-up. Cleaning and sanitizing your dispenser periodically or in the recommended frequency of cleaning once every 3 to 6 months can guarantee you and your family clean, germ-free drinking water.
Fortunately, cleaning and sanitizing your dispenser requires only a few minutes of your time, water, and either bleach or vinegar.
The following simple cleaning procedures will help clean most models of bottled water dispensers save for the self-cleaning models.
Before starting the cleaning, unplug your dispenser and assemble the required items that include; water, vinegar or bleach, a sponge, and a clean cloth.
Cleaning Using Bleach
- Empty the reservoir by draining all the water through the spigot.
- Prepare a bleach solution using two teaspoons of household bleach to a gallon of water.
- Use the bleach solution a sponge to wipe the top of the dispenser, the bottle collar, the spigot, the grill, the inside of the reservoir, and the drip tray surfaces.
- To sanitize the spigots internally, fill the reservoir with the beach solution then drain two cups through the spigots.
- Refill the reservoir with the bleach solution and let it sit for 10 – 15 minutes.
- Drain the solution and rinse the reservoir thoroughly with clean water.
- Remove the drip tray and scrub it in warm soapy water then rinse it off. You could clean the drip tray every other time as anything besides water such as coffee and tea can make the tray smelly on top of facilitating a bacterial build-up.
- Check for dust accumulation on the grill at the back of the dispenser. It is important to note that a dirty grill will not cool water properly.
- Place a fresh bottle of water on the dispenser then drain and discard about a cup of water through each spigot to make sure all traces of bleach are completely flushed out.
Cleaning With Vinegar
- Unplug the water cooler and remove the old, empty bottle.
- Drain the reservoir and prepare a vinegar solution by mixing one part vinegar and three parts water.
- Using the vinegar solution and a sponge or cloth, wipe the top of the dispenser, the bottle collar, the tap, and the inside of the reservoir.
- To sanitize the taps internally, fill the reservoir with the vinegar solution then drain two cups through the taps.
- Refill the reservoir with vinegar solution and let it sit for 10 – 15 minutes.
- Drain the solution and rinse the reservoir thoroughly with clean water.
- Remove the drip tray and scrub it in warm soapy water then rinse it off. You could clean the drip tray every other time as anything besides water such as coffee and tea can make the tray smelly on top of facilitating a bacterial build-up.
- Check for dust accumulation on the grill at the back of the dispenser. It is important to note that a dirty grill will not cool water properly.
- Place a fresh bottle of water on the dispenser then drain and discard about a cup of water through each spigot to remove all traces of vinegar
Cleaning a Self-Cleaning Water Dispenser
The self-cleaning technology breaks down bacteria and viruses in the water using unstable oxygen. This ensures that no harmful germs can grow in your water dispenser.
To activate the cleaning cycle turn on the Self-Cleaning Switch on the back left of your water dispenser and press IN, hold for 3 seconds, and release. An LED indicator on the dispenser lets you know the unit is in self–cleaning mode.
Primo water dispenser leaking
If your water dispenser is leaking, the bottle may have a leak that is too large for the Leak Guard feature (not on all models) to stop. To troubleshoot the problem:
- Remove the bottle, dispense one quart of water and install a new bottle. If there is still a leak, remove the bottle and contact Primo customer service for further assistance.
If water is leaking from the tap, there is a possibility of minerals buildup in your system. If this is the case, cleaning the minerals deposit should resolve the issue.
Check this too: Norcold Refrigerator Troubleshooting Guide
Primo water dispenser compressor not working
Primo water dispenser cooling problems
It takes up to one hour after setup to dispense cold water. If cold water is still not cold, try these other troubleshooting instructions:
- Make sure the power cord is properly connected to a working outlet.
- Make sure the back of the dispenser is at least 4 inches from a wall and there is free airflow on all 4 sides of the dispenser.
- Make sure the tank is not overfilled due to a bottle leak. Dispense water until bubbles appear in the bottle.
- Make sure the green switch on the back of the dispenser is ON.
If an issue is proving difficult to resolve, you should consider calling a professional for assistance. Also, you can get in touch with Primo customer service for additional issues or queries you may have regarding your unit.