
The rice cooker is one of your most convenient kitchen gadgets. Cooking rice without manning is a huge advantage when preparing your meals. When the rice cooker stops working, troubleshooting and fixing the issue becomes a priority.
Common Reasons Why Your Rice Cooker Is Not Heating Up
A broken heating element is the most common cause of a non-heating rice cooker. Followed by a damaged thermostat, circuit board, or power cord. However, the issue may be as simple as a blown fuse or dead power outlet in some cases.
Damaged Thermostat
The thermostat is the rice cookers’ thermal regulator. The thermostat is connected above the heating coil to sense and control the heat change effectively. It receives information about the internal temperature of the rice cooker and regulates it by either maintaining the temperature or changing it.

The thermostat induces change by feeding information to the circuit board, which then commands the heating element to change its heating intensity. If the thermostat is broken, your rice cooker may stay at the initial room temperature because of its inability to sense and regulate change.
Solution:
Test the thermostat and replace it if necessary.
How to test your rice cooker’s thermostat
- Unplug your rice cooker and let it cool down.
- Unscrew the screws holding the outer case in place and remove them.
- Open up your rice cooker and locate the thermostat.
- Then, test the thermostat for conductivity using a multimeter.
- Replace the thermostat if there is no conductivity.
Note: Do not attempt to replace the thermostat if you do not have any electrical knowledge. Electrocution may occur if you do not follow the right procedure. Additionally, you may end up damaging the rice cooker. It is best to hire a trained professional to do it.
Faulty Heating element
The heating element is the rice cooker’s heat source. It is located below the inner pot and acts like a stove. Once your thermostat receives information from the heating element, it adjusts the temperature based on the rice cooker setting selected.
This adjustment then signals the heating element to increase the temperature using a magnetic switch. If the heating element is faulty, it will not generate any heat.
Solution:
- Test the heating for conductivity and replace it if it is non-responsive.
How to test your rice cooker’s heating element
- Take a screwdriver and remove the screws from the bottom of your rice cooker.
- Then, pull off the bottom part after removing the screws.
- Test the heating element using a multimeter.
- Turn on the multimeter and set it to the lowest ohms setting (Ω).
- Loosen one of the heating element screws and detach the wire connected to it.
- Place one probe of the multimeter on the loosened screw and the other probe on the remaining screw attached to the face of the heating element.
- The multimeter should read between 10 and 30 ohms if the heating element works correctly.
- If you get a very low or zero reading, it indicates a faulty heating element that needs replacement.
How to replace a faulty heating element:
- Ensure the rice cooker is turned off before working on it.
- Disconnect the wire that’s connected to the heating coil.
- Remove the screw and separate the connection the coil has with the rice cooker.
- Turn your rice cooker back up, open the lid, and remove the pot.
- You should be able to pull the heating coil out.
- Replace with the new coil and reassemble the rice cooker.
Notes:
- For best results, follow your rice cooker’s user manual’s step-by-step guide when replacing your rice cooker’s heating coil.
- If you cannot follow the instructions, bring your electric rice cooker and show it to a certified electrician.
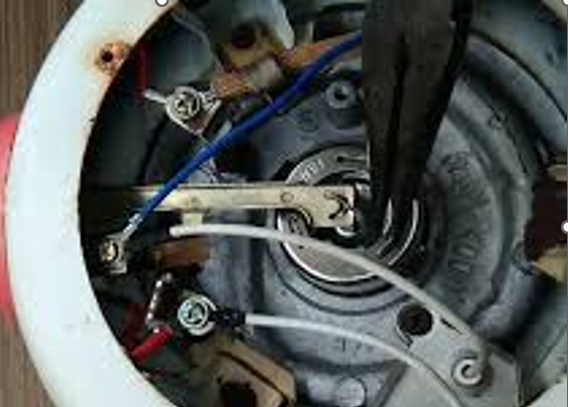
Faulty Wiring
All the electronic components of your rice cooker rely on wiring to circulate electricity current. If the rice cooker wiring is faulty, the different components, such as the thermostat and heating element, will not work.
Solution:
- Inspect the wires for damage.
- Test the wires for continuity and replace them if damaged.
How to test the wiring in your rice cooker
- Turn off the power outlet and unplug the rice cooker.
- Remove the rice cooker’s bottom part using a screwdriver.
- Inspect the internal wiring to see if any wires are loose or damaged.
- Then, use a multimeter to test continuity.
- Remove a single wire from its joint and connect your multimeter’s positive and negative pins to its ends.
- If no current flows through the wiring, it is damaged and should be replaced.
How to replace the wiring in your rice cooker
- Look for replacements for the damaged wires at your local hardware and ensure you replace them exactly as the originals were installed.
- Then reassemble the rice cooker and test to see if it works.
- If not, take it to a professional or try other troubleshooting steps.
Note: If you are new to electrical wiring, hire a certified electrician to replace the wiring.
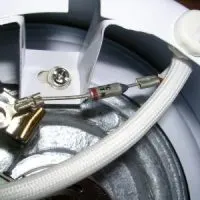
Blown Thermal Fuse
Fuses are designed to interrupt the flow of electricity when there’s an electric surge. This prevents the extra electricity from reaching your circuit board and frying it. A rice cooker usually has two fuses: an electric fuse and a thermal fuse.

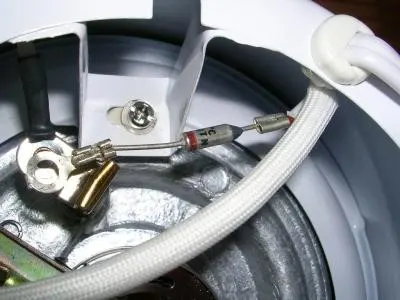
One protects your rice cooker from an electrical surge, while the other fuse protects your rice cooker from a thermal spike. If the thermal fuse is busted due to a prior thermal spike, it will prevent the rice cooker from heating up.
Solution:
- Disassemble your rice cooker and text the fuse for conductivity using a multimeter.
- If you don’t have a multimeter, visually inspect your fuse and look for signs of blackening or filament interruption.
- If it looks damaged, replace it with a similar model and make.
How to test and replace a rice cooker fuse
- Turn your rice cooker upside down and remove the bottom.
- The fuse should be near the AC cord before the circuitry.
- Detach the fuse from the base and remove the rubberized sheath to reveal the fuse.
- Do not use force when removing the fuse to avoid damaging the wires or sheath.
- Test the thermal fuse using a multimeter.
- If it is not working, replace it.
- Use a fuse with the same voltage, current, and temperature parameters as the damaged one.
- Then reconnect the thermal fuse to the power line and reinstall the sheath.
- Attach the fuse to the rice cooker as it was before.
Notes:
- Ensure the rice cooker is off and unplugged before you start working on it.
- Do not replace thermal fuse with thin wires
- Place back the insulator of the thermal fuse after
Bad Electric Outlet
Sometimes, you may think your appliance is dead, only to plug it elsewhere and find out it is still working. If the cord is working and the rice cooker is still not heating up, there is a possibility that your power cord is fine, but the power outlet is not.
Solution:
- Test your wall outlet.
- Unplug your appliance and plug it into a different wall outlet. If this works, then your outlet is to blame.
- You can also plug a different electronic device into the same outlet to see if it will work.
Damaged Power Cord
A damaged power cord can prevent your rice cooker from heating up due to power supply interruption. The cord could be damaged internally or externally, so do not assume it is okay if there are no signs of damage on its exterior.
Solution:
- Use a multimeter to test whether the cord functions as it should. If the cord is not carrying a current, it could be why your rice cooker fails to heat up.
- If the power cord is damaged, replace it with a similar model.
Note: Ensure the power cord is unplugged before testing it.
Malfunctioning On/Off Switch
The rice cooker switch is on the outside and looks like an on-and-off switch. It also has an internal component that sends commands to the control board. If the switch is faulty, the on/off command will be ignored by the control board. As a result, your rice cooker will not heat up.
Solution:
- Test the switch using a multimeter.
- If damaged, replace it with a similar make and model.
- Alternatively, take your rice cooker to a certified electrician to replace the switch.
- If it is still under warranty, you can replace it with an authorizer repair professional for free.
Malfunctioning Control board
The control board controls everything and tells your rice cooker to cook or keep your food warm. In advanced rice cookers, the control board is much more advanced and sends off different commands. A faulty control board will shut down the rice cooker and prevent it from heating up.
Solution:
- Take your rice cooker to a certified electrician to replace the control board.
- If it is still under warranty, you can replace it with an authorizer repair professional for free.
Damaged Circuit Board
A power surge may damage your rice cooker’s circuit board. This typically happens when the fuse in your rice cooker is damaged, and an energy spike reaches the circuit board. In this case, your rice cooker will not turn on at all. Unfortunately, depending on the extent of the damage, you may need to replace the whole rice cooker.
Solution:
- Take your rice cooker to a certified electrician to see if the rice cooker is salvageable.