
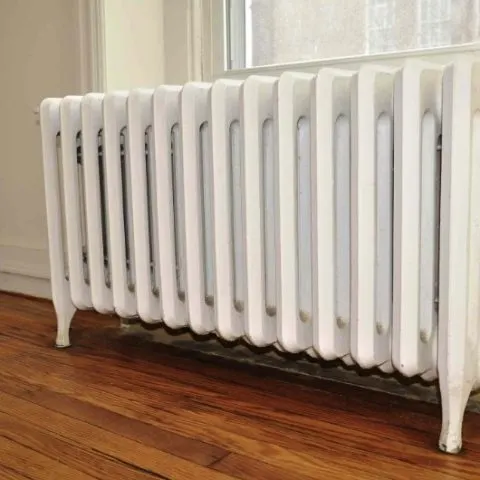
A steam heating system is an efficient and affordable way to heat your home come winter time. The process of heating up water to produce steam utilizes a system of checks and balances that cannot function without each other.
As such your steam radiator need to be fixed immediately to ensure that steam is coming out of radiator in house when needed.
What could be the cause of a steam radiator not heating completely?
Radiators provide heat by circulating steam or hot water, and they’re a feature of many home heating systems. If the radiator isn’t heating properly, some parts of the house will be cold, and heating energy is wasted.
Below are some reasons why the steam radiator is only half hot;
Clogged Air Vents
If your radiator isn’t getting hot, the problem might be a clogged air vent. This is a common issue for steam radiators with a one-pipe system, which are supposed to bleed air as steam fills the system and shut automatically when steam reaches the vent.
You might be able to clear a clogged air vent by boiling it in a water and vinegar solution, but in most cases, you’ll need to replace the air vent, says the Department of Energy.
Clogged Pipes
Clogs in the pipework can also prevent a radiator from heating up. Over time, the water inside the pipes and the radiators corrodes the metal, leaving sludge deposits inside the system. To fix the problem, you’ll need to chemically clean or flush the system to remove the deposits, says Fox and Co. Radiator Repairs.
Pump Defect
Locate the pump near or inside the boiler. If the pump is operating normally, it should be whirring and vibrating as the motor forces water through the pipes. If the pump isn’t working, it might be jammed. You might be able to fix the jam simply by tapping it lightly with a hammer or wrench.
Alternatively, you can turn off the power, remove the pump’s cover and remove the large screw in the center. There should be a second screw beneath it that you can turn to fix the jam, says Fox and Co. Radiator Repairs.
Potential Fixes
If you live in a home with a steam boiler system, it’s not unusual for some of the radiators to only heat part way or not at all. When certain radiators or parts of them start feeling cold, follow these steps to fix the problem.
Turn the valve.
At the base of each radiator should be a round valve. By turning this valve, you can control how much steam is allowed into the radiator. If your entire radiator is cold, there’s a good chance the valve was accidentally turned off.
Note that if the valve is partially open, the radiator may get warm, but never fully hot. Turn the valve counter-clockwise — all of the way — to open it. You will likely find that the radiator heats up the next time the heat kicks on.
Make sure the vent is not blocked.
Look for the little cylindrical apparatus that’s protruding from the radiator. Usually, this is found on the opposite side of the radiator from the main valve. It allows air to escape from the radiator as the steam flows in.
If it accidentally gets blocked or closed, the air will have no way out, and thus the steam won’t be able to fill the radiator. If only half of your radiator is getting hot, a blocked or closed vent is likely to blame. The steam that does enter pushes the air to one side, and that side never gets hot.
Some vents have a flat screw on the top. The screw can be tightened and loosened, and the air escapes from underneath it. If you have this sort of vent, just make sure the screw is loosened to the point that it’s about as loose as it can be without falling out completely.
Turn on your heat. If steam starts coming out of the valve, tighten it back up, a little at a time, until steam is no longer escaping.
Some vents have a little hole in them rather than a screw. This hole is about the size of pencil lead, and it can easily get clogged with dust and the like. If you have this type of vent, use a paperclip to clean it out. That should fix the problem!
Get the Help of a Professional Heating Engineer
If you’re still unsure as to what’s causing your radiators not to heat up, the best thing you can do is call a professional heating engineer.
If your valves are on and your vents are clear, yet your radiators are still not heating up, you will want to call an HVAC technician for boiler repair. There might be a problem with your boiler, or the pipes leading to your radiators might not be angled properly. These problems are best solved by professionals.
Can steam radiators get clogged?
Yes. Steam radiators attract dirt and debris when circulating air through the air vent. Over time the accumulated dirt and debris can clog the vents and valve if they are not cleaned regularly.
Why is only half my steam radiator hot?
If only half of your radiator is getting hot, a blocked or closed vent is likely to blame. The steam that does enter pushes the air to one side, and that side never gets hot. Some vents have a flat screw on the top. The screw can be tightened and loosened, and the air escapes from underneath it.
Check this too: Should You Turn Off Your Water Heater When on Vacation?
To unclog the steam radiator, heat a small pot of household white vinegar and submerge the air vent in the hot vinegar. Let it soak for about 30 minutes, allowing the vinegar to dissolve any mineral deposits and loosen any rust. Rinse the vent with cold water. Test for free airflow by blowing through the vent.
Is a hissing steam radiator dangerous?
A hissing steam radiator means the air vent is not closing at the right time and is failing to trap the steam inside the radiator. An air vent that’s spitting or leaking water may be partially obstructed with mineral deposits or other debris.
For either of these issues, try a good cleaning with vinegar. If that doesn’t solve the problem, replace the valve or vent.
Why is my Radiator Leaking?
Radiator leaks can come from a number of different places, you’ll need to determine where exactly the leak is coming from. You can do this by drying your radiator completely and then get some toilet roll that you’ll use to place over the radiator’s fixtures. Whichever part of the radiator drenches the toilet roll is the source of the radiator leak.
Leaking from the Radiator Body
If the radiator is leaking from the body, you might be wondering how to fix a leaking radiator in this situation. Unfortunately, since this type of leak is caused by corrosion, you’ll need to completely replace the radiator body. (Although, you could take this as a blessing that you finally have an excuse to buy that designer radiator you’ve had your eye on!)
To tide you over until you get your dream radiator, there’s also a temporary fix that you can take, though. If you have a feed and expansion tank, it’s possible to add a plastic resin sealant to stem the water flow. Take note, though, that this isn’t possible to do with a sealed central heating system.
Leaking Radiator Valve
If you discover that you have a leaking radiator valve, luckily this is often an easy problem to fix.
Radiator valve problems are usually caused by damage to the internal spindle packing. This leak only occurs when the valve is partly open and stops when the valve is closed.
To repair the radiator leak by yourself, just follow these simple instructions. If you’re not so handy with a toolbox, it shouldn’t be expensive to call out a plumber to help you with this straight-forward problem.
How To Fix a Leaking Radiator Valve:
- Drain the leaking valve below the leak
- Turn off the supply & lock shield valve
- Catch the water that escapes
- Undo the union nut
- Open the bleed valve to release water
- Wrap the valve tip in PTFE tape
- Re-tighten the union nut & open the bleed & lockshield valves
- Allow your radiator to fill up again
- Check there are no leaks & close the bleed valve
Leaking from the Radiator Spindle
If you’ve identified that the leak is coming from the spindle and not the valve itself, then you can start counting your lucky stars! Much like the valve, this is a simple problem to repair.
To fix a leaking radiator valve spindle, simply use your spanner to tighten the gland nut. This should, hopefully, stop it however, if not, undo the gland nut, wrap some PFTE tape down into the spindle and then tighten it back up again.
If your radiator’s still leaky, you might need to revaluate why the radiator is leaking and follow our steps to check where the leak is coming from. Chances are you’ve confused a spindle leak with a radiator valve leak but, luckily, we’ve already shown you how to fix this.
Leaking from the Radiator Gland
Did you follow our instructions on how to fix a leaking radiator valve but the problem’s still persisting? The most likely cause for this is that your radiator’s leaking from the gland- not the valve. The radiator gland is a tiny fixture that lives underneath the plastic lid of the valve.
How to fix a leaky radiator gland easily using PFTE tape:
- Turn on the valve and wait to see if any water leaks from under the plastic cap. If it does, you should also turn off the lockshield valve.
- After removing the plastic cap, carefully unscrew the gland nut
- Take a 20 cm long piece of PFTE tape and wrap it around the valve spindle
- Use a flat-headed screw driver to force the tape into the body of the valve
- Screw the gland nut back on before replacing the plastic cap and turning the valve back on
Leaking from the Radiator Pipe Joint
If you have a compression heating system, you’ll have a series of joints that connect the pipes to your radiator. When these joints get lose, leaks can happen. To fix a leaking pipe joint, simply use your spanner to tighten the joints up. If your radiator is still leaking water after being repaired, follow these steps:
- Drain your radiator to below the source of the leak
- Use a spanner to remove the nut from the leaking radiator pipe
- Take your PFTE tape and wrap it around where the face of the olive meets the joint.
- Re-tighten the nut using your spanner
Leak Sealer
Leak sealer is a great product which can allow you to seal small, internal and inaccessible leaks as well as weeping joints. This is the perfect solution for problematic leaks and can be used on all materials found in heating systems, including aluminium.
Leak sealer will work best in warm circulated water and can be effective within 24 hours depending on the severity of the leak.
Do you need to replace your radiator or radiator valves?
Unfortunately, sometimes you’ll find that you need to completely replace your radiator, or at least the valve. This would be the case if your radiator leak is coming from the body or the valve is faulty.
If you’re faced with the task of replacing a damaged radiator or radiator valve, you’ll need to predetermine which product is right for you.
How to replace a steam radiator valve
Tools needed:
- Phillips screwdriver
- Adjustable wrench
Steps:
- Close the valve at base of radiator.
- Turn off the room’s thermostat.
- Carefully unscrew the old air vent from side of radiator; if valve is hot, use thick cloth to protect your hand.
- Wrap Teflon tape around the threads of the new steam valve.
- Thread new steam valve into side of radiator; be sure valve points straight up.
- Remove handle from valve at base of radiator.
- Use adjustable wrench to unscrew packing nut from valve stem.
- Wrap graphite packing gasket around threaded valve stem.
- Replace nut and tighten with adjustable wrench.
- Open valve at base of radiator.
- Turn on the room’s thermostat.
How to Clean a Steam Radiator Air Vent
A steam vent is designed to allow air to escape from the steam piping or steam radiator during the heating phase (when steam is rising in the system), in order to allow steam to rise into the piping or into the radiator itself.
If the steam vent becomes debris clogged or otherwise is not working it cannot vent air properly. Results of a clogged steam radiator vent or mainline steam vent include loss of heat, diminished heat, cold steam radiators, or sometimes a steam vent that does not stop venting when it should, continuing to vent steam even after the radiator is hot.
Items Needed
- Open-end wrench
- Small pot
- Materials
- Plumber’s Pipe Seal Tape
- Household white vinegar
- New air vent (if needed)
Steps
Turn Off the Radiator
Turn off the steam to the radiator by closing the supply valve found on the end of the radiator opposite the air vent. If there is no valve, turn the thermostat to a low setting to ensure the system is not producing steam while you work.
Turn off the heating system and allow it to cool so that when you remove the steam vent you don’t send potentially dangerous scalding steam venting into the occupied building spaces.
Remove the steam vent from the radiator using a suitable wrench.
Remove the Air Vent
Using an open-end wrench, remove the air vent from the radiator by turning it in a counter-clockwise direction. Do not use a larger wrench than necessary and still if you cannot remove the steam vent with just modest turning force (counter-clockwise) STOP lest you break off the vent and have to leave your heating system shut down while waiting for your heating service technician to bail you out.
Clear the steam heat radiator vent
Clear the air hole in the top of the vent with a small wire or sewing needle. When people paint radiators, many of these air vents get painted over, plugging the air hole.
Clear the air hole in the top of the vent with a small wire or sewing needle. If you’re still worried about the air vents working, consult a hot water/steam heat specialist.
Clean the Vent
Heat a small pot of household white vinegar and submerge the clogged steam radiator air vent in the hot vinegar. Let it soak for about 30 minutes, allowing the vinegar to dissolve any mineral deposits and loosen any rust.
If there is visible white mineral scale on the vent that disappears or that will disappear when you agitate the vent in the vinegar you’ve probably soaked it long enough.
Rinse the steam vent thoroughly with cold water.
Test for free airflow by blowing through the vent. If you cannot blow through the air vent, then repeat the process again. If you still cannot blow through the vent, then it needs to be replaced with a new one.
If the steam vent is clear: you can blow through the steam vent and air comes out of the vent’s exit orifice freely then the vent is as clean as you’ll get it without disassembly.
If the steam vent is not clear: if you can’t get air to move freely through the steam vent try shaking it and rinsing it again. If you still can’t get air to move through the vent you can try soaking it longer and repeating the rinse and blow test above.
If you cannot clear the steam vent your options are to risk ruining it by disassembly (shown above) or just buy a new replacement steam vent of the same type and capacity.
Reinstall the Vent
Reinstall the cleaned vent (or new one) in the radiator by wrapping three loops of plumber’s pipe-seal tape around the threads in a clockwise direction, then screwing the vent into the radiator vent fitting until it is hand tight.
Wrap the threaded end of the vent with Teflon tape, taking care that the tape doesn’t block the steam entry port on its mounting end and screw it back into its tapped mounting opening on the steam radiator.
Tighten an additional one-quarter turn with a wrench. Adjust the head of the vent so the pointed end is facing upward.
Test the Vent
Reopen the steam supply valve on the radiator and test the operation of the vent. The vent should allow air to pass through as steam begins filling the radiator, but then should close to retain the steam as the system gets hot. As the system cools, the heat-sensitive vent should open again to allow air back into the system. If the vent does not close as the system heats up and open as the system cools, then the vent fitting needs to be replaced.
Note: ensure that you end up with the steam vent pointing “up” for proper steam vent operation
Turn the heating boiler back on and set the room thermostat to above room temperature so that the boiler operates and sends steam rising in the system.
Watch the steam vent for proper operation: as steam rises in the system the vent should release air in the piping or radiator. When the radiator (and the steam vent itself) become hot the steam vent should close. If the steam vent does not close – that is if it continues to vent steam, replace it.
How to Clean Cast Iron Steam Radiators
Items needed
- Vacuum
- Duster, optional
- Plastic drop cloth
- Water
- Mild detergent
- Microfiber cloths
- Sponge
- Soft-bristled brush, optional
Steam heating systems that use cast iron steam radiators–valve-controlled cast iron coil assemblies–distribute steam through a series of pipes throughout a building. Many people find cast iron steam radiators difficult to clean as the hot radiator surfaces attract dust, dirt and other debris.
In addition, the paint applied to the radiator’s surfaces to increase heating efficiency can easily fleck or peel with little scrubbing or abrasion. Cleaning cast iron steam radiators is not impossible because you can easily remove most dirt with a vacuum and/or duster and mild or gentle cleaning products.
Step 1
Turn the radiator valve(s) at the base of your cast iron radiator to shut off the steam and cool your radiator’s surface. If you are pre-cleaning and have not turned on your radiators, skip this step.
Step 2
Attach a soft-bristled brush or upholstery brush head to the hose of your vacuum and lightly vacuum dust, dirt, cobwebs or other debris from your cast iron steam radiator’s coils, valve(s) and/or heat reflector (if applicable) as well as the floor and baseboard.
If the brush head will not fit into certain areas (between coils or under/behind the radiator), dust the areas with a fabric thread-style or microfiber style duster.
Step 3
Lay a plastic drop cloth on the floor beneath and around your radiator before cleaning with soap and detergent so that you protect the floor.
Step 4
Wipe your cast iron steam radiator–coils, valves and pipes–with a soapy lint-free microfiber cloth. Wait 10 minutes for the chemicals in the detergent you used to break up any oils clinging to the radiator’s surfaces. In addition, wipe your foil reflector (if applicable).
Step 5
Rub a damp sponge over all the radiator surfaces to remove the soap residue. Rinse the sponge and repeat as needed.
Step 6
Blot undiluted mild detergent on caked-on dirt and stains. Wait 10 to 20 minutes. Rub with a damp sponge to remove the dirt, oil or staining material and then rinse.
Step 7
Remove the plastic drop cloth.
Step 8
Turn the radiator valve(s) on to dry the radiator and surrounding surfaces. If a great deal of moisture remains or you skipped Step 1, dry the radiator, pipes, floor, baseboard and/or heat reflector with soft, lint-free microfiber cloths.
Note
If you cannot remove dirt or a stain, brush the dirt or stain with a soft-bristled brush. Brush the top of the dirty/stained spot in a gentle, circular motion until the dirt and/or stain breaks away or fades.
Warning
Always wait until the cast iron surface of your radiator(s) has cooled before cleaning so that you do not burn yourself on the radiator’s surface.
Never dust your radiator with a feather or fine thread duster that can snag or easily pull as loose feather and fibers/thread can stick to the radiator, not only causing a reduction in heating efficiency, but also posing a potential fire hazard.
Never use a soft-bristled brush unless you are cleaning debris from the valves or dealing with tough or caked-on dirt/stains. In addition, brush only the top of the dirty/stained surface instead of any surrounding surfaces to protect the paint.
How to Fix a Radiator That Gurgles
If a steam radiator makes gurgling noises, either from the air vent or from the radiator itself, it’s usually a sign that condensed water is being trapped in the radiator rather than draining back down to the boiler. This can be the result of problems with the radiator itself, the control valve, or the air vent.
Check the Supply Valve
Make sure the supply valve is fully open (turned counterclockwise all the way) and that it operates properly. If this valve isn’t fully open in a one-pipe system, it may be preventing condensed water from draining out of the radiator, If the valve is corroded or stuck, repair or replace the valve.
Ensure the Proper Slope
Check the radiator’s slope. In a one-pipe system, the radiator should slope slightly toward the end with the supply valve. Shim under the feet of the radiator as needed to achieve a proper pitch of 1 inch for every 10 feet toward the supply valve.
With two-pipe systems, make sure the radiator is sloped in the opposite direction, toward the return pipe.
Examine the Air Vent
In one-pipe systems, make sure the air vent is positioned vertically. Make sure it is not pointing upside down, diagonally, or sideways. Usually, you can simply rotate the valve clockwise to the vertical position (it’s threaded into the radiator).
Inspect the air vent to check for obstructions caused by mineral deposits or other debris. Try to clean the vent with vinegar. If you can’t blow air through the vent after cleaning, replace the vent.
Troubleshooting a Radiator That Doesn’t Heat
If the radiator doesn’t heat up, it often indicates that the air valve is stuck shut, blocking cold air inside the radiator and preventing steam from entering.
Open the Valve
Make sure the supply valve is fully open (turned counterclockwise all the way). Use a wrench if the valve is resistant to turning.
Check the Thermostat
Check to see if the thermostat in the room (as applicable) is set too low. Confirm that the thermostat is set above the current room temperature.
Ensure the Proper Slope
Check to see if the radiator is sloped properly. On one-pipe systems, it should slope slightly toward the end of the radiator with the supply valve and pipe. Shim under the feet of the radiator as needed to achieve a proper pitch of 1 inch for every 10 feet toward the supply valve. On two-pipe systems, the radiators should slope away from the supply valve and toward the return pipe.
Why is only one steam radiator cold?
If it’s a one-pipe radiator, check the air vent. If the vent is clogged, the air can’t get out and the steam can’t get in. Painters do a real job on air vents.
Check the radiator’s pitch while you’re at it. If the pitch is wrong, there may be a buildup of water in the radiator. That will cause the steam to quickly condense before the radiator can get hot all the way across. If the pitch is wrong, the radiator will also gurgle and rumble and the vent will probably spit.
There may also be a buildup of sludge in the horizontal runout to the radiator’s riser. That sludge will trap water, and the water will condense the steam before it reaches the radiator. A “panting” air vent is a good clue that you’re having this problem.
Clean the radiator and, if necessary, the riser. And make sure you have the radiator pitched the right way.
Two-Pipe Steam Radiator Is Too Cold
If it is, check the steam trap by opening it up. Take care not to get burned. If air rushes out of the trap and the steam races through the radiator, you know either that trap or a nearby trap is defective. Find it, and repair or replace it.
Never add an air vent to a two-pipe-steam radiator. The air vent will make the radiator hot, but if their steam traps have failed, the condensate won’t drain from the radiator. You’ll wind up with water hammer, further steam trap damage, higher-than-normal fuel bills, and severe water level problems in your boiler or boiler-feed pump receiver.
How to Troubleshoot & Fix a Steam Radiator
Steam Radiator Diagnosis Procedure;
Check the thermostat & the steam boiler
Make sure that your room thermostat is set to a temperature higher than the temperature in the room – so that it is calling for heat.
Make sure that your heating boiler is working, that is that the heating boiler turns on and off normally. A steam boiler will usually turn on right away in response to the thermostat being turned up or on a call for heat.
Check the radiator control valve
Make sure that the control valve at the heating radiator is “open” or “on” as we describe just below.
First check the radiator valve itself. At cold hot water baseboard / radiator we illustrated different types of heating radiator control valves and explained their operation.
Experts warn that a radiator slow to heat could have a supply valve that is too small (the problem would always have been observed since date of installation) or a supply valve that is partly closed (the problem would have originated when the valve was closed and would go away when the valve is fully opened, provided the valve is undamaged and really opens internally when its handle is turned.)
radiators and other forms of steam or hot water heaters will not get hot enough if the supply piping is undersized, a valve is partly closed, piping is clogged or blocked, or the hot water flow rate or for steam heat the rise of steam is too slow.
Other problems can cause a steam heat radiator to stay cold when you want heat as we explain next where after the above digression we continue our diagnostic and repair advice for cold radiators or convectors in steam heating systems.
Check the steam vent on the radiator
If some of your steam heat radiators are not getting hot, the steam vent may not be working, may not be venting at all (radiator stays cold) or may be venting too slowly. If a steam radiator valve is open but the radiator is still cold, the steam vent may not be working.
When steam is first rising in the heating system, the steam heating radiator will be cool as will be the steam vent. The vent opens, allowing rising steam to enter the radiator by pushing air out through the vent.
When the steam radiator and steam vent are warm or hot, the vent closes. If a steam vent stops working, rising steam cannot enter the radiator and it will be slow to heat or may not heat at all.
A cold upper part of the radiator may indicate the vent is plugged with scale or is malfunctioning. Vapor or slight moisture from the vent is normal. Steam continuously passing through the vent indicates a malfunction. Replace the vent as needed or every 10 years.
Check which radiators are not getting hot – check radiator slope
A steam radiator that is sloped the wrong way, perhaps due to building floor settlement or a change made by an inexperienced re modeler, will become partly or even completely blocked by accumulated condensate, leading to loss of heat.
Steam heating system controls, inspection, diagnosis, and repair are discussed beginning
Check these other causes of cold steam radiators
Internal leaks in the steam boiler can cause cold radiators – diagnosis:
Small boiler leaks can be hidden from view: As reader Robert discovered and kindly explained in our FAQs section below, several clues can point to an internal leak in the steam boiler.
A relatively small leak in the steam boiler may never show up as water on the floor around the boiler – the leaking water may just evaporate on boiler internal surfaces.
A larger steam boiler leak will probably show up as water on the floor, boiler running continuously, or if the leak is fast enough, a low-water cutoff switch will shut down the boiler.
Abnormally high water feed rates into the boiler can in turn speed up corrosion within the boiler leading to costly or even ruinous leaks in the steam boiler itself.
The rate of corrosion will vary depending on not just the water feed rate but also other factors such as the water chemistry and the overall boiler on-time.
Check boiler steam pressure – lower than normal steam pressure can result in heat being delivered too slowly to all radiators, slower heat or even no delivery of heat to radiators on upper floors.
If all of the lower floor radiators in a building heat up but none of the upper floor radiators do so, or if no radiators near the end of the steam risers get hot, low steam pressure could be the problem.
Don’t rush to “fix” this by changing the steam pressure control switch – that’s treating the symptom not the illness.
Check the steam boiler water usage rate – an increase in water usage at the boiler can be due to a leak somewhere – in the condensate line, or in the case of cold radiators, in the boiler itself.
Steam boiler operating problems that can lead to inadequate heat
Radiators not hot enough or distant radiators not heating up – diagnostic checks.
Steam boiler problems: An oil or gas fired steam boiler may fail to deliver enough heat for a number of reasons including:
- Inadequate draft
- Poor fuel quality
- Improper attention or firing (lack of maintenance, burner not firing properly)
- Boiler is undersized – if this is the case the heat inadequacy would always have been present but may not be noticed until very cold windy weather
- Improper steam piping – as above, if this is the case the heat inadequacy would always have been present or present ever since steam piping has been changed or modified.
- Improper arrangement of boiler sections
- Lack of boiler cleaning/maintenance, leaving soot in the boiler. Soot acts as an insulator, slowing heat transfer from the fire into the boiler water
- Improper firing rate of oil (nozzle size, fuel unit pressure) or gas
One pipe steam system radiators fail to heat;
- Radiator vent problems: The radiator vent is improperly sized or not working.
- Steam pipe problems: The steam pipe feeding the radiator is under-sized or is not properly sloped (steam supply pipes in a one pipe system also return the condensate and must slope away from the radiator and down towards the boiler – always) – (the problem will have always been present but may not be noticed until very cold weather)
- Air vent problems: The drainage tongue on the air vent has become damaged or lost or corroded away
Two pipe steam system radiators fail to heat;
- Radiator pitch problems: doesn’t slope towards the steam trap – the radiator should slope away from the steam supply valve and towards the steam trap
- The radiator steam trap is clogged, damaged, or stuck closed
- The steam pipe feeding the radiator is undersized or the condensate return not pitched properly, leading to blockage
- Steam convectors or “unit heaters” are not putting out enough heat
- Dirty heater coils – check for dust or debris blocking the fins on the heater coil – see our photo at left
- Dead unit heater fan – if the unit heater such as a ceiling-mounted garage heater is driven by a blower fan (not just a convector (driven by gravity), check that the fan operates normally
- Blocked steam piping feeding the unit or within the heating coil – due to air or water blockage in the piping
Below are more technical problems that affect unit heater heat output:
- Design mistakes: the unit is too small for the heated space (the problem will not be new), or the unit has been improperly located – too far from exterior walls can leave cold areas between the heater and the exterior wall;
- Improper installation: the steam pipe supplying the unit may be inadequately insulated, improperly sloped, or routed through a cold area where it loses too much heat
- Abnormal or too-low steam pressure in the system (there may be hidden leaks in the system)
- Maintenance problems: oil and debris in the steam, coating the heat transfer surfaces of the interior surfaces of the heating coil itself
- Steam system design or building heat loss rate problems
If the steam radiators get hot but the building does not get warm enough, check these;
The number of radiators is inadequate, or some radiators are turned off or not heating for other reasons – the remaining radiators can’t keep up with the building heat loss rate. You’ll notice this more in colder windier weather
The building is losing heat too rapidly for the heating system to keep up. If this is a new problem look for a new draft – a window left open, an attic door or pull down stair left open, etc.
The steam pressure is set too low – steam doesn’t rise to upper floors or rises too slowly. Check with your service technician as other problems such as a boiler leak or condensate return leak can result in low steam pressure.
Building design, such as many open stairwells, high ceilings, can make it hard to heat – this problem will have always been present.
Note: If your steam radiator is too hot in a two-pipe steam system, according to the U.S. DOE, check the steam traps:
In two-pipe systems, older steam traps often stick in either the open or closed position, throwing off the balance in the system.
If you seem to have problems with some radiators providing too much heat and others providing too little, this might be the cause.
The best approach is often to simply replace all the steam traps in the system.
Note: an overheating electric heater is a fire hazard.
Do steam radiators need bleeding?
Steam radiators do not require bleeding. They have automatic air vents designed to permit air to escape by itself from the radiator as steam enters. However, if symptoms similar to those of a malfunctioning hot water radiator develop – poor or incomplete heating – chances are the vent is clogged.
If your radiator is not used for a while, you may need to do some quick maintenance to get it working properly. During a period of inactivity, or if the heating system has been drained, air enters the pipes, collecting near the top of one or more radiators. When air prevents water or steam from filling the radiator, the radiator may fail to heat completely or to develop sufficient heat.
If some radiators in your home are working fine, but others remain cold, it could be that there is air trapped inside one of the radiators. This can prevent the hot water from circulating properly to provide the heat you need.
Letting the air out of the system, or bleeding the radiator, may be an easy solution.
How to bleed a steam radiator
To bleed a hot water radiator, first turn the heat on and let the system come up to capacity. Be sure that the circulating pump, which supplies water pressure, is operating; it is on the furnace.
- Turn the radiator on also, in the usual way by opening the supply valve, to admit hot water.
- Then find the small vent valve at or near the top of the radiator, usually on the end opposite the supply valve. Many vent valves can be opened or closed with a screwdriver. Others require a special socket wrench sold at plumbing and heating-supply stores.
- When you find the vent, open it while holding a small container, like a measuring cup with a handle, beneath it.
- Air should escape from the valve, followed by a pressurized stream of hot water. When water begins to escape, the trapped air has been released.
- Catch the water in the container, while closing the valve with the screwdriver or wrench.
- Close the valve tightly to prevent air from leaking back in or water from being forced out.
Steps to bleed a hot water radiator
If you have a hot-water heat radiator that’s not heating the cause is usually trapped air, and getting rid of it is simple. If your radiator has a cover, remove it first. At the top of your radiator, look for a small valve. Use a radiator key, 1/4-in. 12-point socket, or a flat screwdriver (depending on your valve type) and slowly turn the valve counterclockwise until water starts dripping out.
This will release trapped air and let hot water into the cold fins. While you’re at it, you should repeat the process with your other radiators. Bleeding the radiators will lower the pressure in your system, so you might have to slowly add water to increase the pressure.
Do this by opening, then closing, the valve on the water pipe above the boiler. In fact, you may need to add water while bleeding the radiator in order to purge the air from the system. This is where a helper will save on trips up and down the stairs. If you’re unfamiliar with your system, call a pro. How much pressure you need depends on how high the water has to rise.
Check this too: Rinnai Water Heater Troubleshooting & How-to Guide
The basic rule is 1 lb. of pressure for every 2 ft. of rise. Your gauge may read in pounds, feet or both. A basic two-story house, with the boiler and expansion tank in the basement, needs 12 to 15 lbs., or 25 to 30 ft., of pressure.
Items needed
- Radiator key
- Fine wire
Here’s a step-by-step how to bleed radiator;
Step One
The first step is to make sure you have turned off the heat in your home. It’s better if you can wait until the system’s been off for a while to avoid hot water spraying out and potentially scalding you. Then, when you are starting to bleed the radiator, make sure the circulating pump is in operation. This is what adds pressure to the system and pushed the hot water through the pipes.
Step Two
Locate the radiators bleed valve. It’s a small valve that’s usually near the top of your radiator on one of the sides. You will need a radiator key to continue on to the next step. If you don’t have one handy, your local hardware store should have them on hand. If you can’t find your radiator key or don’t want to make a special trip to the store, you can sometimes make it work with pliers or a flathead screwdriver as some valves also have a slot in the top.
Step Three
Grab a cloth and a small bowl before you insert the radiator key and start to bleeding radiators. Water may drop when you bleed radiator valves and you do not want it dripping onto the floor. Hold the bowl or towel under the radiator valve and turn it counterclockwise. Start with half a turn. This should release the built-up air pressure.
The bleed valve will let the air out. At one point, it will suddenly start releasing a steady stream of water – that why you need the bowl and towel. When this happens, you have successfully completed bleeding the radiator. Close the valve again and you should be good to go. Make sure the valve is tightly closed to avoid water leaking out or air leaking in.
Step Four
You likely have more than just one radiator heating your home. You’ll need to do the same things with each one of them. It’s a good idea to do all of them even if they seem to be working fine.
This relieves the pressure on your heating system and makes sure the hot water is flowing properly through the pipes. You should expect to bleed your hot water heating systems with radiators at least once a year for proper operation. We recommend doing it at the start of the cooling season.
Why is My steam Radiators Not Working?
Try the following solutions if your steam radiator is not getting hot;
Check for Air Trapped in the System
The solution is to percolate the concerned radiators. The methodology of exuding a radiator involves opening the radiator’s valves to release the trapped air. If parts of the radiator are hot but others have it cold, this’s likely that trapped air is obstructing the course of hot water.
As momentarily as the whistle sounds and only dampness is coming out of the valve, turn the valve back off with the radiator key and replicate the methodology with any other concerned radiators.
You must preferably swing off the heating and linger for the radiators to refrigerate thoroughly; heretofore involving the bleeding valve with the radiator key, and your selection is then to hear a whistling sound as the trapped air escapes the procedure.
Check Your Radiator Valve
If the absolute radiator is not heating up and displaying no signs of trapped air, you should examine the valve on your radiator to make it foolproof this is a factual experience, and If you maintain a manual valve, you should be able to correspond that this location is on and make any required adjustments.
If you have a thermostatic valve, this should be appointed to celebrate the radiator’s temperature and automatically adjusted to preserve a regular space temperature. The thermostatic valve may be established to an inaccurate temperature and can similarly be effortlessly adjusted.
The best resolution is to reach an experienced heating designer who will be competent to oblige you to vacate the radiator. The architect may uncover that radiator itself is decomposing and requires to be replaced.
If you contain examined the valves on your radiator and this is still not performing, the valve may include been intercepted by earth and limescale.
Check Your Water Pressure
you should determine your water anxiety and If your boiler seems to be in working circumstances. The accurate level of nervousness is usually appointed at one standard; If the pressure seems to be more undersized than this, you should reach a professional.
Your intention has an anxiety gauge, an exhibition that delivers the level of water tension existing communicated from the mains to the boiler usually discovered instantly where the water collection communes to your boiler.
If more than one radiator is not working, the situation may be boiler-related. Examine the production module to witness if there is a defect.
If everything is working accurately and inspect the manometer to see if this is designated to the accurate water anxiety station.
If the radiator is cold in some parts but hot in other parts, this is likely that the trapped air is at fault. Bleeding from the affected radiator should solve the problem.
If the absolute radiator is not heating up, this is a potential that you will necessity to percolate the simulated radiator; alternatively, this could be that there is a situation with the valve.
How to maintain a steam radiator
Do the following checks regularly to ensure your radiator is performing optimally;
1. Check for Bigger Problems with Your Central Heating & Boiler
The first thing you should do is check for any bigger, more serious problems with your system. This means making sure that your central heating system is actually working. If all of your radiators won’t heat up rather than just one, this could be a sign of a bigger issue.
You should also check to see if anything seems unusual about your central heating system. Be on the lookout for weird noises and heating issues. If that’s the case, the first thing you should do is call a professional heating engineer and have them take a look.
2. Check for Trapped Air and Bleed Your Radiators
If just one (or a few) of your radiators aren’t heating up, the most common reason for this is trapped air. If you’ve just turned the heating back on after the summer, air can become trapped in your radiators, causing them to be warm at the bottom but cold at the top.
If this is the case, you may need to bleed your radiators. Simply use your radiator key to unscrew the bleed screw a little, just until you hear a hissing sound. Once the hissing dies away and water starts coming from your radiator, be ready to close the bleed screw.
Your radiator should soon be nice and warm.
3. Check Your Radiator Valves
If trapped air in your radiators isn’t the problem, or your entire radiator is cold not just the top, the next step is to check your radiator valves.
Make sure both the valve on the left and right of your radiator are open, and if you have a thermostatic valve (one that allows you to set the temperature and adjusts it automatically), make sure the radiator is turned on.
Thermostatic radiator valves can also seize up, causing your radiator to stop working. If you think this might be the case, get in touch with a professional heating engineer who’ll be able to properly diagnose the problem and replace the valve with a new one if necessary.
4. Find Out if Your System Needs Powerflushing
If none of these issues seem to fit with your radiator problem, it’s possible that you may need a powerflushing service. Powerflushing is the process of removing sludge and debris that can become stuck in your central heating system over time, causing it to not function properly.
A sure sign that your radiator needs powerflushing is when the radiator is warm at the top, but not the bottom, as sludge in the bottom of your radiators can stop this area from being heated properly.
Below are other tests you can perform to help you remedy any issues before they blow up and cause your steam radiator to malfunction;
- Test your supply valve. Ensure it turns smoothly in either direction and check its condition. Turn the supply valve all the way off or on.
- Visually inspect the air valve: ensure it is positioned right-side up and check for visible water marks. If there is evidence of water leaking, replace the air valve. Remember to use Teflon tape, which creates a water-tight seal on the threads.
- Check the pitch: Make sure the radiator is pitched so the condensate is able to flow towards the supply valve.
- Check for water damage around the radiator: If it looks like there’s been past damage, check it right away. Don’t put it off until the damages get worse, or it even travels to other apartments.
- If your radiator seems like its seen better days, think about giving it a fresh coat of paint with a rust proof high heat paint.
- Check the safety valve every month: Located on the top of the boiler, this important valve vents excess pressure if the boiler goes crazy and exceeds safe levels. When the system is hot, push down on the handle to see if steam comes out. Stand away from the outlet — the steam is boiling hot. If no steam comes out, call a serviceperson to replace the valve immediately.
- Check the water level once a month: The water-level gauge has valves on each side. Open them both and make sure that the water level is in the middle, and then close the valves. If you didn’t see any water, shut off the boiler, let it cool down, and then add water.
Because steam systems occasionally need water added, it’s better and more convenient to have an automatic water valve added to the system. The valve monitors water levels and adds water ever so slowly to avoid damaging the boiler.
Make sure that every radiator slopes slightly toward the steam inlet pipe (which comes out of the wall or floor). If one doesn’t, slip a 1⁄4-inch-thick rectangle of wood under the feet at the vent end. Doing so prevents those irritating knocking and clanging noises.
Check the vents to make sure that they aren’t blocked. Corrosion and paint can keep the vent from venting and then air trapped in the radiator prevents steam from entering the radiator. If your vent is blocked, replace it. Your local hardware store probably carries them (yours is not the only house in the area with steam heat), and they simply screw off and on.
Check the position of the inlet valves. They should be either all the way closed or all the way open. A partially open or shut valve does nothing to regulate heat and causes knocking and clanging.
Preventative and Protective Measures
So, you’ve got your shiny new radiator, but you never want to go through the stress of fixing a leaking radiator again. If that’s the case, make sure to use a Rust and Corrosion Inhibitor and clean your water using a Radiator Cleaner on a regular basis! You should also be sure to check the hose connections that join the radiator to other parts of your central heating system for any signs of malfunction. Identifying potential problems early on can help you avoid having a leaking radiator.
What are the Signs and symptoms of a Blocked Radiator?
Sludge is a result of built-up dirt and debris inside your radiator. It limits the flow of water throughout you central heating system making both heat pumps and radiators work harder. This can have a knock-on effect for your boiler as if left unchecked, can cause boiler breakdowns.
This will in turn – rapidly age the whole central heating system which will mean you’ll need to replace sooner than later. It is important to carry out radiator maintenance at least once a year. Summer is the best time to do this.
Symptoms of Blocked Radiators
- Noisy boiler
- Broken or leaking heat pump
- Radiators are slow to heat up
- Cold spots at the bottom of the radiator
- Brown water when bleeding your radiator
You will be able to tell by the colour of the water that comes out when you bleed the radiator, just how bad the sludge is. If the water is clear, you will have little or no sludge. If it is slightly brown, sludge is beginning to build up.
This would be the best time to flush it out before it does any damage. If, however, the water is a very dark almost black color, you will need to flush your radiator immediately. You may also need to speak to a professional to check potential damage caused to the rest of the central heating system. This will help prevent a complete breakdown when you can least afford it.
How to Remove Sludge from Blocked Radiators
Items needed
- An old towel or two to clean up any water spillages
- A large bucket or bowl to catch water
- A spanner or adjustable wrench
- Your radiator bleed key
- PTFE tape
- A hosepipe
- A rubber hammer (optional)
Steps
The first thing you will need to do is look at which radiators need clearing. This could be one, a few or worst-case scenario, all of them. Here is a handy step by step guide on clearing a blocked radiator or towel rail.
Turn it off
At this stage, it is best to turn off the whole central heating system to prevent any hot water being pushed through the radiator you are working on. Give it at least an hour to cool down before you begin.
Put down your towels
Ensure a good amount of floor is covered with your towels and/or old sheets. You don’t want to damage the flooring. You will most likely experience spillage under and around the valves so be sure to get the towels all around this area.
Turn off the valves
Set your Thermostatic Radiator Valve (TRV) to off or 0. To turn off the lock shield valve (at the side of the radiator), you will need to remove the cap and using a spanner or wrench, turn the valve clockwise all the way. Make a note of how many times you need to turn it to loosen it as you will need to tighten up the same.
Drain the radiator
Place a bucket or bowl under the TRV at the bottom of your radiator and loosen the TRV at the nut joint with a spanner. Open the bleed valve using the bleed key to remove any air in the system. Sludge and dirty water will begin to drain out. Then, loosen the lockshield valve and repeat. Once the radiator has been drained, close the bleed valve.
Remove the radiator from the wall
Once the water has stopped flowing freely, carefully remove the radiator from the wall. Be mindful of any wall brackets, radiator feet and excess water when moving the radiator. We highly recommend you empty the radiator outside as this next bit will get messy.
Power Flush the radiator
Push the hosepipe through the inlet and turn the water on. This will help flush out any sludge inside. Move the hosepipe around a bit to loosen some of the debris. If you have a rubber hammer, place a soft dust cloth and gentle tap the bottom of the radiator to dislodge any stock on sludge. Repeat this process by attaching your hosepipe to the other inlet and let it run until the water is clear again.
Reconnect your radiator
Carefully hang your radiator back on the wall brackets, reattach any feet you may have taken off. Ensure you tighten the valves back up and that the lock shield also opened as before. Use the bleed valve to remove any trapped air again.
How to Prevent Sludge Build-Up
There are a few things you can do to prevent sludge build up from getting out of hand.
- Regular maintenance is key – keep up with maintenance internally and externally
- Use an inhibitor to help break down unwanted particles in the system and keep it topped up
- Install a magnetic filter such as the Adey MagnaClean. This will filter out any magnetic material that can build up in the system and stop it reaching the boiler and radiators
- Schedule an annual radiator and boiler service with a local tradesperson to ensure the whole system remains healthy for when you need it most
Why is my steam radiator making strange noises?
A normal radiator should not emit any noises. Any hissing, spluttering, spitting, gurgling, whistling or other strange noises should flag that something is wrong and needs to be looked at.
Air Valve stuck open:
Air valves are meant to release air, but never any steam. Moreover, when air is released through air valve, it should exit quietly. If the air valve releases steam or makes strange noises like excessive hissing or whistling, it should signal that something is wrong with the air valve and that perhaps it is ready for replacement.
Ignoring these noises can be costly down the road. Energy (which equals money from someone’s wallet) is wasted through the escaping steam. Escaping steam eventually reverts to water outside the radiator, leaving destruction on the walls, ceilings and floors around the radiator or even inside the apartment downstairs
Solution:
If the air valve is stuck open, you can clean it with vinegar and see if this works to remove any possible blockage. However, you may want to just replace it, especially since air valves are relatively inexpensive these days and easy to find a local hardware store.
Air valve wrong size, type, pitch, etc.
Gurgling or other spitting sounds may indicate that water is getting trapped inside the air valve. Air valves should not leak or trap any water. If it does, it may be that the air valve is installed or positioned wrong, or is the wrong type for your radiator.
The air valve should be connected to the radiator by screwing into the radiator body to create a snug, air tight seal. Condensate may leak when the metal threads inside the radiator body are ruined and not holding tight, or if there’s a mismatch with the threads on the air valve, leaving it wiggling loosely.
Also, you will need to look at the orientation of your air valve. It must be positioned right-side up so that the air hole is pointing straight up, or on some valve types, turned to sit at the highest part of the body. An air valve shouldn’t be leaning over or pointing sideways.
Using the wrong air valve type can lead to similar issues.
There’s different valves, for instance, with different shapes depending on where or how it screws into on the radiator.
There’s also different-sized air holes, depending on how far your radiator is from the boiler.
So, if you’re on the highest floor (furthest from the boiler), the bigger the hole should be. Conversely, the closer your radiator is to the boiler, such as an apartment on the first floor, the smaller the air hole should be. The principle behind this setup is that every radiator in the system warms up at the same time and no apartment is overheated before another one starts to warm up.
Why is my steam radiator making Hammering, Clanging, Banging or Knocking noises?
Basically, the occurrences of banging, knocking or other similarly jarring noises happen when the cooler condensate returning to the boiler encounters the hot steam and then a violent expansion and contraction takes place.
These sounds can emanate from anywhere in the building’s heat pipes where the condensate has backed up and its encounter with pressurized steam is unavoidable.
But, when these sounds seem close by, your own radiator may be the culprit. Condensate can become trapped at the bottom of your radiator and create a “water dam” that is ripe for an epic showdown with the steam flowing in.
Supply valve turned halfway:
A common mistake many people make is leaving the supply valve on their radiator partially open or closed on the assumption that the rotating handle can dial the heat up or down incrementally. The fact is that the supply valve does not control the temperature and, rather, the only two states to set the valve is either fully open or fully closed. There is no middle ground.
When the supply valve is left open in a halfway position, it physically blocks the condensate from flowing out of the radiator while the steam tries to surge in. This violent interaction between the two warring states of H2O takes place and the dread noises are created.
Solution:
To solve this problem, first, open your supply valve all the way to let the water drain out.
If water remains inside, you’ll need to disconnect the radiator body from the pipes and drain the water out. Water remaining inside the radiator can cause serious problems down the road, so you’ll want to address this as soon as possible.
As the radiator body is often very heavy and since disconnecting it involves special tools and experience, this should be done by a professional or the Building Super.
If you’ve found an issue described above, or need any help in doing so, give us a call and we’ll be happy to give you a hand.
Radiator pitch is wrong
Steam radiators must be pitched slightly towards the supply valve so that the condensate can easily drain out from the radiator (in other words, the air valve side of the radiator must be elevated slightly higher than the other side that is connected to the supply valve).
If the pitch is not enough to drain the condensate out of the radiator, it will pool at the bottom of the radiator body and block the entry of steam, causing the banging, clanging and other unpleasant noises.
Radiator pitched wrong fixed by Building Super
Sometimes, even the slightest error in pitch can cause problems, such as seen in this photo. I didn’t have a bubble level at the time so I used the window sill as my visual marker to indicate how much the pitch was off.
Solution:
If you cannot tell by simply looking at it, you can check the pitch by placing a bubble level on top of the radiator. It should be pitched towards the supply valve.
If it isn’t, carefully lift the end of the radiator that seats the air valve and try to elevate it by wedging a firm, flat piece of wood beneath the feet just enough to raise it slightly over the other end (with the supply valve).
There are other ways that a radiator can be pitched the wrong way to cause problems, but this is the most common problem.
This is a repair that should be performed by someone with experience, like your building super, so read this first.
Important
Condensate can be very corrosive to metal and eat away rubber gasket, washer and seal inside the valves. So, if you hear hammering, banging and other loud noises, and find that the pitch of your radiator is off or your supply valve is only partially turned, address this right away.
The longer that condensate sits idle inside your radiator, the more damage it can cause to its cast-iron body and valves, leading to unforeseeable water leaks and related expenses.