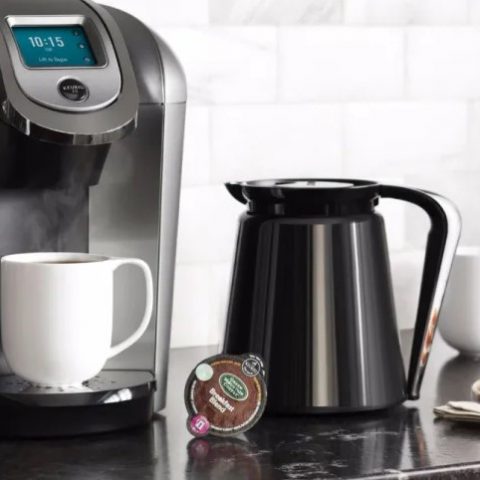
A Keurig coffee maker is one of the best appliances that you can get as a lover of coffee. It is easy to use, efficient and makes the best brew right in your home, so you want it functioning optimally. This means that you should always pay attention to how it works, and one of the areas to check is the needles.
These are very important as they directly affect the quality of coffee that you will get. There are different ways of cleaning them; most are very simple and straightforward once you learn. The following is a guide for everything you need to know about cleaning Keurig needles.
What are Keurig Needles and What Do They Do?
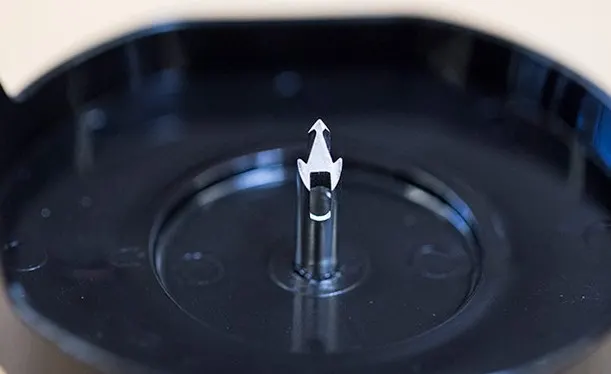
The Keurig needles are essential since they help in automatically piercing through your fresh K-cup. There are two needles on the machine, one at the top and the bottom one. It’s impossible to use the appliance without the puncturing part, so you must take care of it. Due to frequent usage, they can become clogged, which means that your coffee may sputter.
The blockage of the needles can lead to the poor taste of your coffee as well as other operational issues. The good news is that cleaning them is not difficult at all and you can do it without any specialized tools. Take time to understand all the parts of your coffee maker before attempting to clean, so you don’t make a costly mistake.

How to Use the Keurig Needle Cleaning Tool
This tool is included in the accessories of the Keurig Plus range. It is, however, available for purchase online should you need it for your coffee maker. The cleaning tool makes it much easier to clean the needles since it is automatic, and you don’t need to take anything apart.
If you are new to using the machine and are finding it challenging to clean, it is a good idea to purchase it. The following steps show you how to use this accessory for removing grime on the needles.
- Start by turning off your coffee maker and unplugging it from the wall.
- Fill the bulb with water as you would when making coffee and insert the tool where you would place a K-cup.
- Close it using the handle and repeat the raising and closing action about five times, after which your needles should be clean.
- Open the machine and take out the cleaning tool then plug it back to the wall to run a rinsing brew.
- Drain out the water, and your coffee maker should be ready to use.
How to Clean Keurig Needles Without the Cleaning Tool
If you don’t have the tool, don’t worry, since you can still get the job done relatively quickly. It is a bit more involving but shouldn’t take more than ten minutes. You will need to use a straightened paper clip to clean out around the needle as well as the holes. If you follow the following steps carefully, you should get excellent results.
- Turn off the coffee maker and unplug from the socket.
- Use the handle to open the coffee maker and expose the pod holder, which holds the K-cup, and remove it from its place.
- Separate the funnel from the pod holder by pulling them apart. You will need to use a little more effort to do this. If you are unable to, soak the piece in some warm water for a minute then try again.
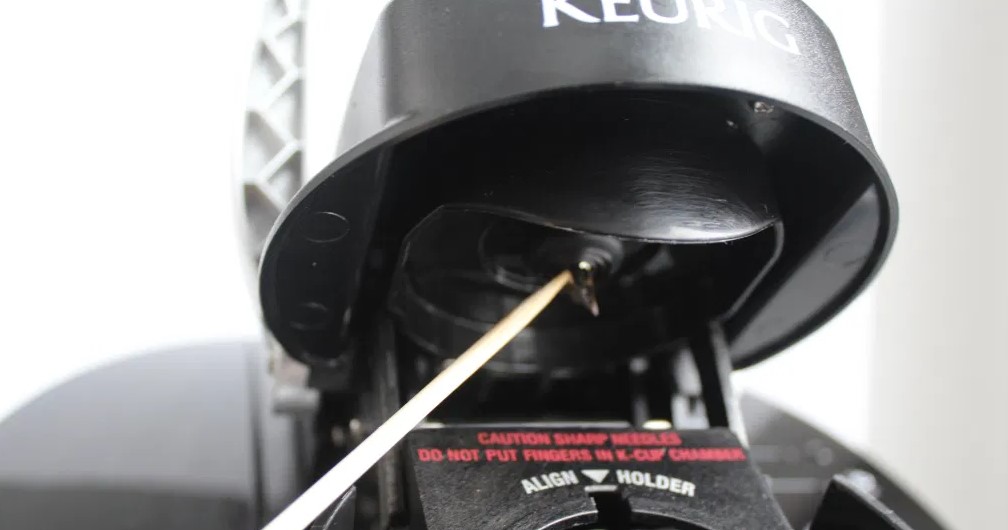
- The pod holder nests the bottom needle, and when you separate from the funnel, you will see a little tube with a hole. This is where you want to clean using a straightened paper clip. Turn the pin inside it to get out any grime. It is not very deep, so don’t struggle too much when you get blocked.
- Once you have removed most of the grime, rinse under running water, but be careful not to prick yourself using the needle. You may also put it in a dishwasher. Place the pieces on a kitchen towel and let it air dry.
- Under the top part of the brewer, you will see the other needle that could also need cleaning. Use your paper clip to scrape any grime on the point, as well as the two holes near it.
- Once the pod and funnel are dry, click them back together and insert back into the machine, then lock.
- Finish by running one or two brews to clean out any remaining grime using water only. Check the quality of the water let out to know if you need another round.
How Do I Change the Needle in My Keurig?
It is unlikely that the top needle will need a replacement, so the bottom one is what you would need to change. It is a pretty straightforward process that shouldn’t take more than five minutes with the following steps.
- Get the appropriate Keurig needle replacement. You can buy these online, and most are usually universal, but check to be sure it is suitable for your machine.
- Turn off your Keurig and unplug from the wall.
- Lift the handle to expose the pod and take it out, just like if you were to clean it.
- Separate the funnel from the pod. The pod is what you need to replace since it is where the needle is located.
- Rinse the funnel in running water and leave out to dry.
- Take the replacement pod and snap it together with the funnel. It should fit right in if it doesn’t check that it is the correct part.
- Return the pod into your Keurig and close it.
- Run a brew to confirm that it is working.
Why Is the Keurig Bottom Not Puncturing?
The bottom needle of your Keurig is essential, so it must be working correctly. If it has malfunctioned, chances are you will either not be able to brew coffee or end up with half a cup. You may also notice that it takes much longer to brew than what you are used to. If you see this, then the bottom needle is not puncturing, and these are the reasons for this:
- The needle is blocked. If you haven’t cleaned it in a while, it may have collected a lot of grime, which is preventing it from puncturing. To solve this, open it up and clean properly, then try again.
- The needle could be broken. If it breaks or bends due to improper use, then it may not puncture as it is supposed to. The only way to find out whether this is the case is to remove the pod and check using a light. If it is spoiled, you can buy a replacement part.
- The wrong type of cup. Some K-cups are problematic to use since they don’t puncture easily. This is common with ribbed cups. Try using a different style and try brewing again.

Signs That It Is Time to Clean Your Keurig Needles
If the Keurig needles are functioning correctly, you should be able to brew your coffee without any issues. Therefore, if you start experiencing problems with the machine, one of the areas you should check is the needles. The following are some of the signs to show that the point is not working correctly.
- When it stops brewing, when you insert your K-cup and turn it on, and it won’t brew, there could be a problem with the needles. If they are clogged, they can’t puncture the cup hence no coffee.
- When you get half a cup, if you don’t get the regular amount of coffee from your brew, then it could mean that the needles didn’t puncture properly. It could also be a sign of another issue, but cleaning them is an excellent first step to finding a solution.
- Sputtering and splashing. Once you notice that brewing coffee is getting messy, then it is probably time to check and clean the needles.
- When you notice it is taking more time to get a full cup of coffee, which means that your needles are likely clogged.
The Keurig needles may seem like a small, unimportant part of your machine, but without them, you may have to buy your morning cup of coffee. It is essential to continually check that they are not clogged and are functioning correctly. Follow the steps in this guide for cleaning, and you should experience any more issues unless they need replacing.