
When your thermostat displays a low battery warning or if it isn’t cooling properly, then its time for a battery change.
The procedure for changing batteries varies with the Honeywell thermostat model you are using. In this guide, we will show you the different methods for removing the faceplate and changing batteries on different Honeywell thermostats.
Confirm the model you are using first to avoid using the wrong method as this could damage your thermostat’s faceplate.
Honeywell 4000 series thermostat
If you own a Honeywell 4000 series such as the TH4110D, Pro 4000, or TH4210D, follow the steps below to replace the batteries:
- Turn off the thermostat
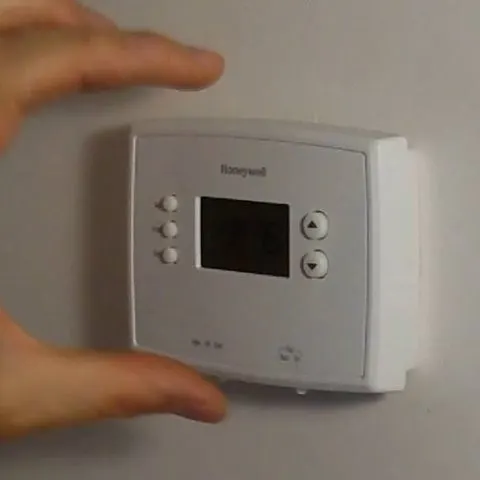
- Use one hand to find the slot at the bottom and push it against the wall
- With the other hand, hold the thermostat such that the thumb is at the bottom while your four fingers grab the upper part.
- Apply moderate pressure to pull and lift the faceplate with your thumb
- Once it has come off, turn the thermostat over, remove the existing batteries and replace them with new ones.
- Realign the thermostat on the wall plate and gently press it to return to its original position.
Read Also: How to reset a Honeywell thermostat
You should then switch it on and wait for a few minutes for the display to start working.
Honeywell 5000 and 6000 series
For Honeywell 5000 and 6000 series such as the TH5000, TH6110D, and TH6320U, replace the battery by:
- Pushing down the top right side of the thermostat and sliding it to the right
- The battery holder should come off
- Insert the new batteries and return the holder by sliding it back in position
Take the shortest time possible to replace your Honeywell thermostat’s batteries as it will reset if they aren’t inserted within 2 minutes.
Honeywell 8000 series
For Honeywell 8000 series thermostats including the TH8110U and TH8320U, when “LO BATT” flashes on your screen or the thermostat’s screen goes blank, do the following:
- Grab the thermostat’s faceplate with your thumb at the bottom and four fingers at the top
- Pull it gently to remove the thermostat from the wallplate
- Insert the new batteries, realign the thermostat and push it gently to reinstall
For most modern thermostats such as the Honeywell Lyric, you only need to hold the thermostat and pull it gently. Wiggle it a bit if it doesn’t come off. While at it, don’t apply too much force as it could damage the thermostat.
Common issues when replacing a Honeywell thermostat battery
Now that you’ve learned how to change a Honeywell thermostat battery, whether it is in your new touchscreen or old device, how about some troubleshooting tips for issues that might occur during the process?
Check this too: Honeywell Thermostat Vision Pro 8000 Troubleshooting & How-to Guide
Honeywell thermostat won’t work after replacing batteries
If your thermostat was low on battery and you’ve replaced them but it still won’t work, do the following:
- Set the thermostat to an Off position
- Open the battery compartment and remove the batteries
- Insert them backwards and leave the thermostat on for 5-10 seconds
- Switch it back off, remove the batteries and insert them the correct way
- Switch on your thermostat
Your thermostat is now reset and should be working properly. Check out our other guides on the thermostats and other home appliances.