
Before you call a plumber for a problem you might be having with your Moen shower valve, it helps to perform troubleshooting procedures to see if the issue resolves. In many cases, the problems are minor issues and shouldn’t cost you a fortune to fix. This guide looks at the commonly-reported Moen shower valve issues and the simple steps you need to take to resolve the problem. We also look at how to perform various operations on these units.
How to troubleshoot Moen shower valve
Shower valve has no hot water:
- Check the hot water line to ensure no valve is turned off, preventing hot water from reaching the shower.
- Pry off the valve handle cap using a screwdriver if there is one. Then unscrew the handle from the faucet stem. If the handle is attached with an Allen nut, loosen it using an Allen wrench and remove the handle. Then pry the escutcheon from the wall and remove it.
- Check the Posi-Temp valve on the hot water inlet. If it is in the vertical (off) position, rotate it 1/4 turn to the horizontal position using a screwdriver. If your faucet has a scald-guard limiter, check it and adjust if necessary. Then replace the handle and try the faucet.
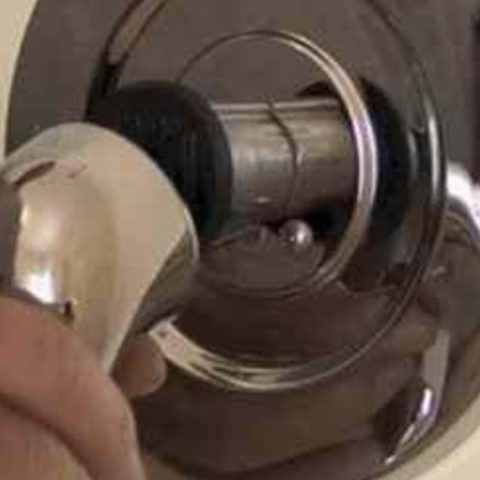
- If there is no Posi-Temp or scald-guard feature, or if performing the adjustments don’t resolve the issue, turn off the water to the shower. Then remove the handle and the plastic scald-guard limiter.
- Using pliers, remove the pin holding the cartridge by grasping and lifting it straight out. Make sure the water is off before doing this.
- Pull the cartridge from the faucet assembly while paying attention to the cartridge orientation for re-installation or replacement.
- Inspect the cartridge holes for signs of blockage that could be preventing hot water from passing through the valve. Shake the cartridge and listen for a rattling sound. If there is no sound, the balancing spool may be stuck.
- Disassemble the cartridge to clean the spool and cartridge interior. Then reassemble and shake it. If you hear a rattling sound, reinstall it in the faucet. Replace the cartridge if you can’t clean it sufficiently to produce a rattling sound.
- Insert the cartridge back into the valve.
- Replace the scald-guard limiter and handle and tighten the screw to the handle securely to the faucet stem. Then snap the cap back on.
Hot/cold sides reversed
If you have reversed hot/cold lines, it is because the cartridge installed upside down. To correct the issue, rotate cartridge stem 1800 so that the north is facing down towards the drain.
Leak or drip from the spout
If there is a leak or drip from the spout, it means grommets are not sealing correctly. Replace the cartridge to fix the problem.
The handle is hard to turn
If your Moen shower faucet handle is hard to turn, it is difficult to rotate the cartridge stem. To fix this problem, replace the cartridge or lubricate.
How to install Moen shower valve (Moen T3428, T3238CP, T3429)
To install a Moen two handle thermostatic shower valve, you’ll need the following tools:
- Hex wrench
- Pipe wrench
- Teflon tape
- Philips screwdriver
- Plumber putty
- Safety glasses
- Flashlight
Then follow these installation instructions:
Install the Shower Arm:
½” copper lookout (pipe protruding from wall) must be 2″ (50mm) minimum to 3″ (76mm) maximum in length and be free from scratches, dents, kinks or bends. The cutoff end must be free of burrs inside and out. Using a tubing cutter is recommended.
To install slip fit shower arm;
- Press and twist the shower arm onto the lookout upside down and tightly against the wall.
- Tighten set screw with a 3/32″ hex wrench until it just starts to bind.
- Turn shower arm upright into position against the wall and finish tightening the set screw. Don’t over-tighten.
If you are using a shower arm adapter-IPS to CC:
- Apply Teflon tape to thread and install into IPS connection.
- Tighten with 9/16″ socket wrench; do not use an open-end wrench.
- Cut off 2-3″ from the finished wall surface. Use of a tubing cutter is recommended.
Installing the Showerhead:
- Wrap shower arm thread with Teflon tape.
- Thread showerhead onto the shower arm.
- Tighten the showerhead using a wrench on the flats located on the shower ball. Hold shower arm with one hand while tightening.
Attaching Base Escutcheon:
- Turn off the main hot and cold water supply to the valve.
- Turn the temperature extension near the top of the valve body counterclockwise until it stops (it may already be in the full counterclockwise position)
- Turn the white flow extension near the bottom of the valve body clockwise until it stops (it may already be in the full clockwise position).
- Place the base escutcheon over the hole in the shower wall with a larger hole in the base escutcheon surrounding the top threaded extension from the valve. The base escutcheon will be correctly oriented when the word “MOEN” is right-side up.
- Place the flat side of the two ring escutcheons against the base escutcheons: one ring escutcheon over the temperature extension and one ring escutcheon over the white flow extension. The ring escutcheons and base escutcheon will be hanging from the threaded extensions of the valve body at this point.
Attach Temperature Knob:
- Confirm that the temperature extension near the top of the valve body is rotated fully counterclockwise.
- Align the temperature knob to the temperature extension with the number “9” on the grip ring turned upward to the 12 o’clock position.
- Move the temperature knob towards the temperature extension until the internal splines (projections on the inner diameter) on the temperature knob start to engage the external splines on the temperature extension.
- After splines start to engage, turn the lower shell of the temperature knob clockwise several turns while holding the rubber grip to prevent it from turning. This turning will thread the internal threads in the temperature knob onto the threads on the valve body. Continue turning the lower shell until the lower shell compresses the ring escutcheon against the base escutcheon. Note that as the temperature knob nears the base escutcheon, the base escutcheon and the ring escutcheon will have to be shifted upwards so that the ring escutcheon is centered on the lower shell and the black plastic part extending from the bottom of the temperature knob fits within the hole in the base escutcheon. Tighten the lower shell hand-tight only. Verify that the “9” is still at the 12 o’clock position.
Attach Flow Handle:
- Confirm that the white flow extension is turned fully clockwise. Align the flow handle to the flow extension with the handle pointing towards (6 o’clock position).
- Move the flow handle towards the flow extension until the internal splines in the flow handle start to engage the external splines on the flow extension.
- After the splines start to engage, turn the shell of the flow handles clockwise several turns while holding the handle to prevent it from rotating. Continue turning the shell until it compresses the ring escutcheon against the base escutcheon. Again, as the flow handle nears the base escutcheon, the ring escutcheon will have to be shifted upwards so that the ring escutcheon is centered on the lower shell. Tighten the shell hand-tight only. This completes the attachment of the flow handle. The valve trim is now completely assembled and is ready for operation.
How do you adjust a Moen shower valve (Two-handle thermostatic valve)?
To adjust a Moen shower thermostatic valve, follow these steps:
- To re-calibrate the valve, it is necessary to gain access to the spindle (located behind the temperature extension near the top of the valve).
- Turn the temperature extension counterclockwise until it stops.
- Loosen and remove the screw in the center of the temperature extension by turning it counterclockwise.
- Carefully remove the temperature extension without turning it or the spindle behind it. You have now accessed the spindle.
- To increase the temperature, rotate the spindle counterclockwise one or two spline(s) past the mark on the retaining nut. To decrease the temperature, rotate the spindle clockwise one or two spline(s) past the mark on the retaining nut.
- Replace the temperature extension, positioned fully counterclockwise with the tab as close as possible to the clockwise side of the pin in the retaining nut. Do this without rotating the spindle. Don’t install the screw at this time.
- Turn the flow handle counterclockwise to start the flow of water.
- After the temperature of the water has stabilized, check the temperature. This will be the new maximum temperature. If the temperature is unsuitable, remove the temperature extension as described above and repeat the procedure to further adjust the water temperature.
- When the maximum temperature is acceptable, reinstall the screw in the temperature extension and tighten it.
- Re-attach the temperature knob.
What happens when a Moen shower valve goes bad?
When your Moen shower valve is faulty it may display a number of symptoms, which often worsen with time. Below are some of the signs you could have a bad shower valve that needs to be replaced:
- Leaks or drips coming from the spout.
- Difficulty turning the shower handle, which worsens over time.
- Hot water suddenly starting to run hotter or water becoming too cold.
- Slow reaction time when changing water temperature.
New Moen shower valve has no water
If your Moen shower valve has no water, it’s most likely because hot and cold water may not be supplied to the valve. This can happen because of improper use or there is an obstruction in the showerhead/spout.
To fix the issue, try these troubleshooting tips:
- If you have external shut-off valves, verify they are opened all the way.
- Make sure there is nothing obstructing the spout or showerhead.
Moen shower faucet won’t turn on
There could be several reasons why your Moen shower faucet doesn’t turn on. The best way to resolve the issue will vary depending on your specific model. Below is how to troubleshoot different Moen shower faucets models that are not turning on.
For Posi-Temp models:
- Rotate the handle to turn it on. The handle on this model doesn’t pull out.
- Both hot and cold water must be supplied to the valve to get any water from the unit.
- If the valve has stops, both will need to be opened. If your Post-Temp valve has these, they will be located on the inlets of the valve. The stops look like small flat head screws. The flat would need to be horizontal to be opened (if it is vertical, that will shut the water off).
For Moentrol models:
- Verify the handle is being pulled out to turn the water on. If the handle is only being rotated, the water will not turn on.
- Both hot and cold water needs to be supplied to the valve to get any water from the unit.
- If your Moentrol valve has stops, they need to be opened. The stops look like small flat head screws and are located on the inlets of the valve. Use a flat head screwdriver to unscrew this counterclockwise until you reach a stop, this will ensure it is opened all of the way (screwing clockwise until a stop is reached will turn the water off).
Check this too: Rheem Water Heater Troubleshooting & How to Guide
For ioDigital models:
- Verify the controller will turn on. If not, troubleshoot the valve not turning on.
- Verify the shut-off valves are in the open position. These will vary depending on your ioDigital model.
For ¾” ExactTemp models:
These units must be installed with a volume control valve in addition to the thermostatic valve. The volume control must be rotated counterclockwise to turn the water on. The temperature (thermostatic) handle only adjusts the temperature.
This model will have stops located on the valve’s inlets. The stops look like small flat head screws. Use a flat head screwdriver to unscrew this counterclockwise until you reach a stop, this ensures it opened all of the way (screwing clockwise until stop is reached will turn the water off).
Moen leaking shower valve causes and fix
In most cases, leaks are caused by a scratched or torn cartridge, O-ring, or grommet. Replacing the cartridge should fix this problem.