Most people assume that a washing machine filter does not require regular cleaning as it cleans itself put while running a load. However, failure to clean your washing machine can lead to smelly clothes and residue or streaking in your laundry.
Keep reading to learn how to clean the lint filter of a top-load washing machine.
Where is the filter on a top-load washer?
The location of the washing machine filter depends on the age and type of machine you have. Refer to the owner’s manual for help. If you don’t have the manual, here’s where to check:
Along the top rim of the washer drum: Slide your fingers around the top of the washing basin, and you may run into a screen, which you can pull out to remove lint. Be careful not to jam fingers, and be sure you have a good hold on the lid, so it does not fall on your hand while investigating.
Inside the center agitator: If you have a top-loading washer, inspect the center agitator. The cover may be removable, revealing a lint trap inside.
At the end of the drainage hose: A small mesh screen may be fitted onto the hose that drains water out of the machine.
Note: newer high-efficiency (HE) washers don’t have a lint trap. Instead, they rely on a self-cleaning pump filter to remove lint from the wash. Still, running an empty wash cycle once a month is wise to flush excess lint from the pump filter.
Whirlpool filter location
In most cases, the filter can be found behind the agitator or near the bottom of the washer tub. For example, the whirlpool washing machine filter top loader is a cylindrical piece of plastic that sits on top of the agitator or at the bottom of your washer and catches lint and other debris as the water and clothes pass through it.
The purpose of the whirlpool washing machine filter is to keep the agitator and pump free of debris and maintain optimal washing conditions.
Maytag filter location
the Maytag washer filter location for front-loading machines is behind a dispenser drawer on the right side of the washer’s front base. This location allows it to better protect the drain pump that’s alongside it. The following steps detail how to quickly and easily clean the Maytag washing machine filter in front-load models quickly and easily.
All modern Maytag washers have filters that should be regularly cleaned every 3-6 months to prevent harmful lint buildup or clogs. In top-loading machines the filters are in the center of the agitator tube. They can be removed by taking off the agitator cap and pulling the filter upward. Lint and debris can then be removed by hand before replacing the filter.
Samsung filter location
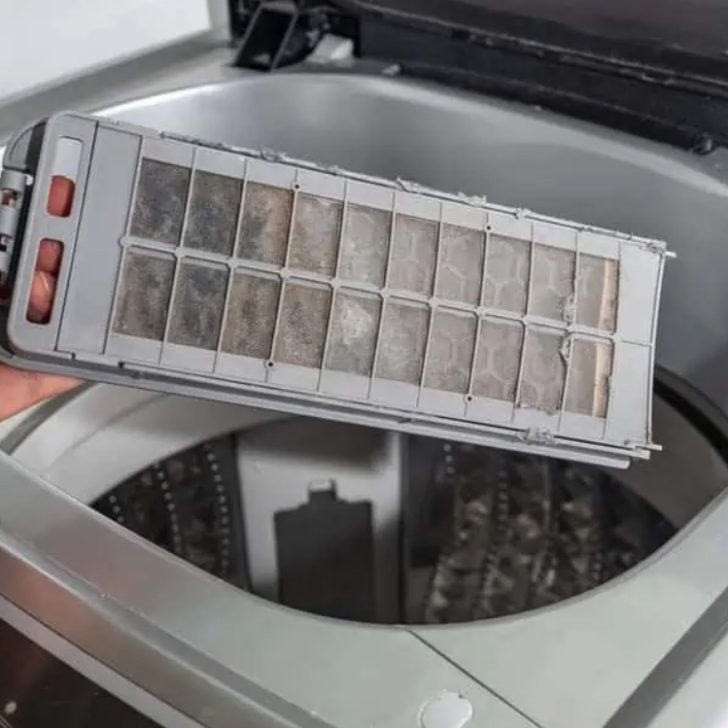
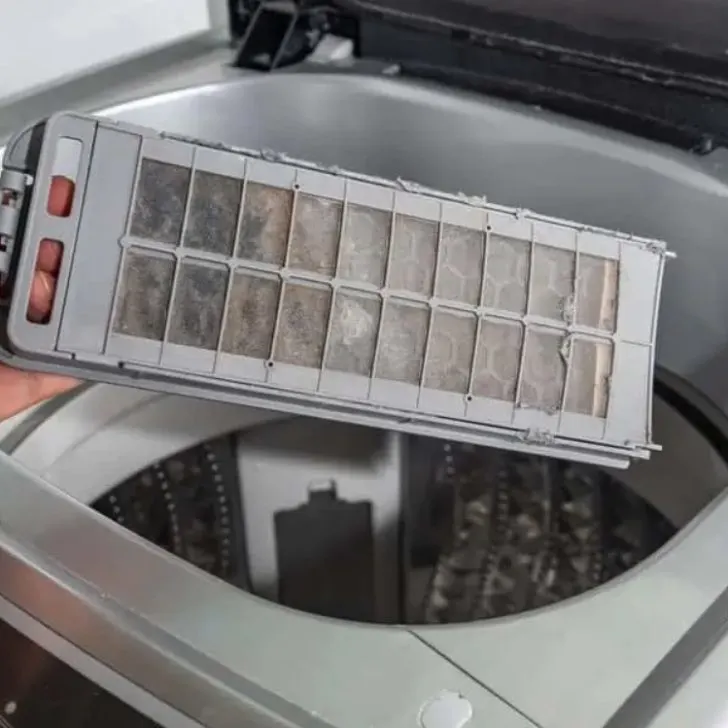
The filter is located right inside the washing machine. It is a small to medium, rectangular, or circular shape fine Mesh plastic attachment that is visible once you open the lid of your washing machine.
All you need to do is press the lock button that holds the filter and pull it out to detach it.
Note: Some High-Efficiency top-load washers don’t have a detachable filter unit. You need to use a toothbrush or paper towel to remove lint and stuck debris.
LG filter location
The filter is located at the back of the washing machine. Some washing machines may have non-removable filters. In that case, you will need to clean it with an old toothbrush or scrubber.
GE filter location
GE Top Load Washer (the most common top load washer) has used several washer lint filtering systems over the years. The following is a description of the most recent systems:
2001 and newer:
The Fine Mesh filters were removed from under the agitator when it was found that a better pump and larger holes in the hub under the agitator did a better job of removing lint and preventing clogs in the drain system. The drain system allows water to flow through the basket and out the bottom of the tub, pulling lint, hair, and small particles with the water.
No maintenance is required on this system, and there is no way to access the pump for cleaning or maintenance.
Exception: Spacemaker Washer – Cleaning Lint / Pump Filter
1995 through 2000:
Two crescent-shaped Fine Mesh plastic lint filters are in the bottom of the wash basket under the agitator. Water flows through the filters from the bottom of the tub. Accumulating any lint on the bottom of the filter screens.
During drain down and spin, the water forces the lint off the bottom of the filters and down the drain.
These filters should never require cleaning or replacement. However, service will be required if rubber backing from a throw rug or something similar clogs the drain. For service, please schedule an appointment with GE Appliances Factory Service.
1994 GE and 1994 and earlier Hotpoint models:
A self-clean filtering ring with over four linear feet of filtering surface was featured in these models. The wash and rinse water is constantly filtered, and the spray rinse at the end of the wash and rinse cycles does the cleaning. A powerful flushing action clears the 4,912 tiny perforations in the ring, carrying lint down to the pump and out the drain. There is no need for manual cleaning.
Lint discharge from the washer with a self-clean filtering ring did not cause a problem with septic tanks because most lint is produced from biodegradable cotton fabrics, and septic tanks are designed to handle these fibers.
Also, the design of the self-clean filtering ring allowed for the lint to be dispersed around the filter, so it did not ball up, allowing the lint to biodegrade easily. (On the contrary, with the design of the Filter-Flo system, the lint is caused to ball up for easy hand removal.)
Here is some information on the operation of the self-clean filtering ring flushing and Fresh Water Spray Rinse:
During the first spin of the Normal and Permanent-Press cycles, a cold Fresh Water Spray Rinse was discharged from the fill nozzle. This water was dispersed between both the filter ring and the outer tub.
The Spray Rinse water entering the filter ring did three things:
- Dislodged the lint, allowing the centrifugal forces to transfer it to the outer tub.
- Acted as a Fresh Water initial rinse to the clothes.
- When in the Permanent-Press cycle, the cold Fresh Water Spray Rinse provides a cool down to help prevent the setting of wrinkles in clothing. (The Spray Rinse sprays in the same direction as the filter.)
The Spray Rinse water entering the tub did two things:
- Rinsed the lint from the tub wall and into the drain water.
- Changed soap suds into a liquid for easy discharge.
In the Normal cycle, the Spray Rinse was dispensed in the middle of the spin and lasted 30 seconds. The Permanent Press cycle had the Spray Rinse at the end of the first spin, and the fill continued into the first deep water rinse fill.
1993 and earlier GE models:
Filter-Flo System (exclusive to GE). The Filter-Flo pan sits on top of the agitator and features very fine holes to entrap particles as tiny as sand.
Water is circulated through the pan during the wash and rinse cycles to entrap lint, hair, etc., and prevent these particles from being re-deposited on the clothes.
At the end of the final rinse, remove the lint from the pan and discard it.
If the Filter-Flo pan gets clogged with mineral deposits, you can soak it in a preheated 160-degree F solution of half vinegar and half water for 15 minutes. Then, brush each side of the pan with a stiff bristle brush while flushing with running water.
To prevent recurring clogging, you can soak the Filter-Flo pan overnight in 2 cups of vinegar and 1 gallon of warm water. Brush and flush. This can be done weekly, if necessary.
Caution: Do not soak in a porcelain container or exceed 180 degrees Fahrenheit (the pan might warp at this temperature).
How often should you clean your top-loading washer?
Top-load washers should be cleaned at least twice yearly. If you use automatic dispensers for each load, they should be cleaned monthly to prevent clogs. Because the same mineral deposits in the washer tub can also clog washer hoses, you should clean the washer every three months if you live in a hard water area.
High-efficiency top-load washers use much less water than standard top-load machines with a center agitator, so they should be cleaned more often—at least every three months.
You should consider cleaning your machine every three months if you have hard water, as hard water will leave mineral deposits behind and potentially clog your water hoses.
Another reason to clean your machine more frequently is if you have high efficiency or HE machine. These machines don’t use as much water as regular top-load machines making it likely that you have gunk building up. Clean an HE machine every three months.
Check this too: How to Wash Merino Wool Socks
Monthly cleaning is recommended if your laundry loads are heavily soiled with grease or dirt or if you live in a hot, humid area where mold is an issue. If you live in a humid climate, clean your top load washer monthly to keep the mold and mildew from taking over your machine.
How to clean a top loader washing machine filter
A combination of detergent, dust, hair, and lint can quickly clog up a filter. It is usually filled with a sticky layer of lint, detergent, and fabric softener. A clogged filter limits the washing machine’s efficiency and can lead to more lint deposits on clothes and poor drainage.
Clean or replace the washing machine filter every three months for more efficient operation, better drainage, and reduced lint deposits on clothes.
Here’s how to clean a top-load washing machine filter;
The quickest way to clean out your filter is to remove it from the unit and soak it in hot water, loosening any clog or trapped residue. If the filter cannot be removed, clean it out with a brush.
If the screen is removable, soak it in hot water for 10 minutes to clear away residue. If the filter is secured, clean the lint with a soft brush or paper towel.
Note: Some filters are disposable, so instead of cleaning them, you can throw them away and put a new one in place.
How to clean a top loader washing machine
Items needed
- Microfiber cloth
- An old toothbrush or small scrub brush
- Measuring cup
- Small bowl
- Microwave or stovetop
- Sink or bucket
- Small saucepan
- Materials
- Chlorine bleach
- Distilled white vinegar
- Dishwashing liquid
Safety Warning
Do not add the distilled white vinegar to the chlorine bleach. The combination of products can produce toxic chlorine gas, dangerous even in small amounts if you are sensitive to chlorine bleach odor. Open your windows to ensure good ventilation, or turn on an exhaust fan in your laundry area if you have one.
Cleaning Instructions
- Empty the washer
- Check to make sure that the washer drum is empty of clothes. The dispensers should also be empty, with no detergent or fabric softener in the reservoirs.
- Select the Water Temperature and Cycle Settings
- Set the water temperature to the hottest water setting. Select the largest load setting and the longest wash cycle available.
- Fill the Washer with Water
- Allow the washer drum to fill with hot water but stop the cycle before it begins to agitate.
- Add the Chlorine Bleach
- Add 1 quart (4 cups) of liquid chlorine bleach to the washer drum.
- Run the Complete Washer Cycle
- Allow the washer to run through its longest wash, rinse, and spin cycle. Again, it is important that the chlorine bleach is completely removed before the next step.
Clean the detergent and fabric softener dispensers
If your dispensers are not removable, heat 1 cup of distilled white vinegar in a microwaveable cup or a small pan on the stovetop. It should be very warm but does not need to be boiling. Pour the heated vinegar into the dispensers, and allow it to sit for at least 15 minutes to loosen any residue.
If the dispensers are removable, they can be submerged in a sink or large bucket filled with hot water. Add 1 cup of heated distilled white vinegar, and allow them to soak for 15 minutes. After 15 minutes of soaking, use an old toothbrush or small bottle brush to remove any remaining residue in the dispensers.
Replace removable dispensers in the washer before moving to the next step.
With the freshly cleaned dispensers in place, fill the drum of the washer again with hot water. Be sure the settings are still on a large load and the longest wash cycle. Stop the cycle before the washer begins to agitate.
Add 1 quart (4 cups) of distilled white vinegar to the hot water in the drum.
Allow the washer to complete the wash, spin, and drain cycle.
If you have a washer without an agitator, move on to the next step. Otherwise, remove the top of the agitator and place it in the bucket or bowl of soapy water. Then, use an old toothbrush to clean it.
Then use the toothbrush to scrub the inside of the agitator with soapy water. Your goal is to remove as much gunk from the agitator as possible. Replace the top of the agitator when you’re finished.
Use a clean and dry microfiber cloth to wipe down the drum and dry it. You should have a clean drum with bleach and vinegar after the two cleaning cycles.
Clean the outer housing of the washer
Now that the interior of your washer is fresh and clean take the time to wipe down the outer housing. Mix a solution of warm water, and a few drops of dishwashing liquid.
Dip a microfiber cloth into the cleanser and wring out most of the water. Next, wipe down the outside of your washing machine. Finally, remove all the laundry product residue and gunk.
Wipe away dust, grime, and laundry product drips from the sides of the washer. Pay extra attention to knobs and electronic panels. Open the lid and dip an old toothbrush into the cleaning solution to get into corners and tight places on the lid.
Clean the Panel and Top of the Lid
Do not forget to clean the panel, knobs, and the top of the washer. Before you start tackling any stains present on the surface, wipe over it with a cloth to remove dust, and then dampen a clean microfiber cloth in plain warm water and gently clean the panel/console and knobs.
Use a soft-bristled toothbrush to clean around the knobs. If stains are still present after wiping the panel and top of your washing machine with a damp cloth, use a small amount of vinegar to get rid of them.
Tips to Keep Your Top Load Washer Clean Longer
- If you live in a humid area, leave the lid open after each load to allow the drum and seals to dry out and reduce the risk of mold and mildew growth.
- Never place laundry products on top of the washer at any time. Spills can damage electronic controls.
- Use a flashlight to check your washer basket carefully for chips that can leave rust spots on clothes. Repair kits are available to repaint the porcelain coating. Follow the directions carefully to extend the life of the washer
- If you usually wash your laundry with cold water, periodically flush your machine with a hot water cycle. This will help to remove any residue that may be building up in your machine.
- Don’t overfill or underfill the washer with clothes. A load with too many clothes can cause excess moisture in the washer, while a load too small can leave behind detergent residue.
- If you have a high-efficiency washer, use only HE detergent. Non-HE detergent will cause soap scum buildup.
- Don’t wash too small of laundry, as this may leave detergent behind. Also, don’t wash too large of a load of laundry, as this may cause excess moisture to be left in the machine.
- Wipe down the top area of your drum where the water splashes to keep the area clean and dry.